How to Sell on Blinkit in 2025: Complete Seller Guide (Registration, APOB, Listings, Ads & More)

If you're exploring how to sell on Blinkit or even wondering how to become a seller on Blinkit, you’re in the right place. With the quick-commerce boom and Blinkit's dominance in 10-minute grocery delivery, the opportunity to scale your business is massive. But knowing how to sell products on Blinkit isn’t just about uploading a product—it requires a full understanding of Blinkit’s seller ecosystem.
In this comprehensive Blinkit Seller guide, I’ll walk you through everything you need to know to start and succeed as a Blinkit seller. Whether you’re a D2C brand, local distributor, or wholesaler, this blog will serve as your go-to resource—crafted from over a decade of industry expertise in e-commerce operations, seller onboarding, and performance marketing.
We’ll walk you through each part of the Blinkit journey, from the initial registration to advanced scaling strategies. If you’re curious about how to sell product on Blinkit or how to list your products on Blinkit to maximize visibility, we’ve got you covered. This resource is designed to help you streamline your operations, increase revenue, and dominate in your niche on Blinkit.
Here’s exactly what you’ll learn:
- Blinkit Seller Registration: Step-by-step guide on how to sell on Blinkit with all required documents.
- Additional Place of Business (APOB): Setup process for selling in multiple Blinkit zones.
- Product Listings: Know how to list product on Blinkit or even avoid mistakes while learning how to list product on Blinkist (often confused).
- Blinkit Ads: Use platform-specific ads to boost visibility and sales.
- Commissions: Learn what Blinkit charges per product and plan your margins accordingly.
- Inventory Setup: Send your products to Blinkit warehouses accurately and efficiently.
- Payment Cycle: Understand how and when Blinkit pays you for completed orders.
- Growth Tactics: Pro-level strategies to scale and succeed faster on Blinkit.
- FAQs: Including key questions like how to sell products on Blinkit without GST?
This is not just a guide—it’s your blueprint for success. Whether you’re just starting and searching for how to sell in Blinkit or you’re aiming to refine your existing strategy, this post will help you sell smarter and grow faster. Let’s dive in and explore how to sell products on Blinkit from A to Z—no guesswork, no fluff.
Table of Contents
Blinkit Seller Registration Guide
Planning to sell on Blinkit? This detailed guide covers everything you need to complete your Blinkit Seller Registration successfully — from required documents to step-by-step onboarding instructions.
📄 Documents Required to Start Selling on Blinkit in 2025
Before you start the Blinkit seller registration process, gather the following essential documents. Each of these plays a vital role in verifying your identity, brand, and business operations for approval on Blinkit’s seller platform.
- Mobile Number and Email Address: Used for OTP verification and communication during the onboarding process.
- Udyam Registration or Company Incorporation (CIN): Business identification proof required for verification.
- GST Certificate: Mandatory to sell products legally on Blinkit and comply with taxation laws.
- Trademark Certificate or Application: Required if you are selling branded products to verify brand ownership.
- PAN Card: Needed for tax compliance and identification of the business entity or individual.
- Company Logo: Brand logo to display with your products and improve brand recognition on Blinkit.
- Brand Authorization Letter to Blinkit: Required if you are an authorized reseller; use the Blinkit template for proper format.
- Filled BAL (Brand Authorization Letter): Blinkit's specific BAL document must be signed and submitted as part of brand verification.
- Bank Details or Cancelled Cheque: Bank account proof required for payments and payouts setup.
- Signed Declaration on White Paper: A self-declaration letter, signed and scanned, confirming authenticity of documents.
- Social Media Handles, Website Links, Marketplace Product Links: Provide URLs to establish your brand’s online presence.
- Sales Figures (Online/Offline): Details of your previous sales (if any) to help Blinkit assess your selling capacity.
📝 Complete Guide to Blinkit Seller Registration Process
1. Visit the Blinkit Seller Portal.
Go to the official Blinkit Seller Portal where you can start your registration journey. Look for clear call-to-action buttons like "Sell on Blinkit" or "Register Now."
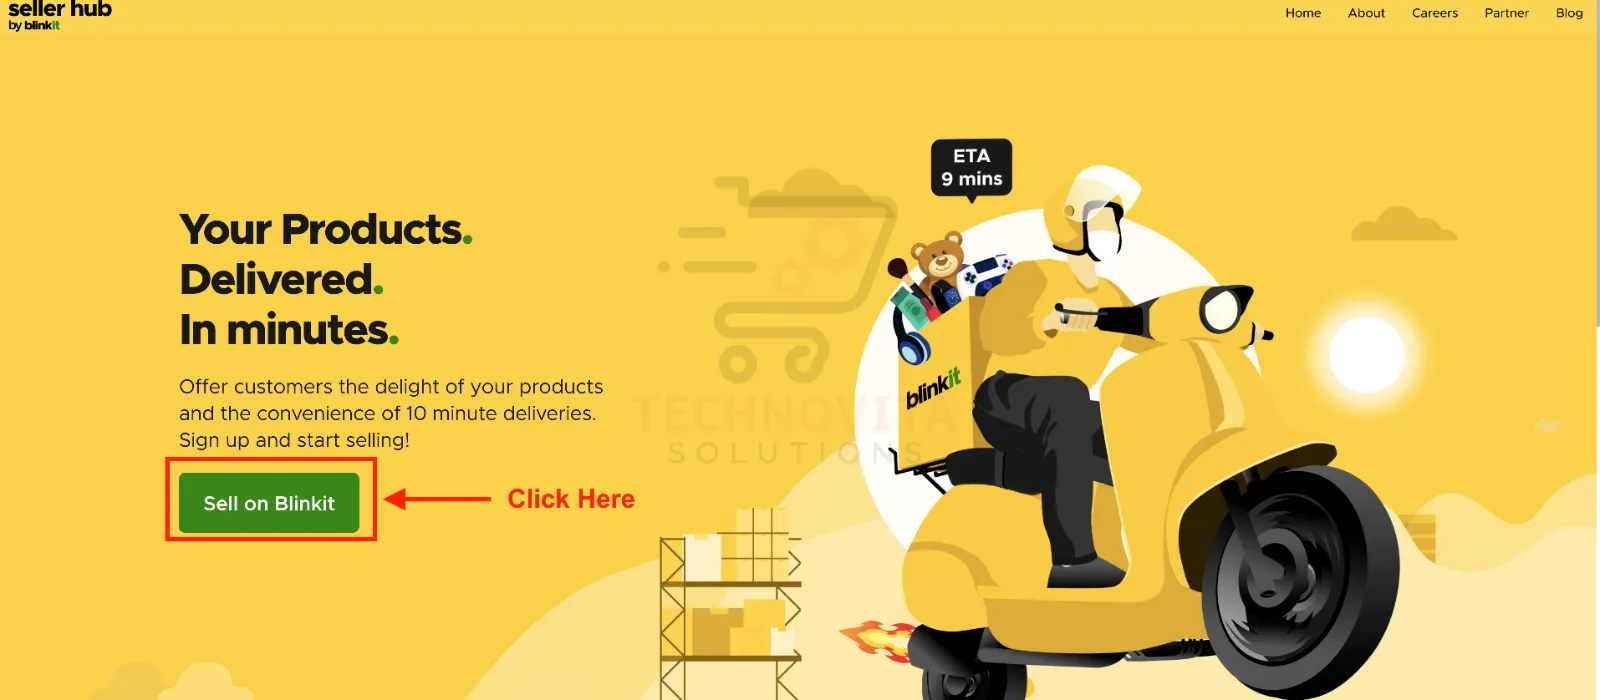
2. Click on the "Sell on Blinkit" Button.
Once on the Blinkit Seller Onboarding page, click the green-colored "Sell on Blinkit" button to start your seller registration. Refer to the screenshot below for clarity.
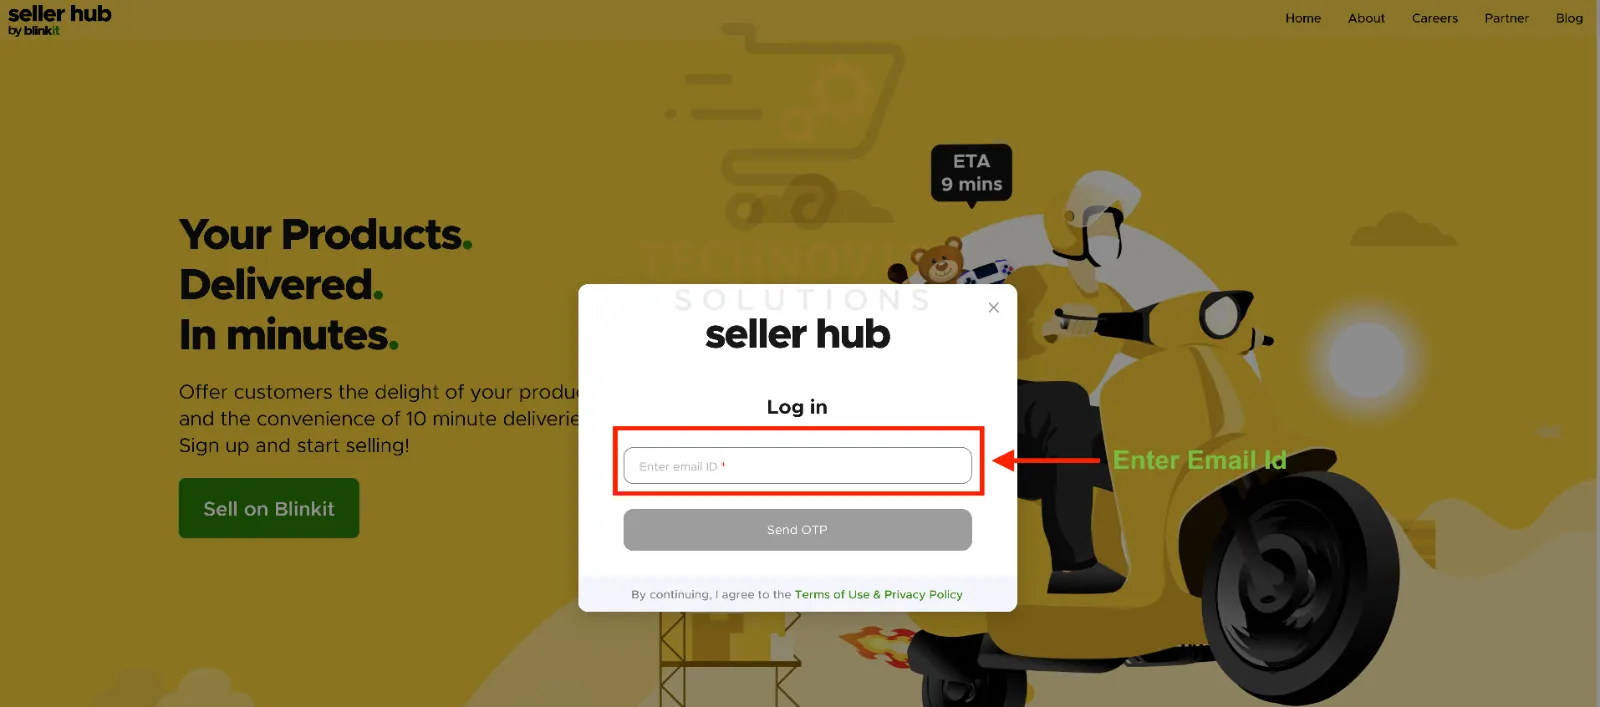
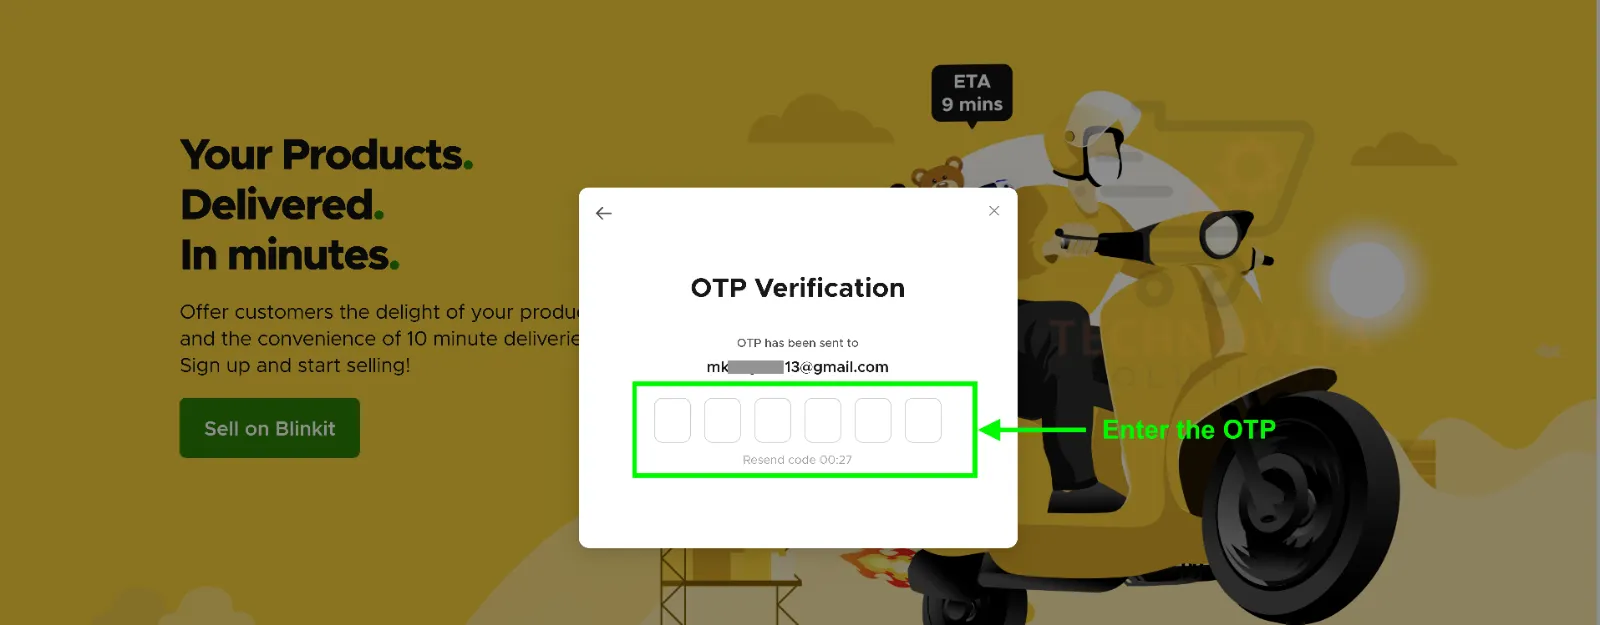
3. Enter Email Address and Verify OTP.
Enter your active email address for Blinkit Seller Sign-Up and click on "Send OTP." Check your inbox and input the received OTP to continue registration.
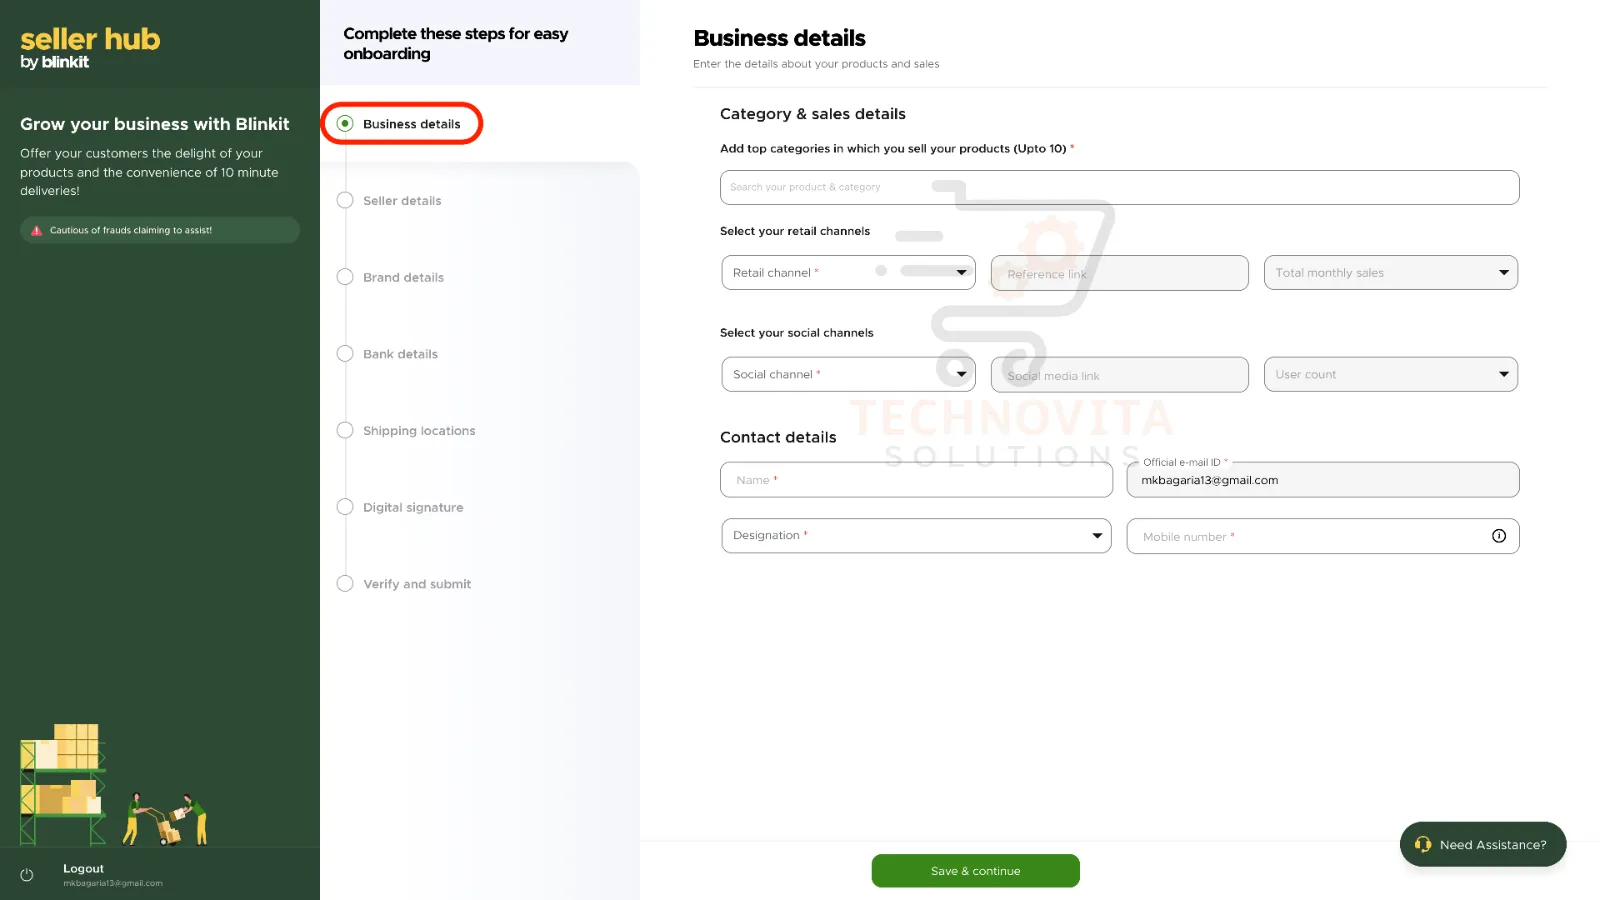
4. Fill in Your Business Details.
After verifying your email, fill out your business information. Select your selling category, online selling platforms (Instagram, YouTube, etc.), your name, designation, and mobile number. Enter the correct number as you will receive another OTP.
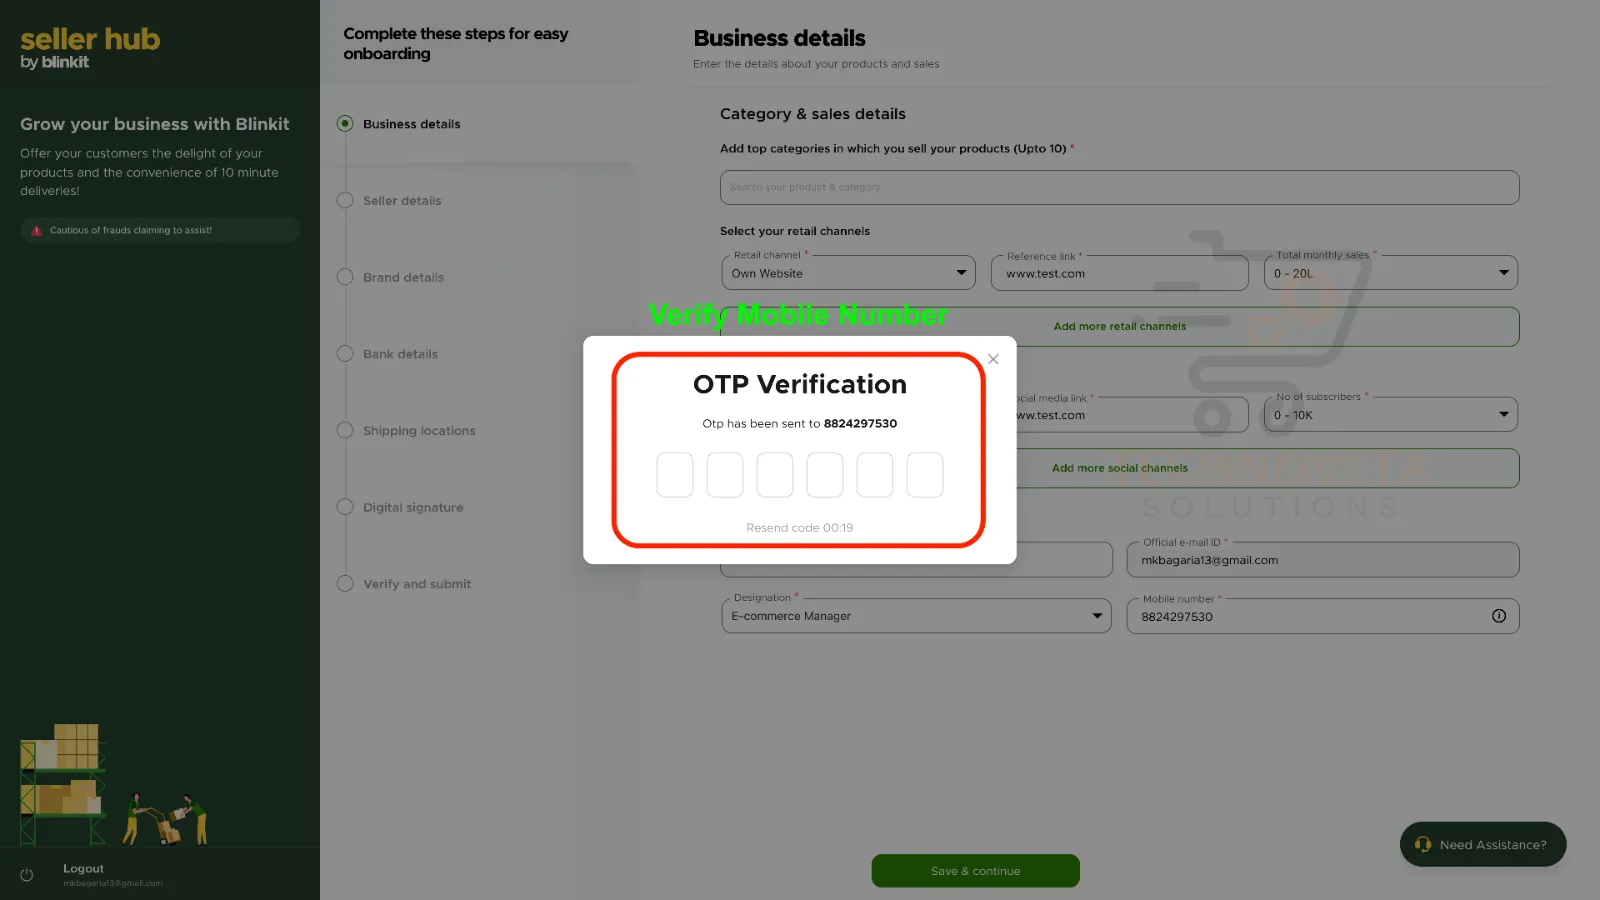
5. Verify Mobile Number via OTP.
Once your mobile number is added, an OTP will be sent to verify it. Enter the OTP and click "Save & Continue" to move forward in the Blinkit Seller Onboarding process.
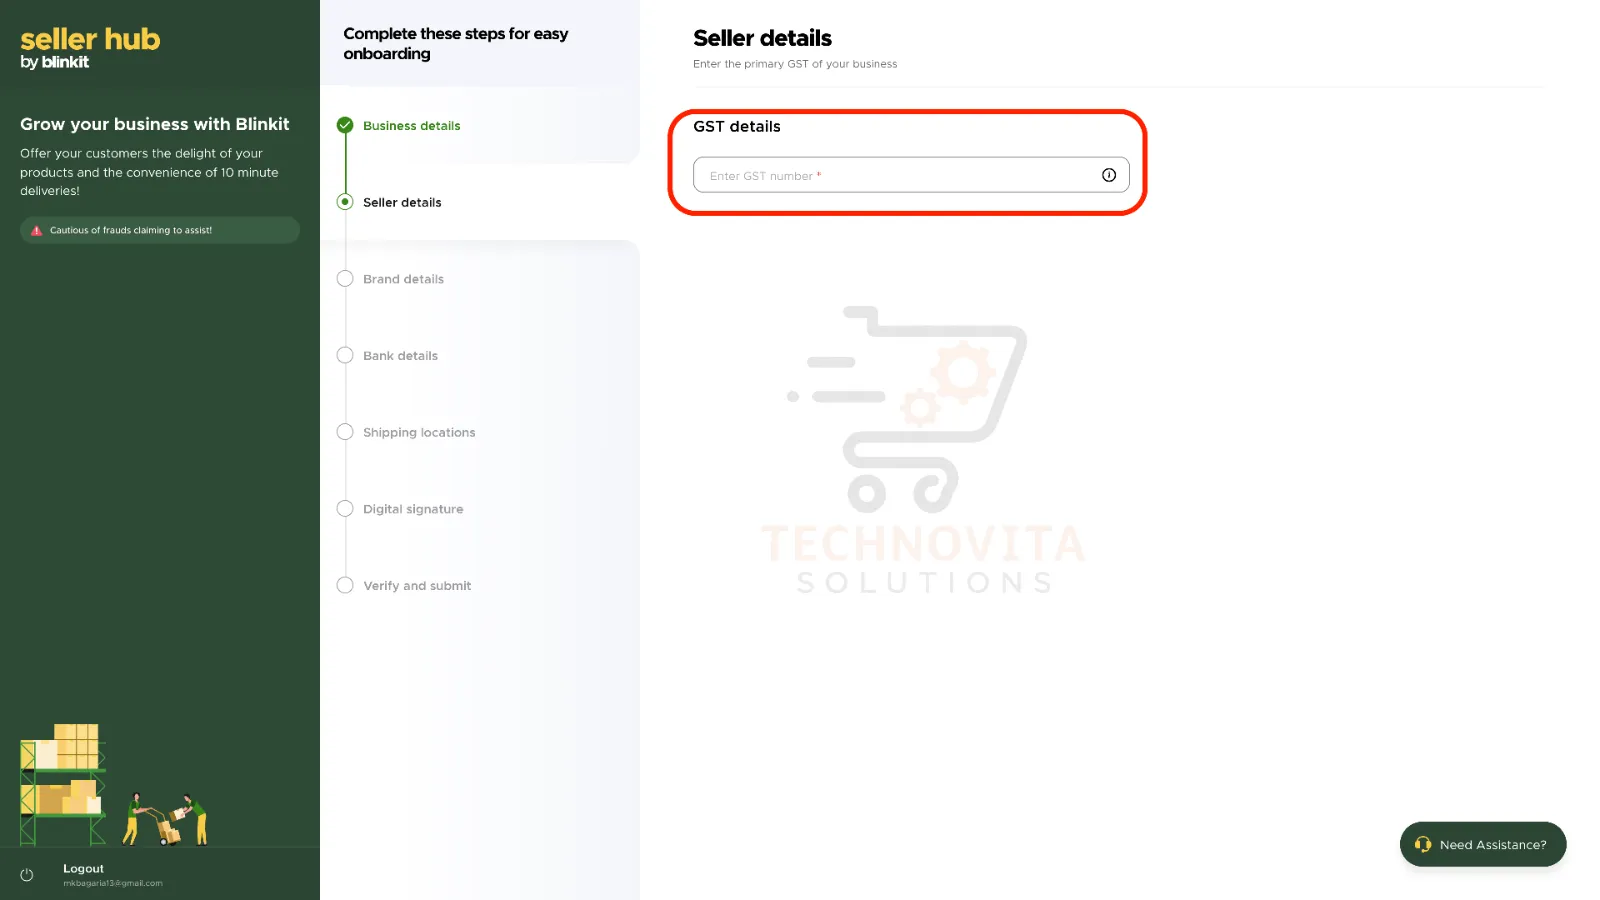
6. Enter Your GST Details.
Provide your 15-digit GSTIN (Goods and Services Tax Identification Number). If you don't have a GST certificate yet, you can apply for one easily online.
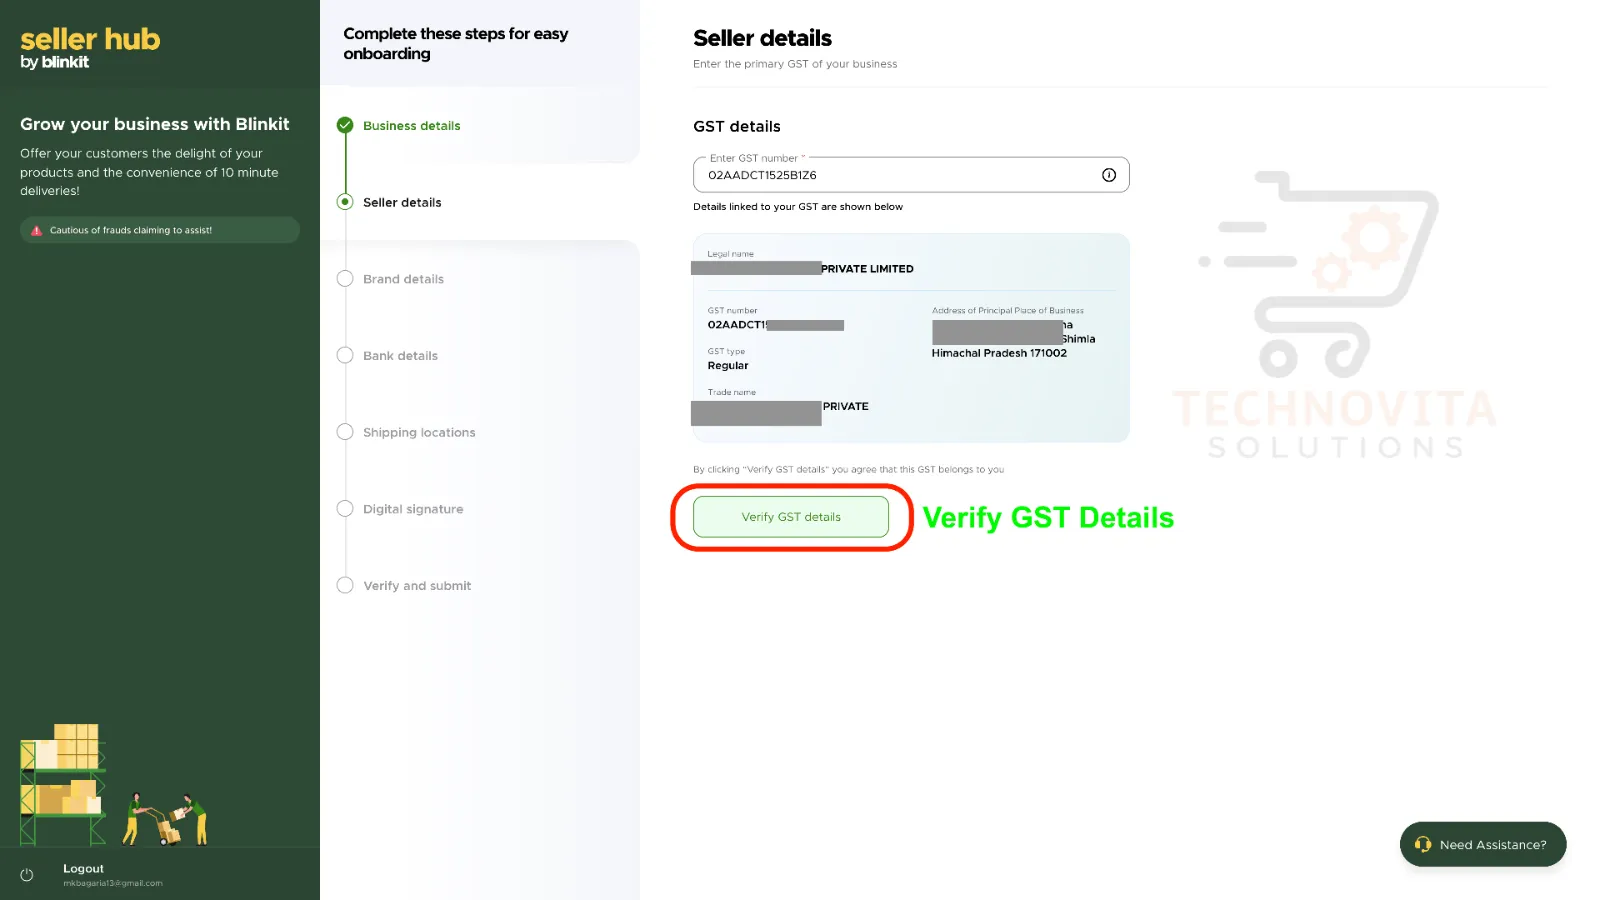
7. Verify GST Information.
After entering your GST number, Blinkit will automatically fetch your registered business information. Click "Verify" to confirm that the GST number belongs to you.
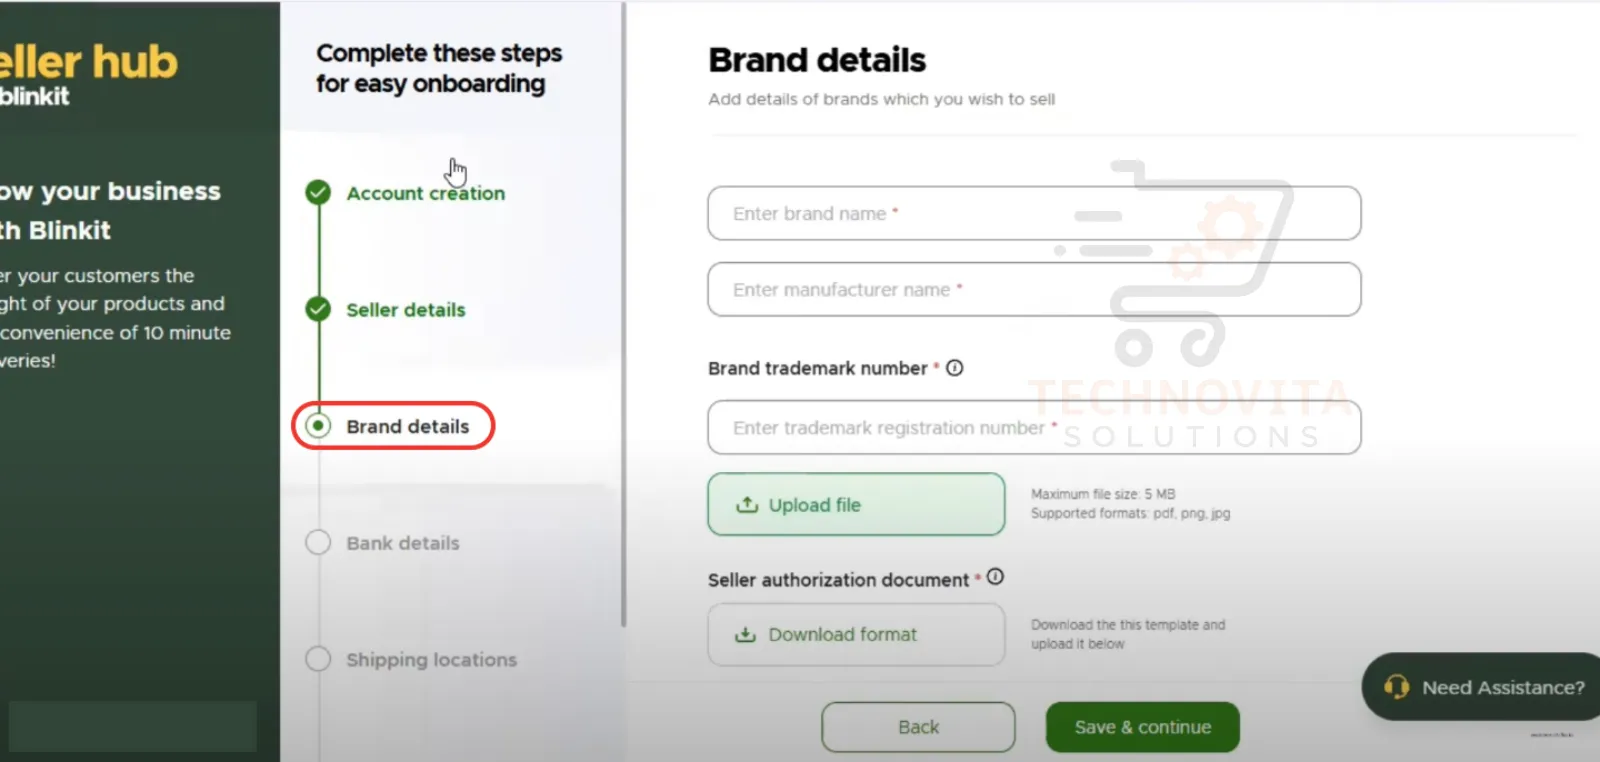
8. Fill in Brand Details.
Next, enter all the brand-related information including brand name, description, and any other details Blinkit asks. This helps Blinkit list your products properly on their platform.
9. Add Your Bank Account Information.
Provide your business bank account details to receive payouts from Blinkit sales. Ensure all information is accurate to avoid future payment issues.
10. Set Your Shipping Locations.
Although Blinkit doesn't ask for a specific shipping hub, you should be ready to supply products from locations within Blinkit's service zones to enable faster deliveries.
11. Upload Your Digital Signature.
Upload a digital signature to complete official documentation. If you don't have one, consult your Chartered Accountant (CA) to create a digital signature easily.
12. Final Verification and Submit Application.
Finally, review all entered information carefully. After confirming everything is correct, submit your application for verification. Blinkit's team will review your onboarding request, and you'll receive a confirmation email shortly after approval!
Step-by-Step Guide to Apply for APOB in GST & Link It on Blinkit Platform
Dear sellers, before you can start selling on Blinkit, you need to add their warehouse as an Additional Place of Business (APOB) in your GST profile. This comprehensive guide will walk you through both the GST portal process and the Blinkit platform linking process with detailed steps and visual guidance. 🚀
Important Note Before You Start
You must first apply for APOB on the GST portal to receive an ARN (Application Reference Number). This ARN is mandatory to proceed with the Blinkit application process. We'll guide you through both steps below.
APart 1: Apply for APOB on the GST Portal (To Get ARN)
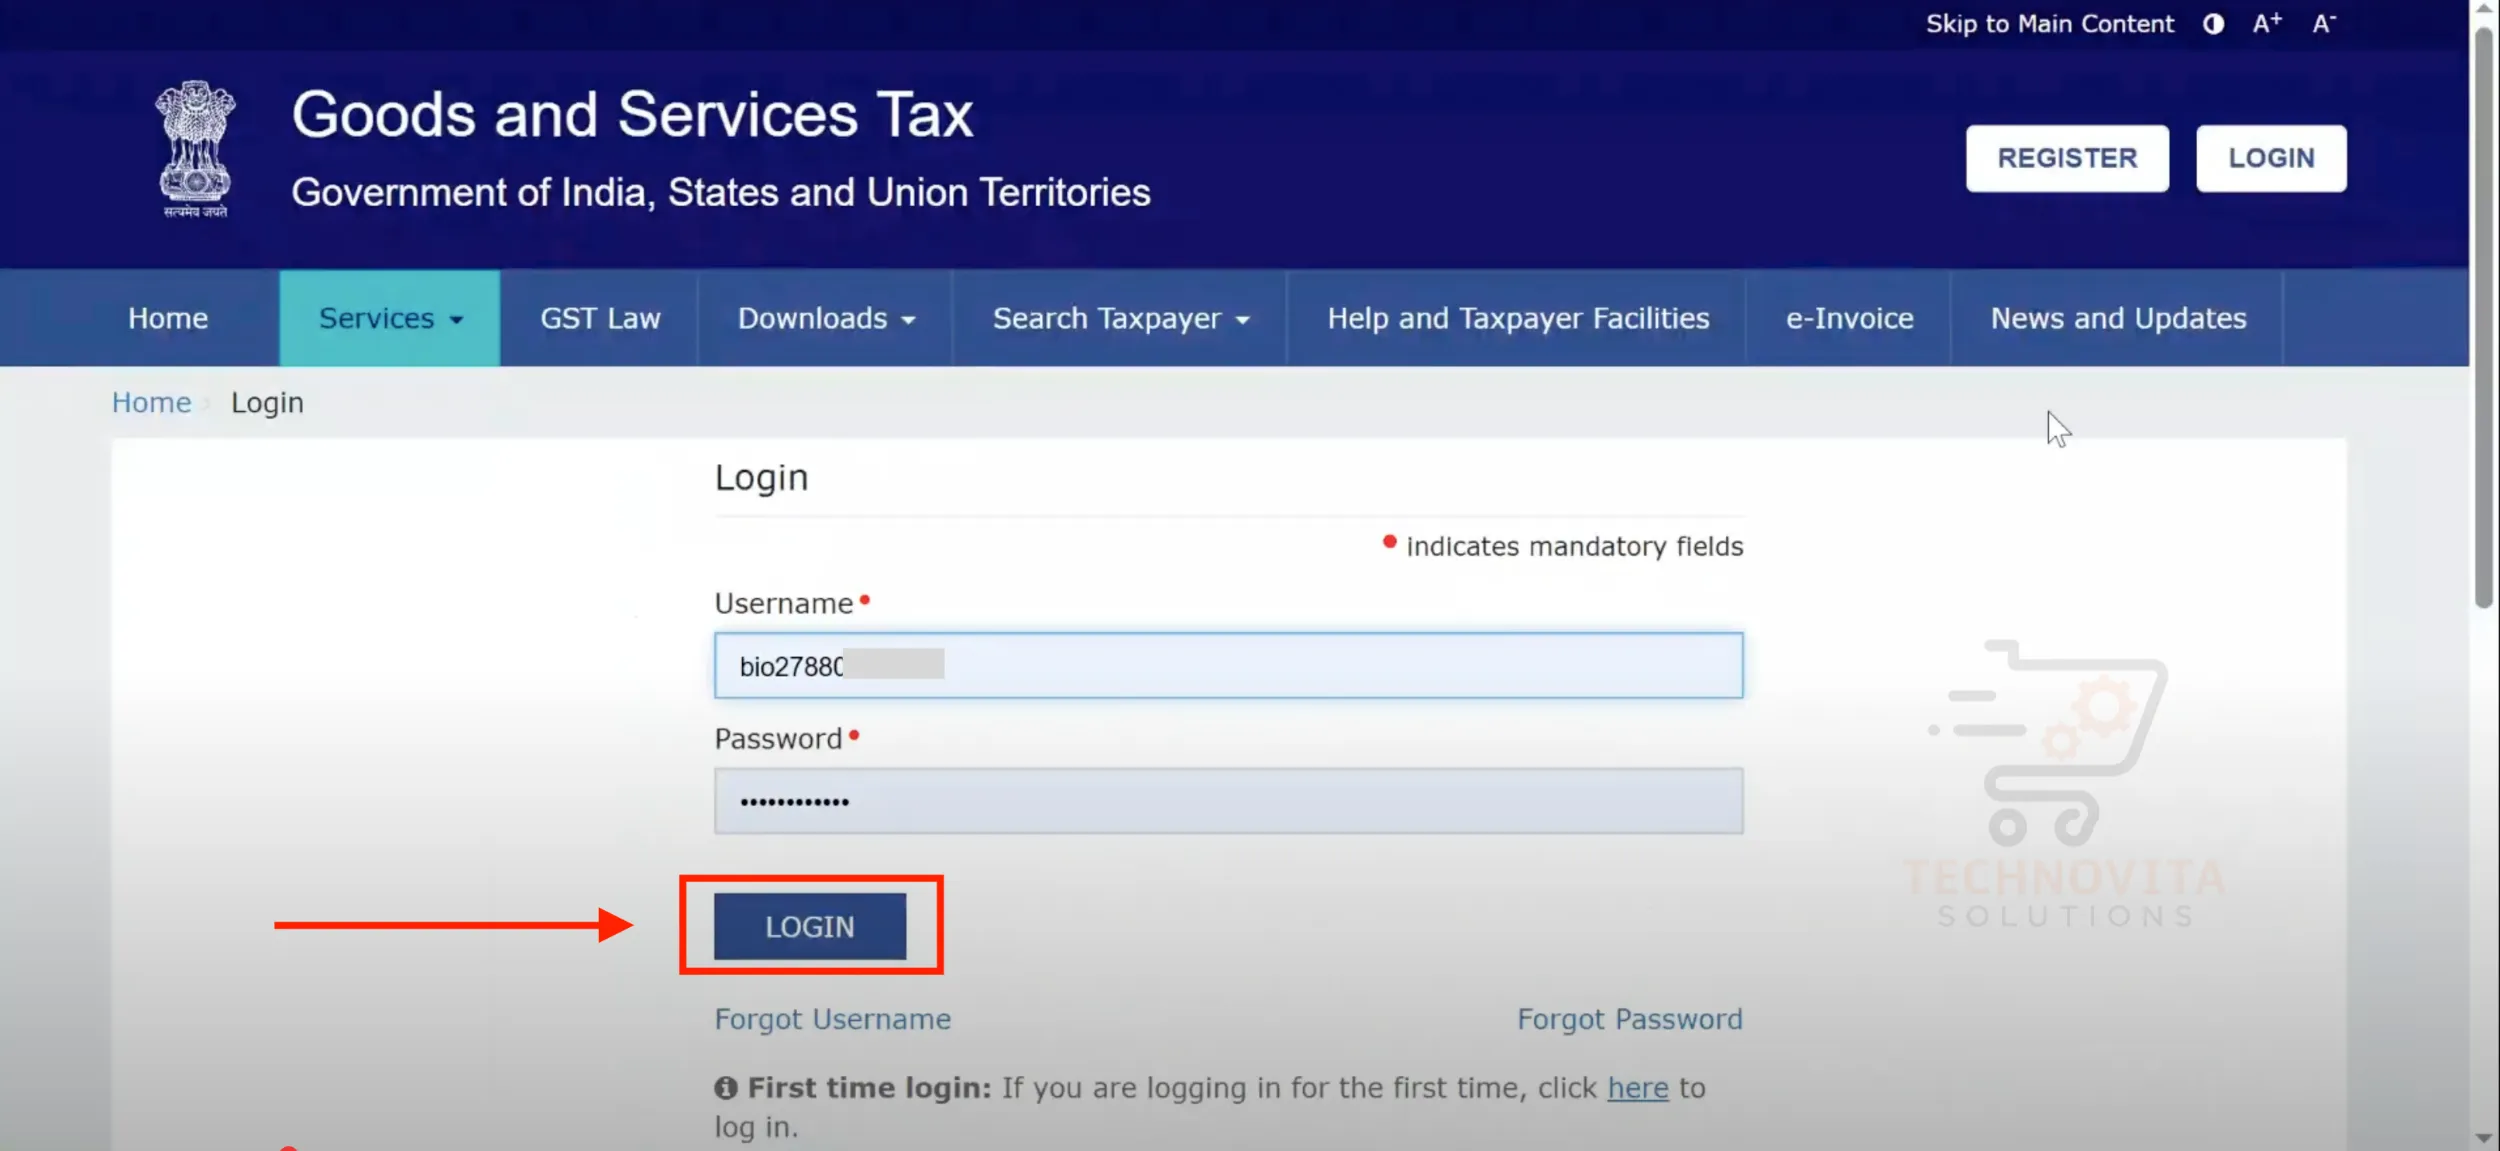
1. Login to GST Portal
Visit www.gst.gov.in and log in using your Username and Password to access your GST dashboard.
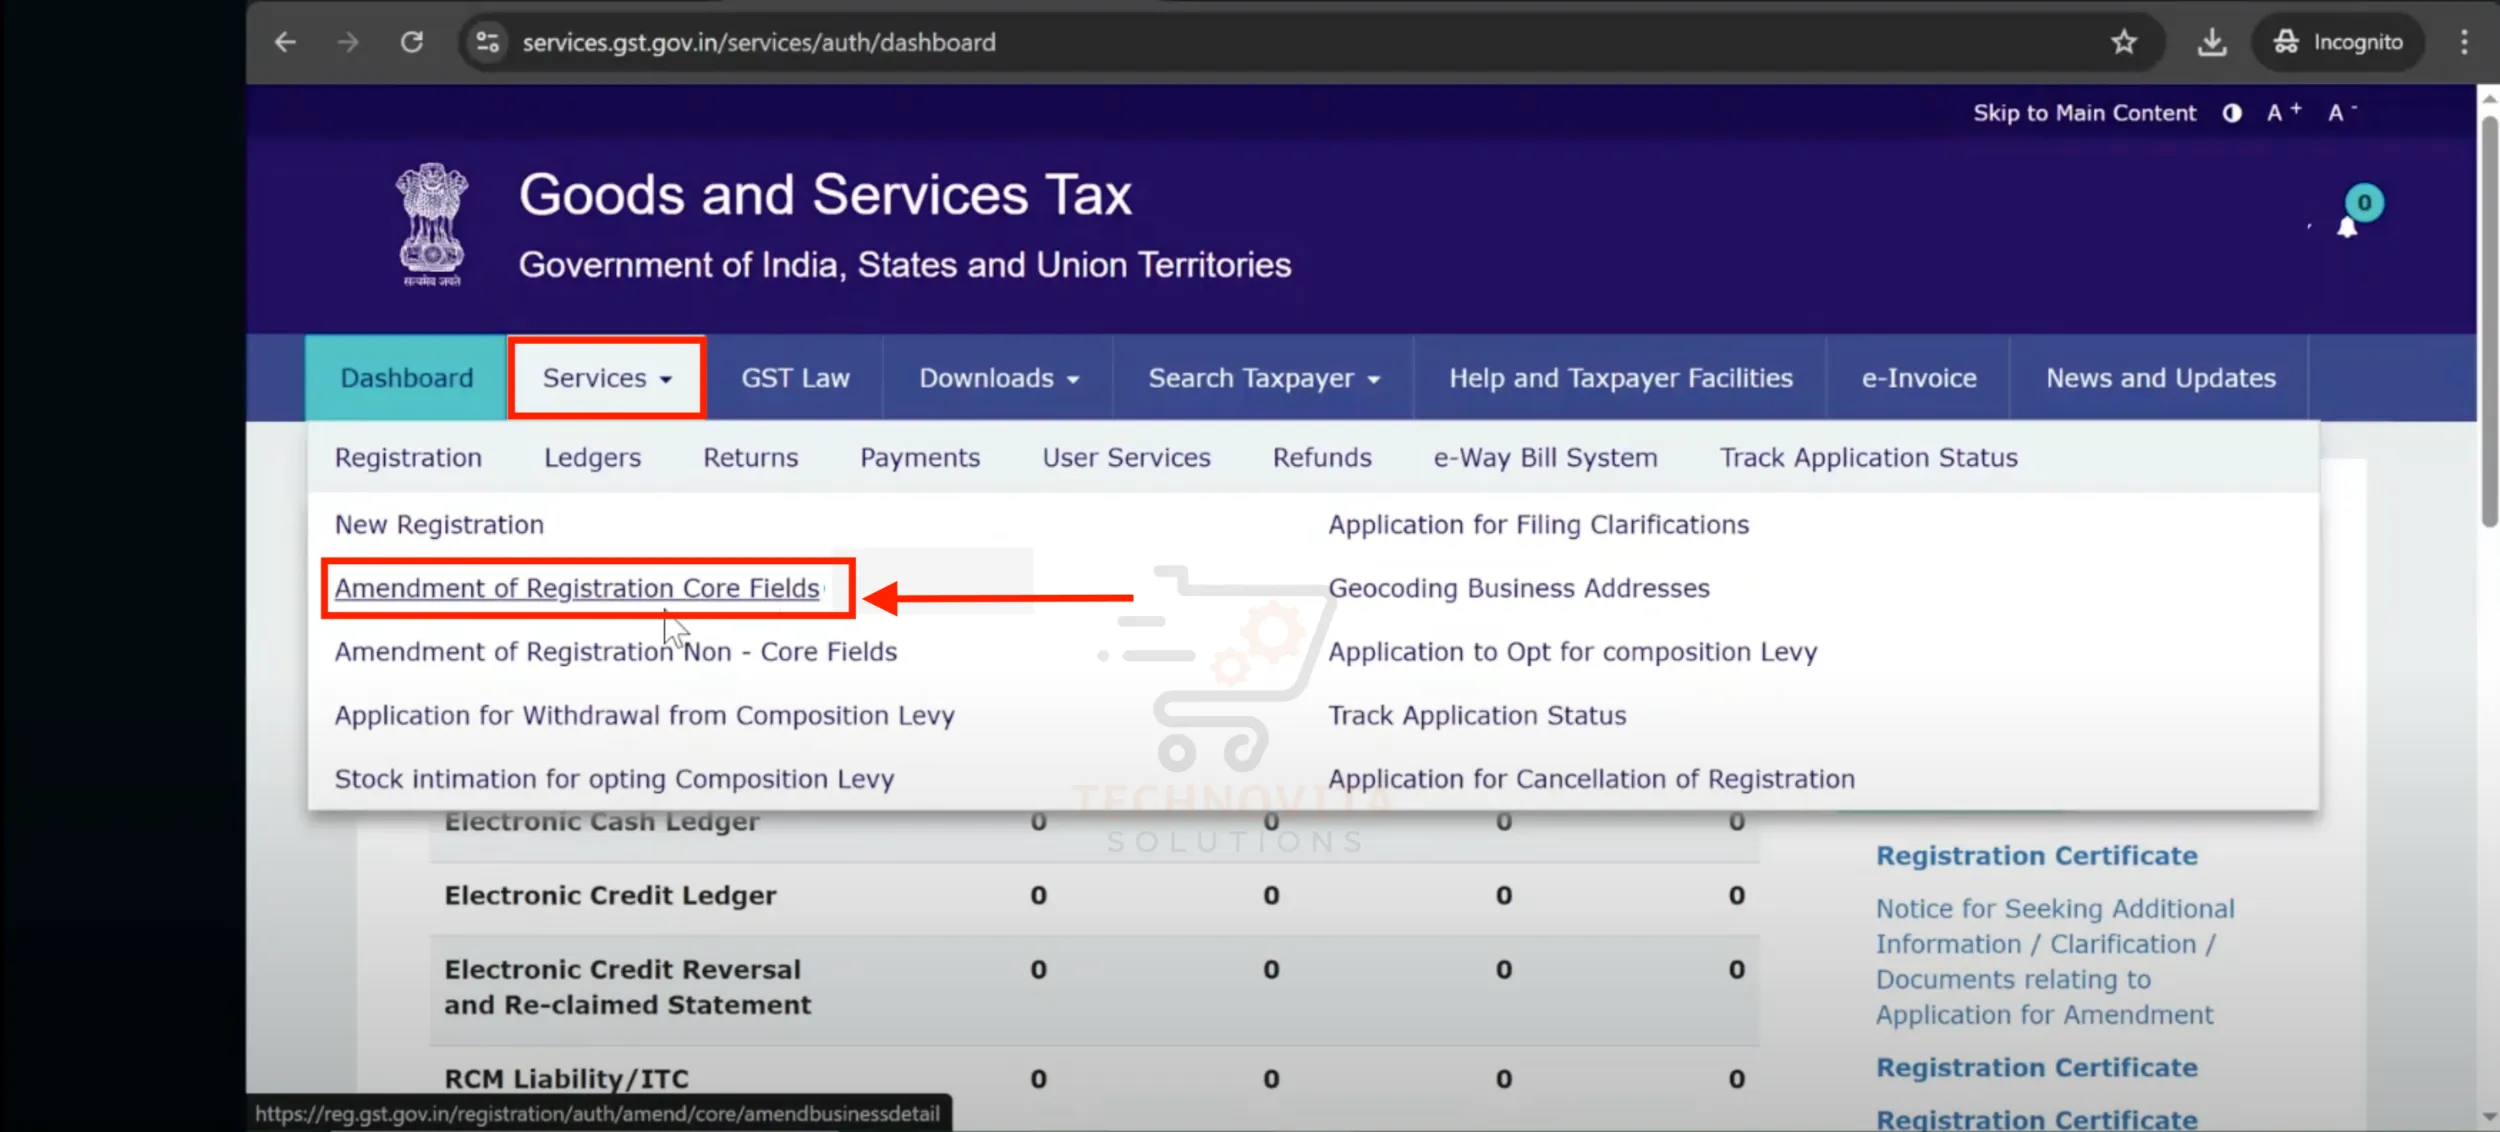
2. Navigate to 'Amendment of Registration'
Go to Services → Registration → Amendment of Registration (Core Fields). This section allows you to update key information like business addresses.
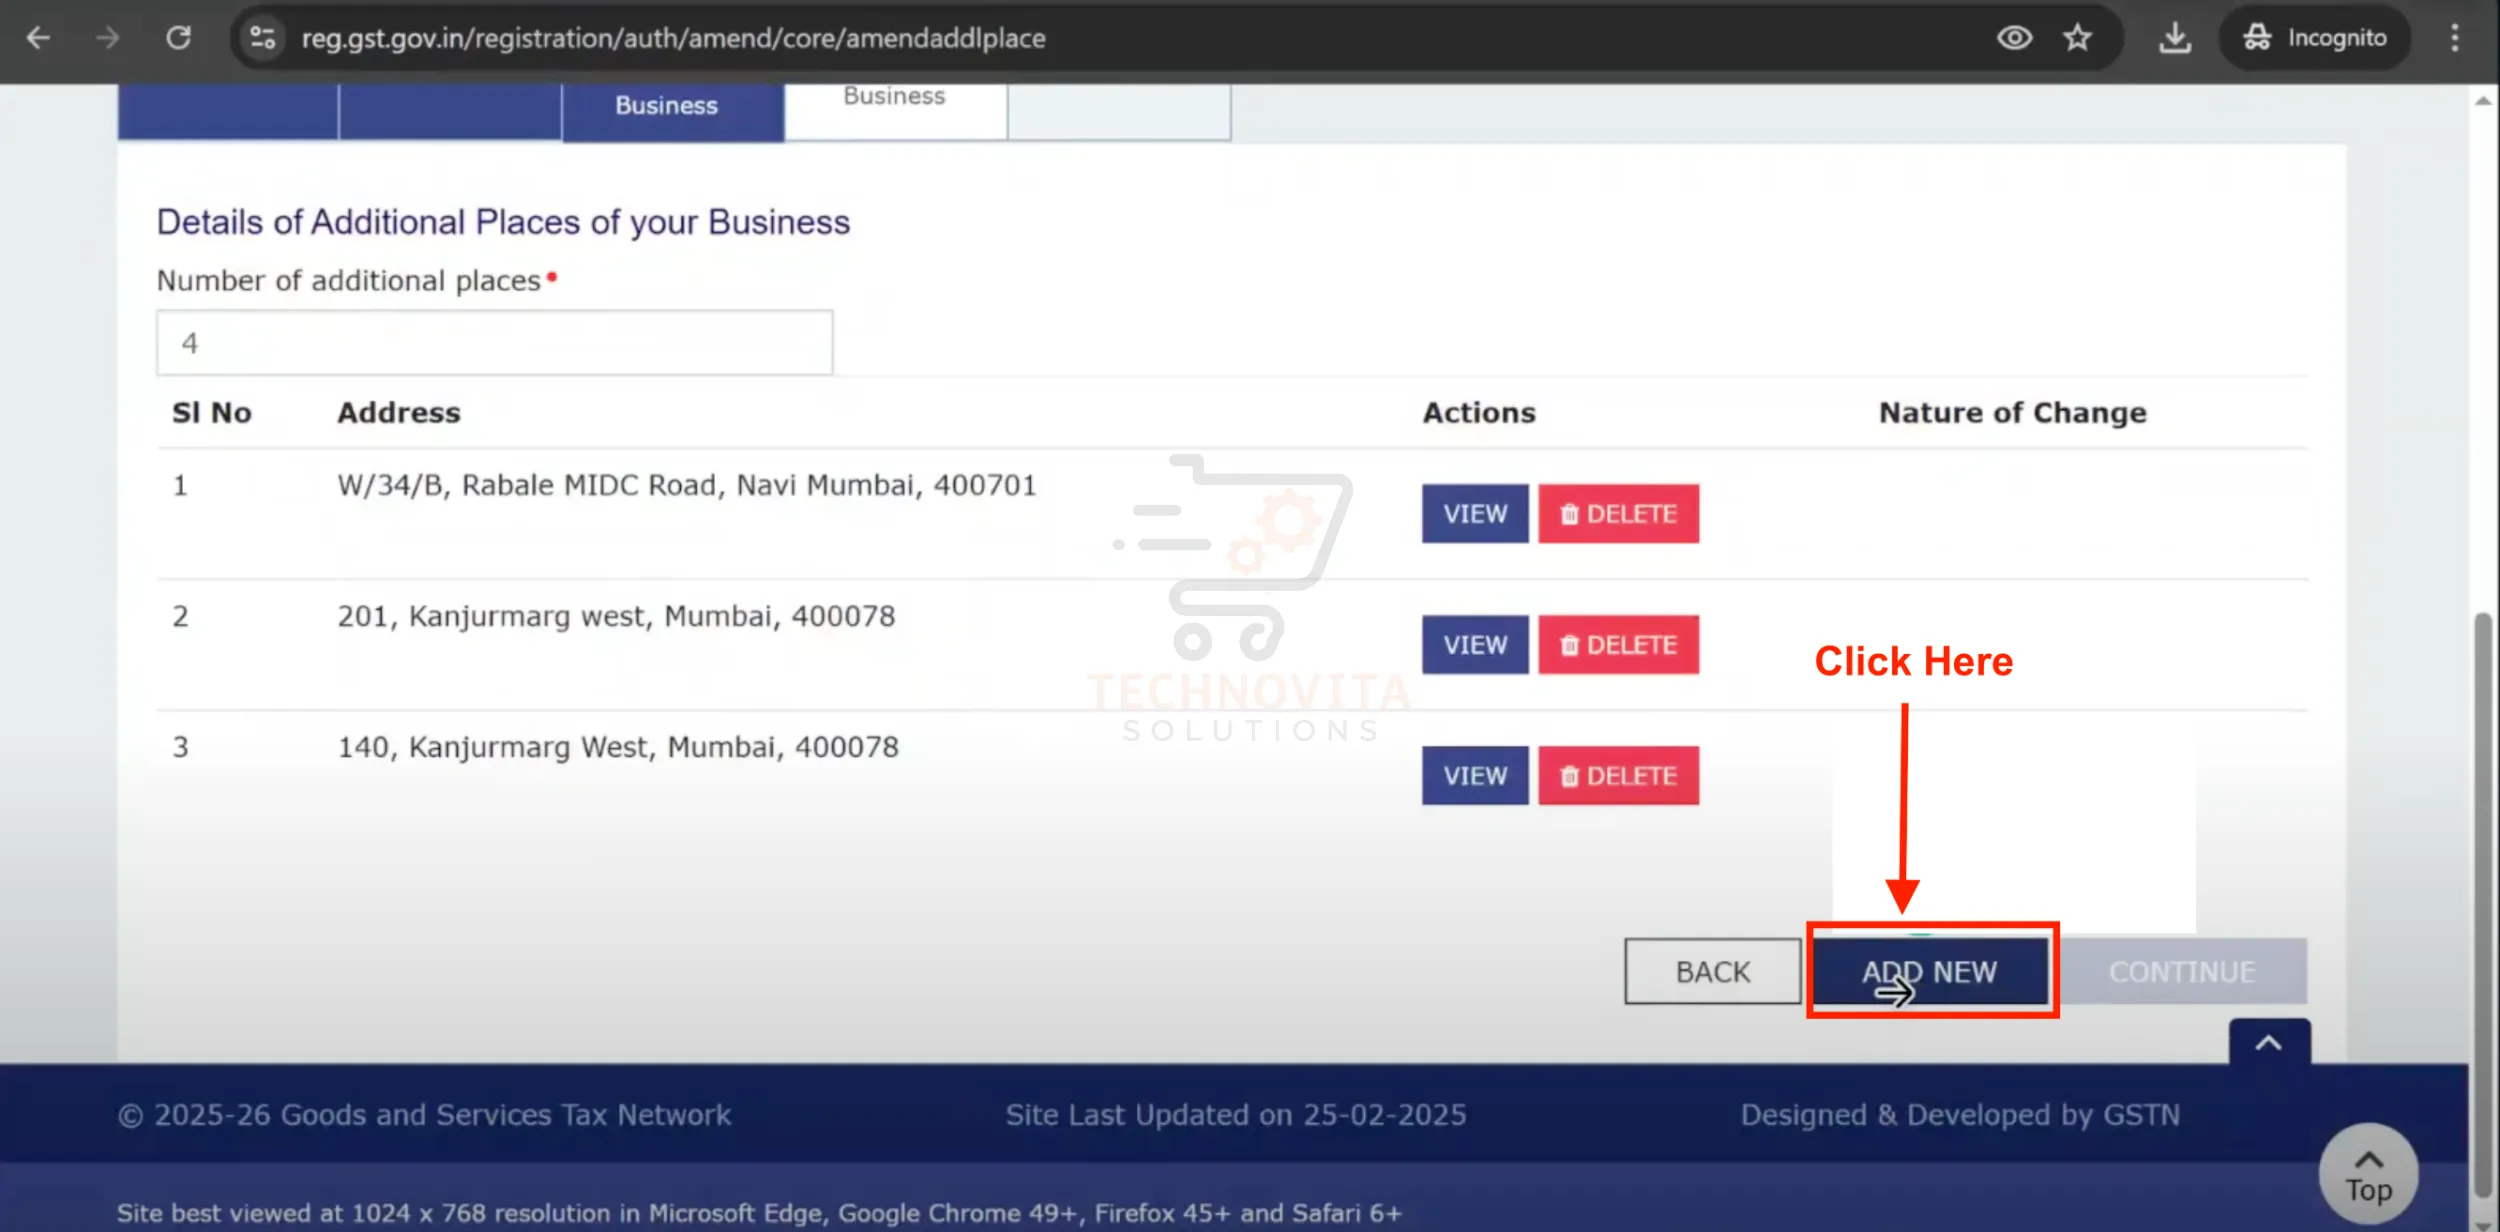
3. Select 'Additional Place of Business'
Click on the 'Additional Place of Business' tab. You'll see your current list of places; click 'Add New' to add the Blinkit warehouse.
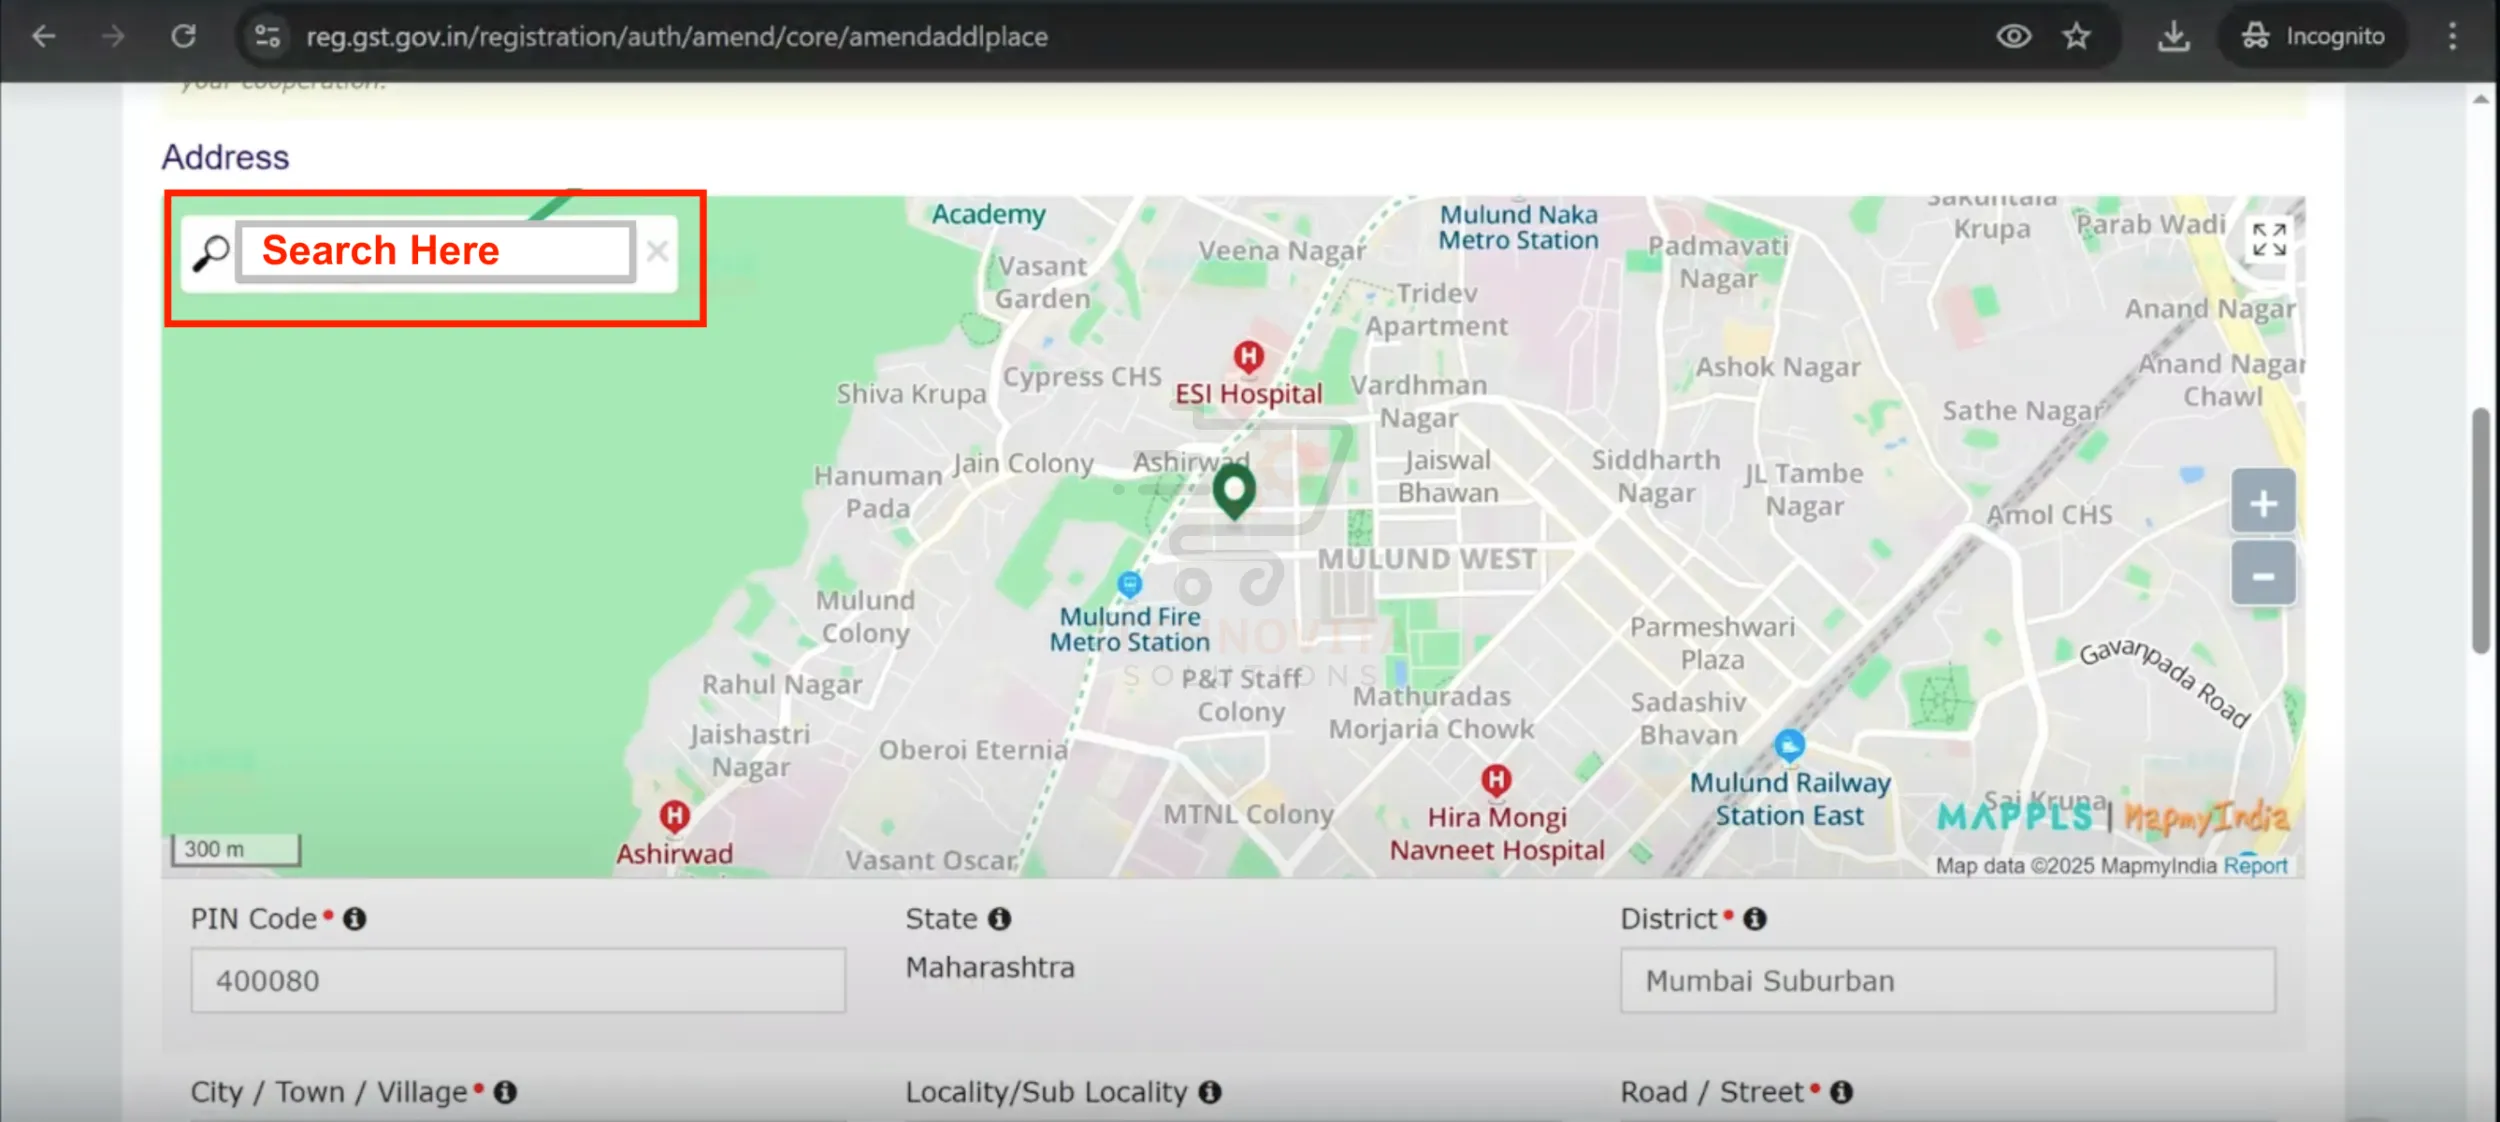
4. Search for Blinkit Warehouse Address
Use the map or search bar to find your respective Blinkit warehouse. For example, search "Mumbai Blinkit" or "Delhi Blinkit" depending on your location. Select it and ensure all address fields auto-fill or are entered correctly: PIN code, State, District, City, Road/Street, etc.
5. Enter Contact Details & Select Nature of Possession
Enter Blinkit warehouse's Phone number and Email ID (provided by Blinkit). Then choose 'Rented' under the Nature of Possession of Premises.
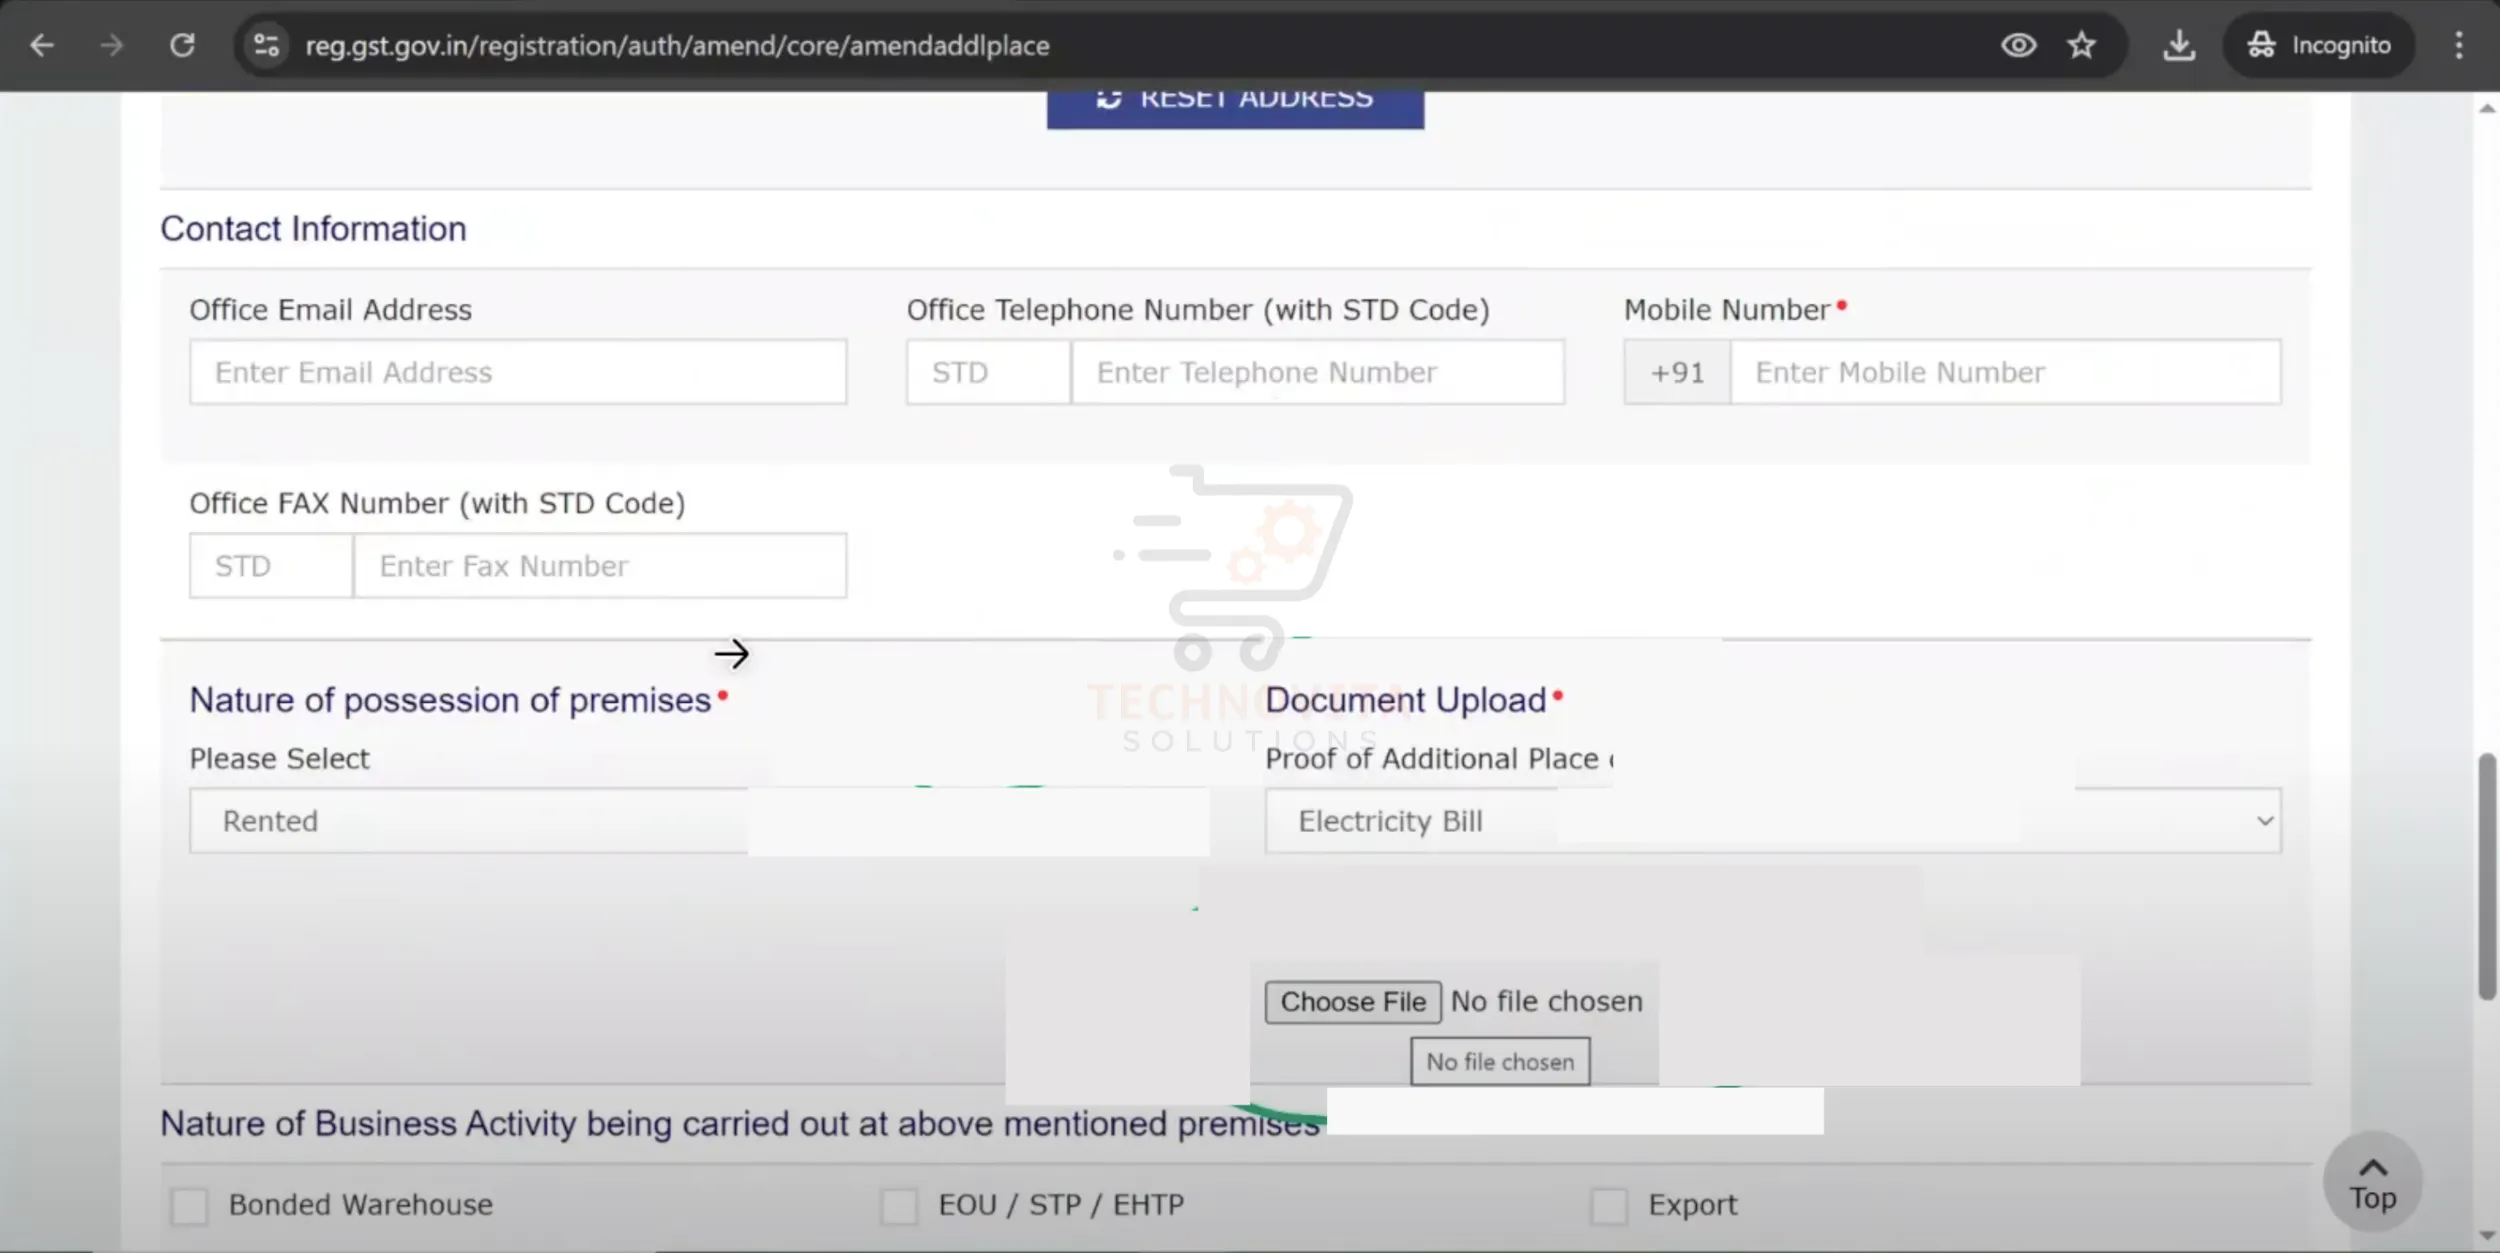
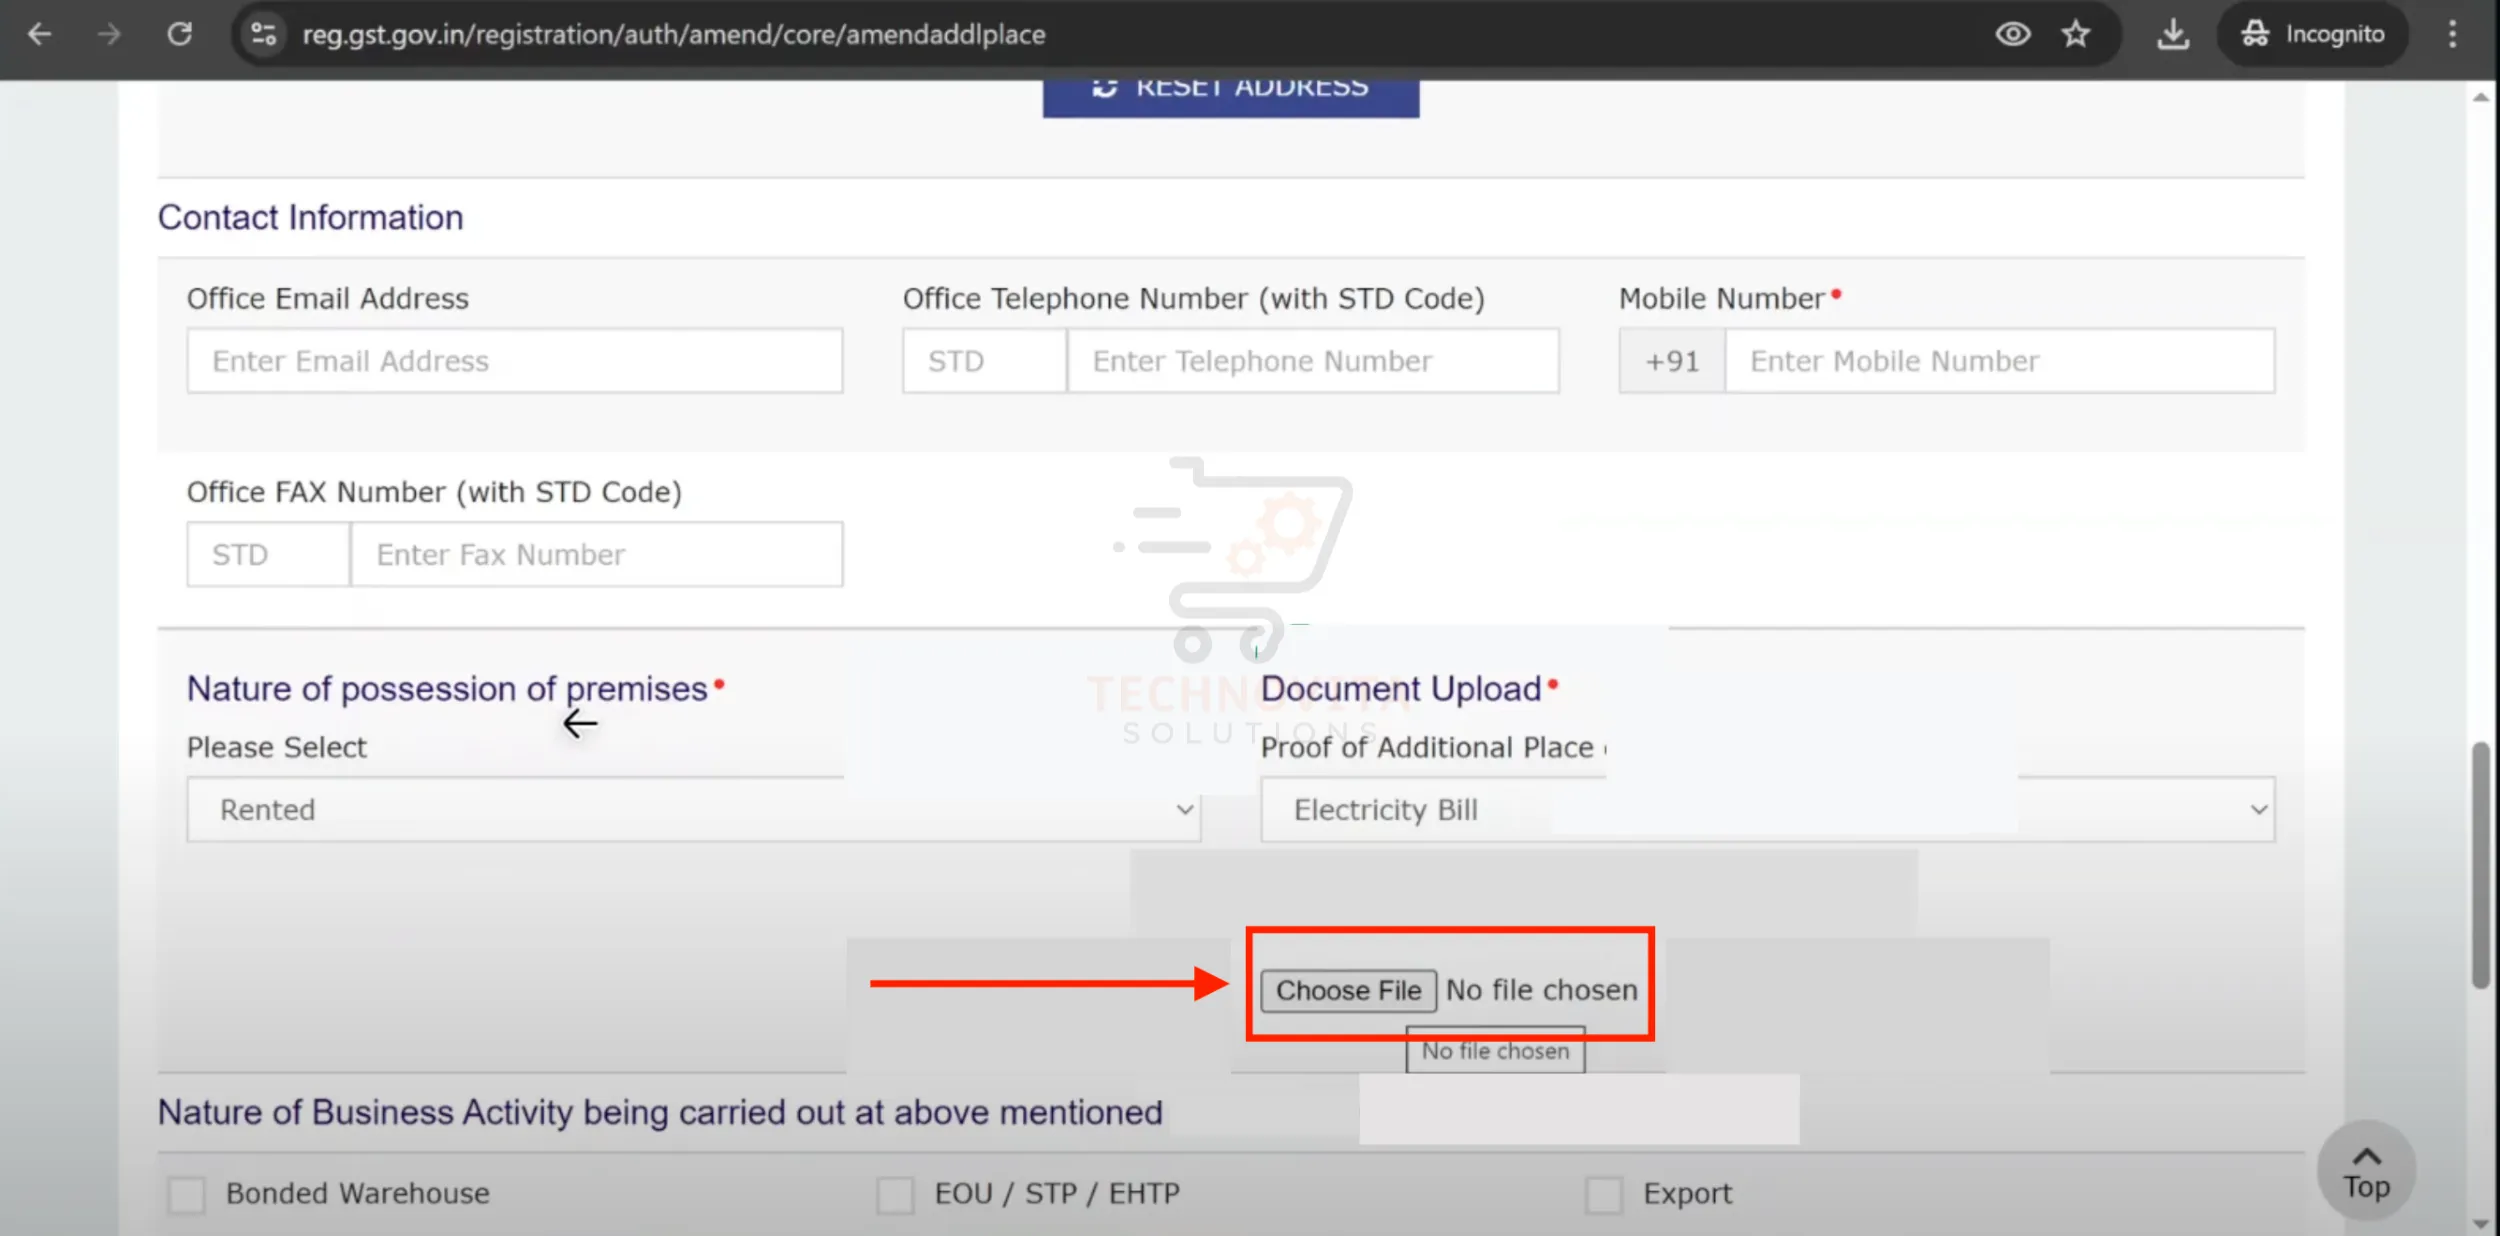
6. Upload Required Documents
Upload a merged PDF file containing the Blinkit warehouse's Electricity Bill and Warehouse Agreement (both available from Blinkit portal). Make sure file size and format meet the GST portal's requirements.
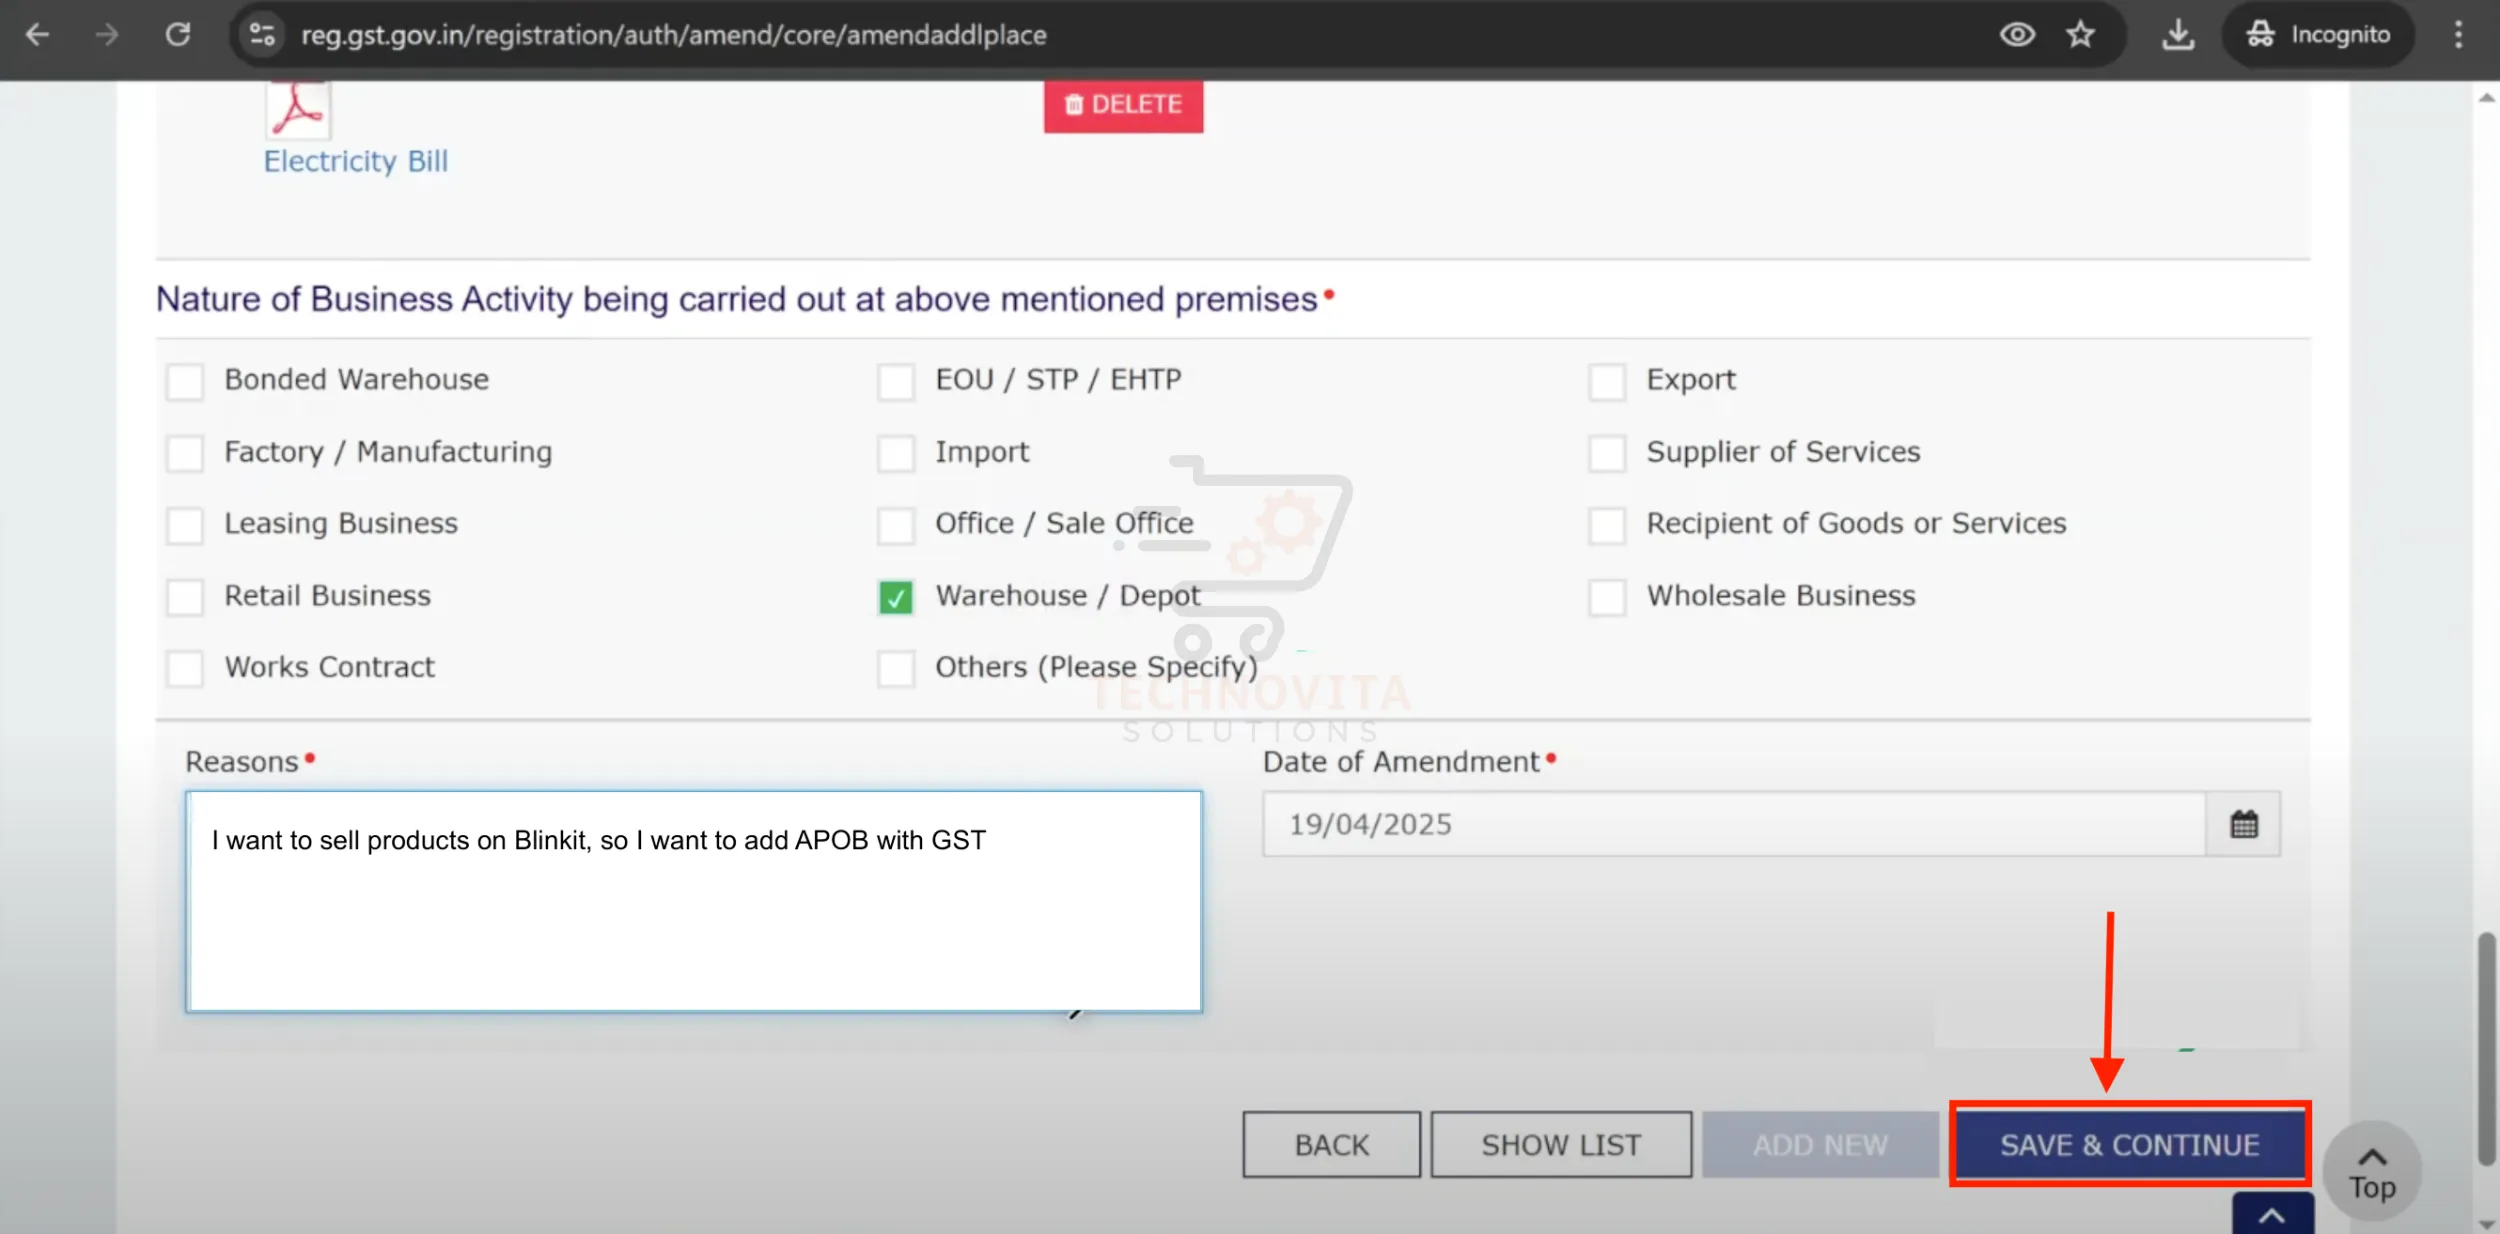
7. Choose Nature of Business Activity & Submit
Select 'Warehouse' as the business type for that location. In the remarks box, write: "I want to sell products on Blinkit, so I want to add APOB with GST." Click 'Save and Continue', tick the declaration box, and then click 'Submit with EVC'.
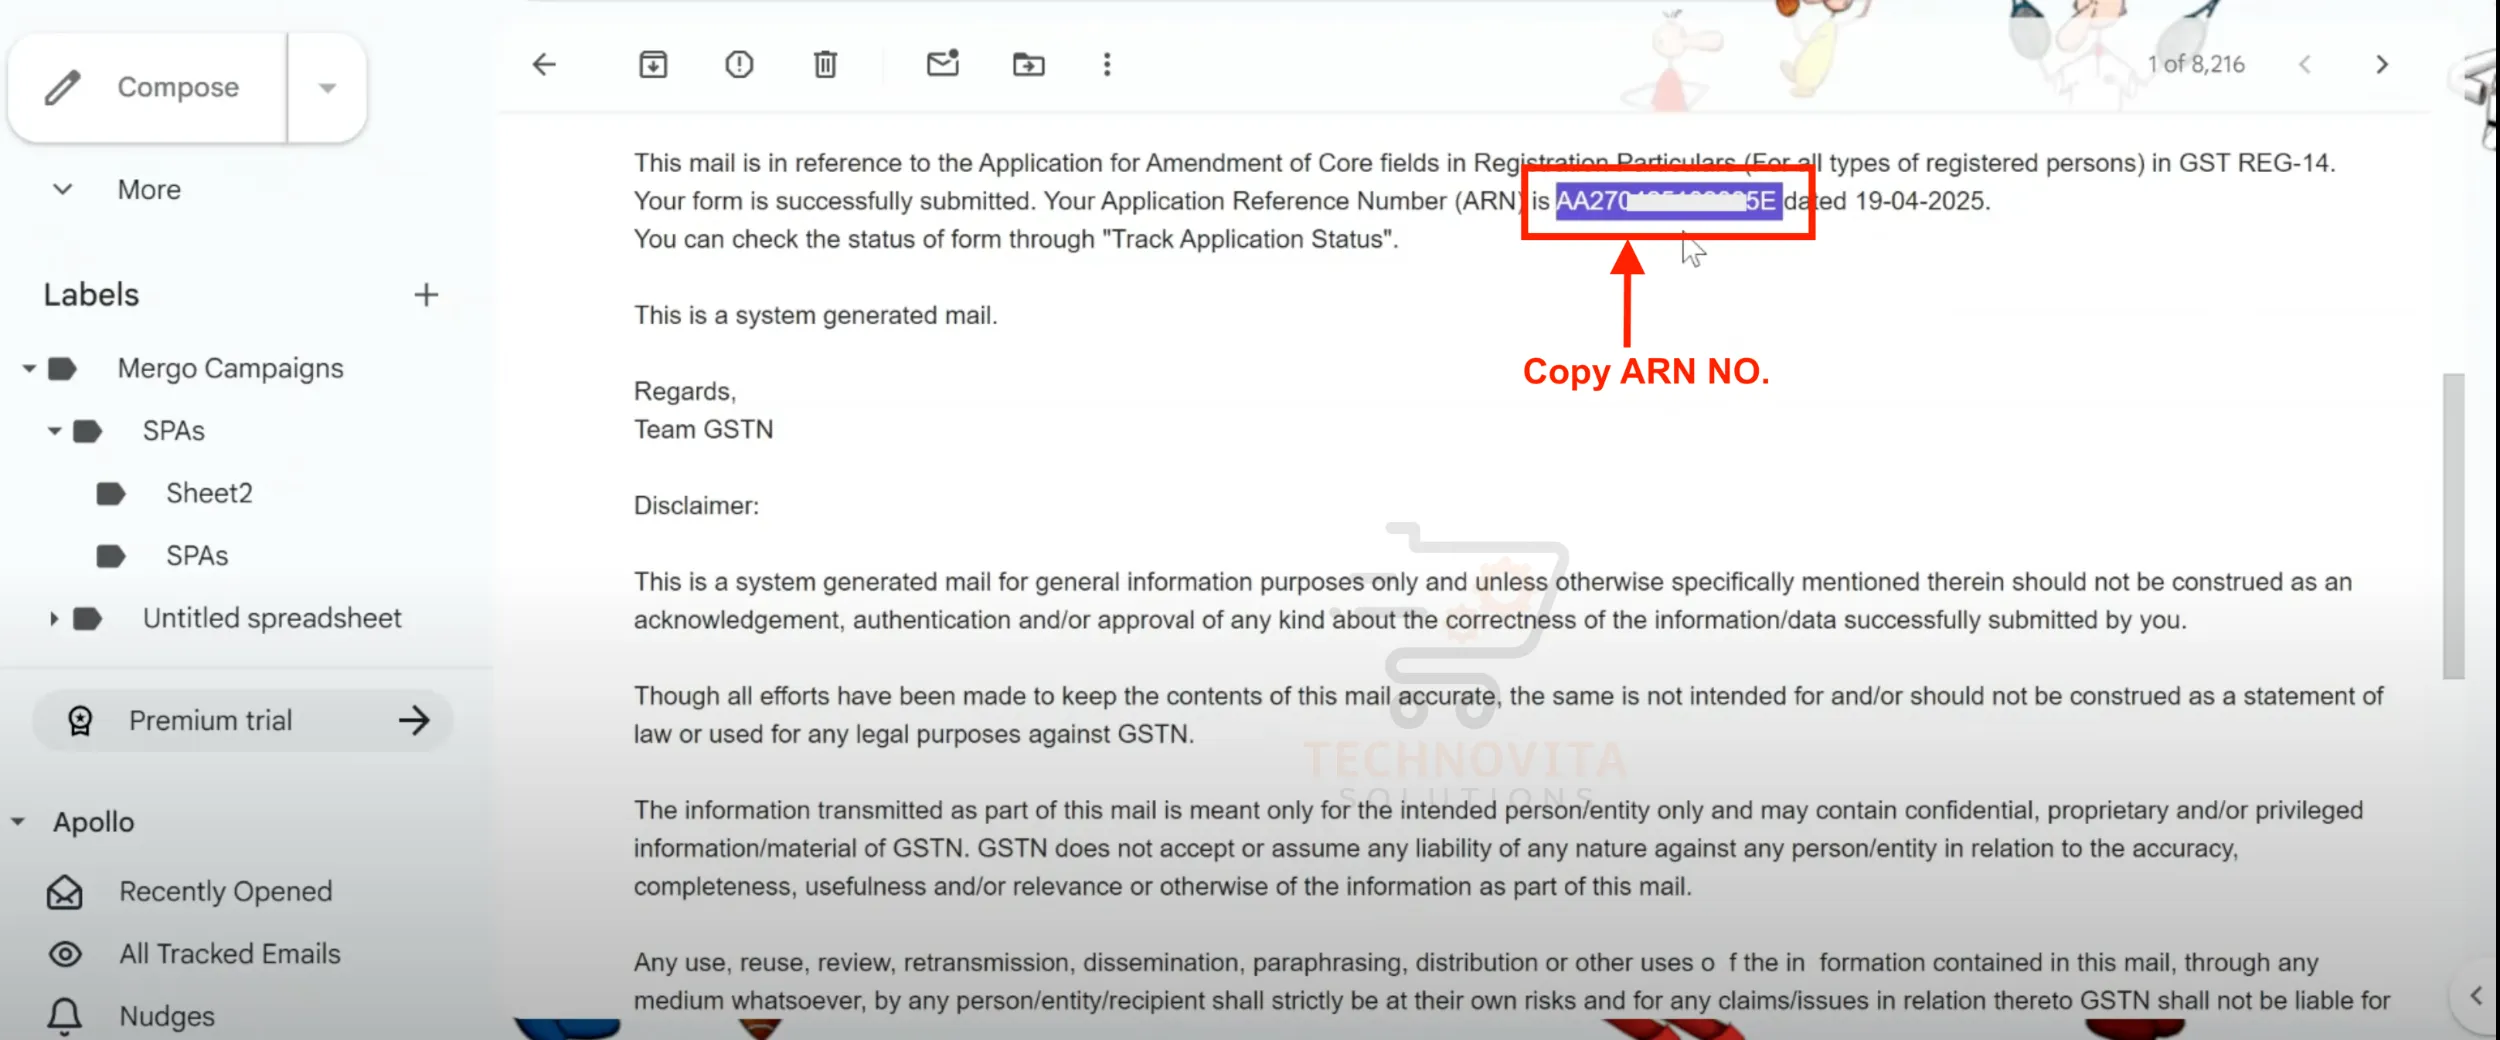
8. Receive ARN (Application Reference Number)
Within 30–60 minutes, you will receive an ARN on your registered email. This ARN proves that your APOB application is under review with the GST department. Important: Note down this ARN as you'll need it for the Blinkit portal in the next steps.
BPart 2: Link the ARN and Apply on Blinkit Seller Portal
9. Login to Blinkit Seller Panel
Go to the Blinkit seller portal and log into your seller account. Ensure you have already completed your basic seller registration before proceeding.
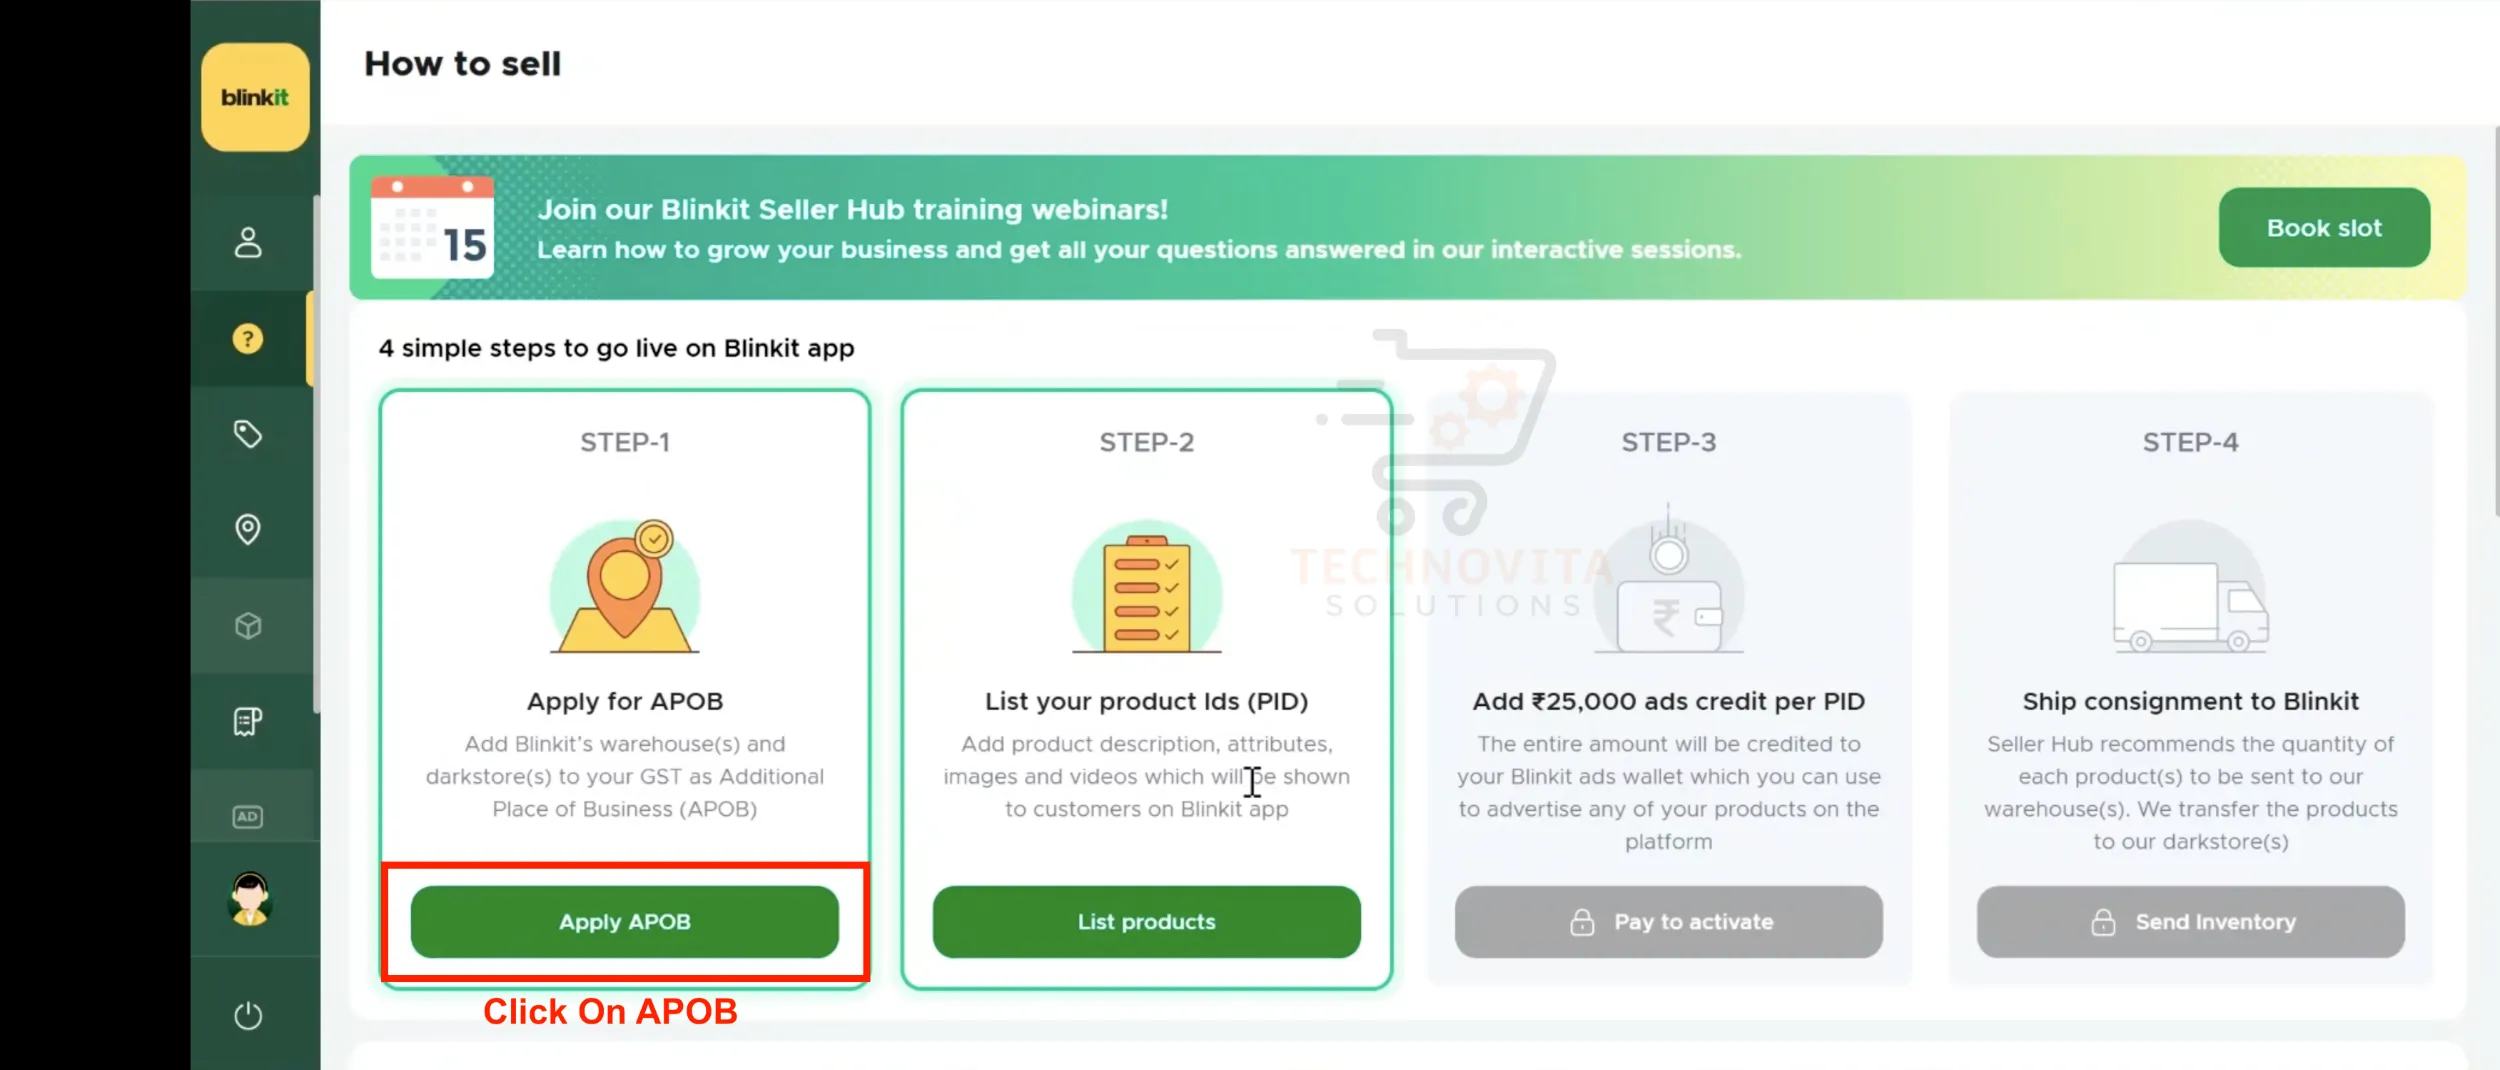
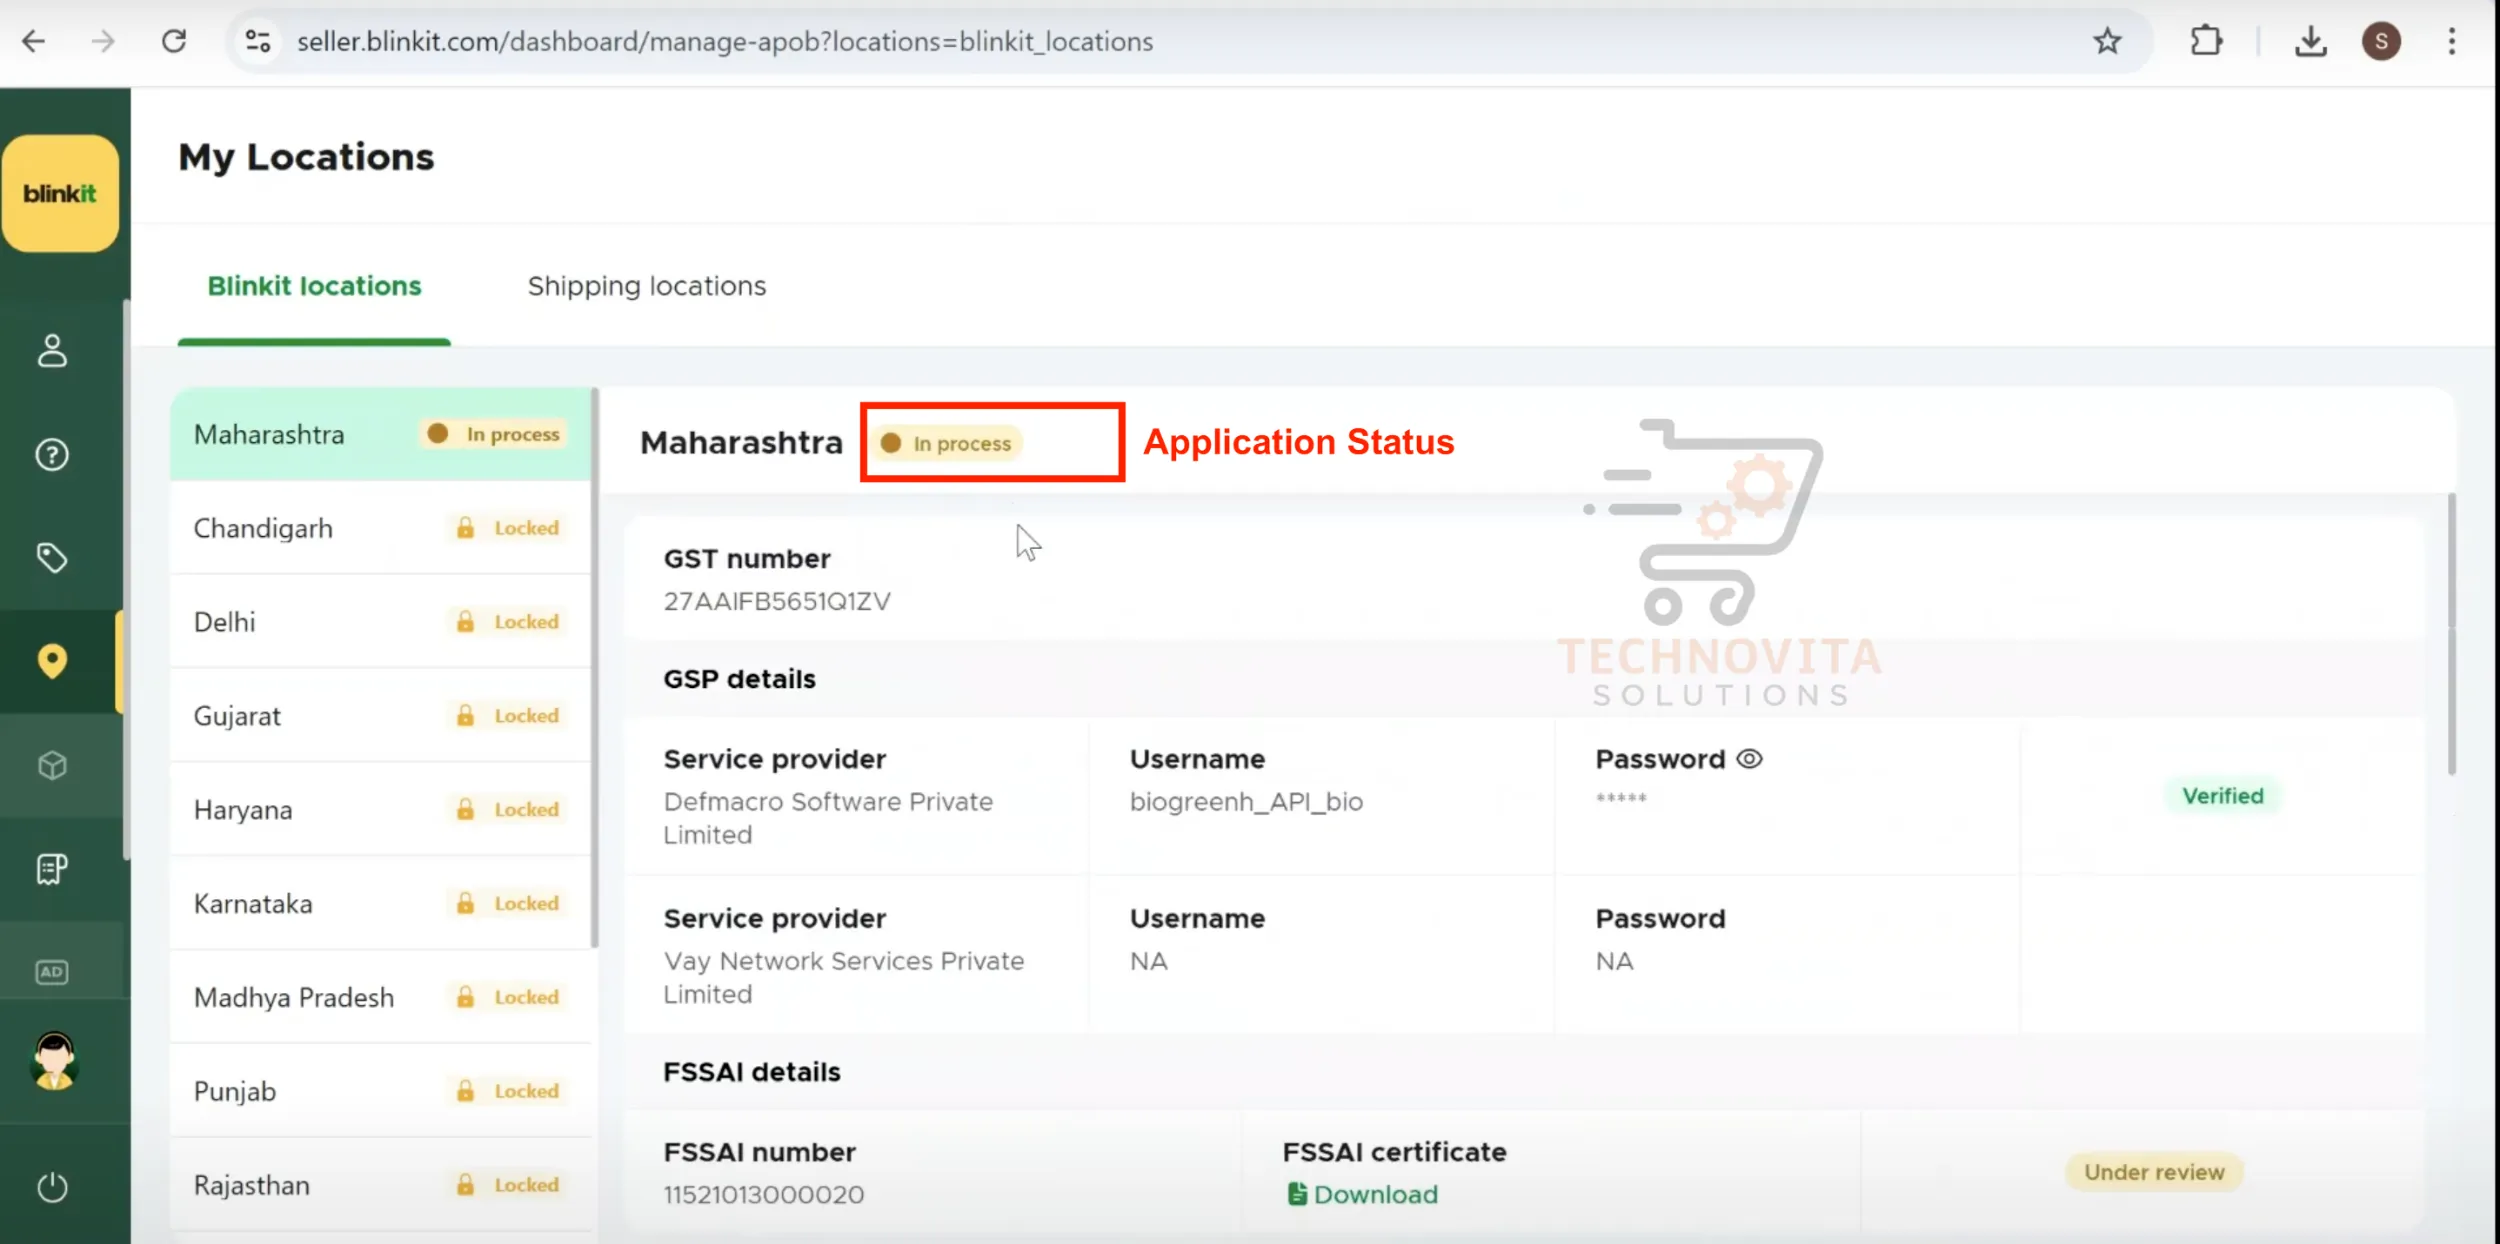
10. Navigate to APOB Application Section
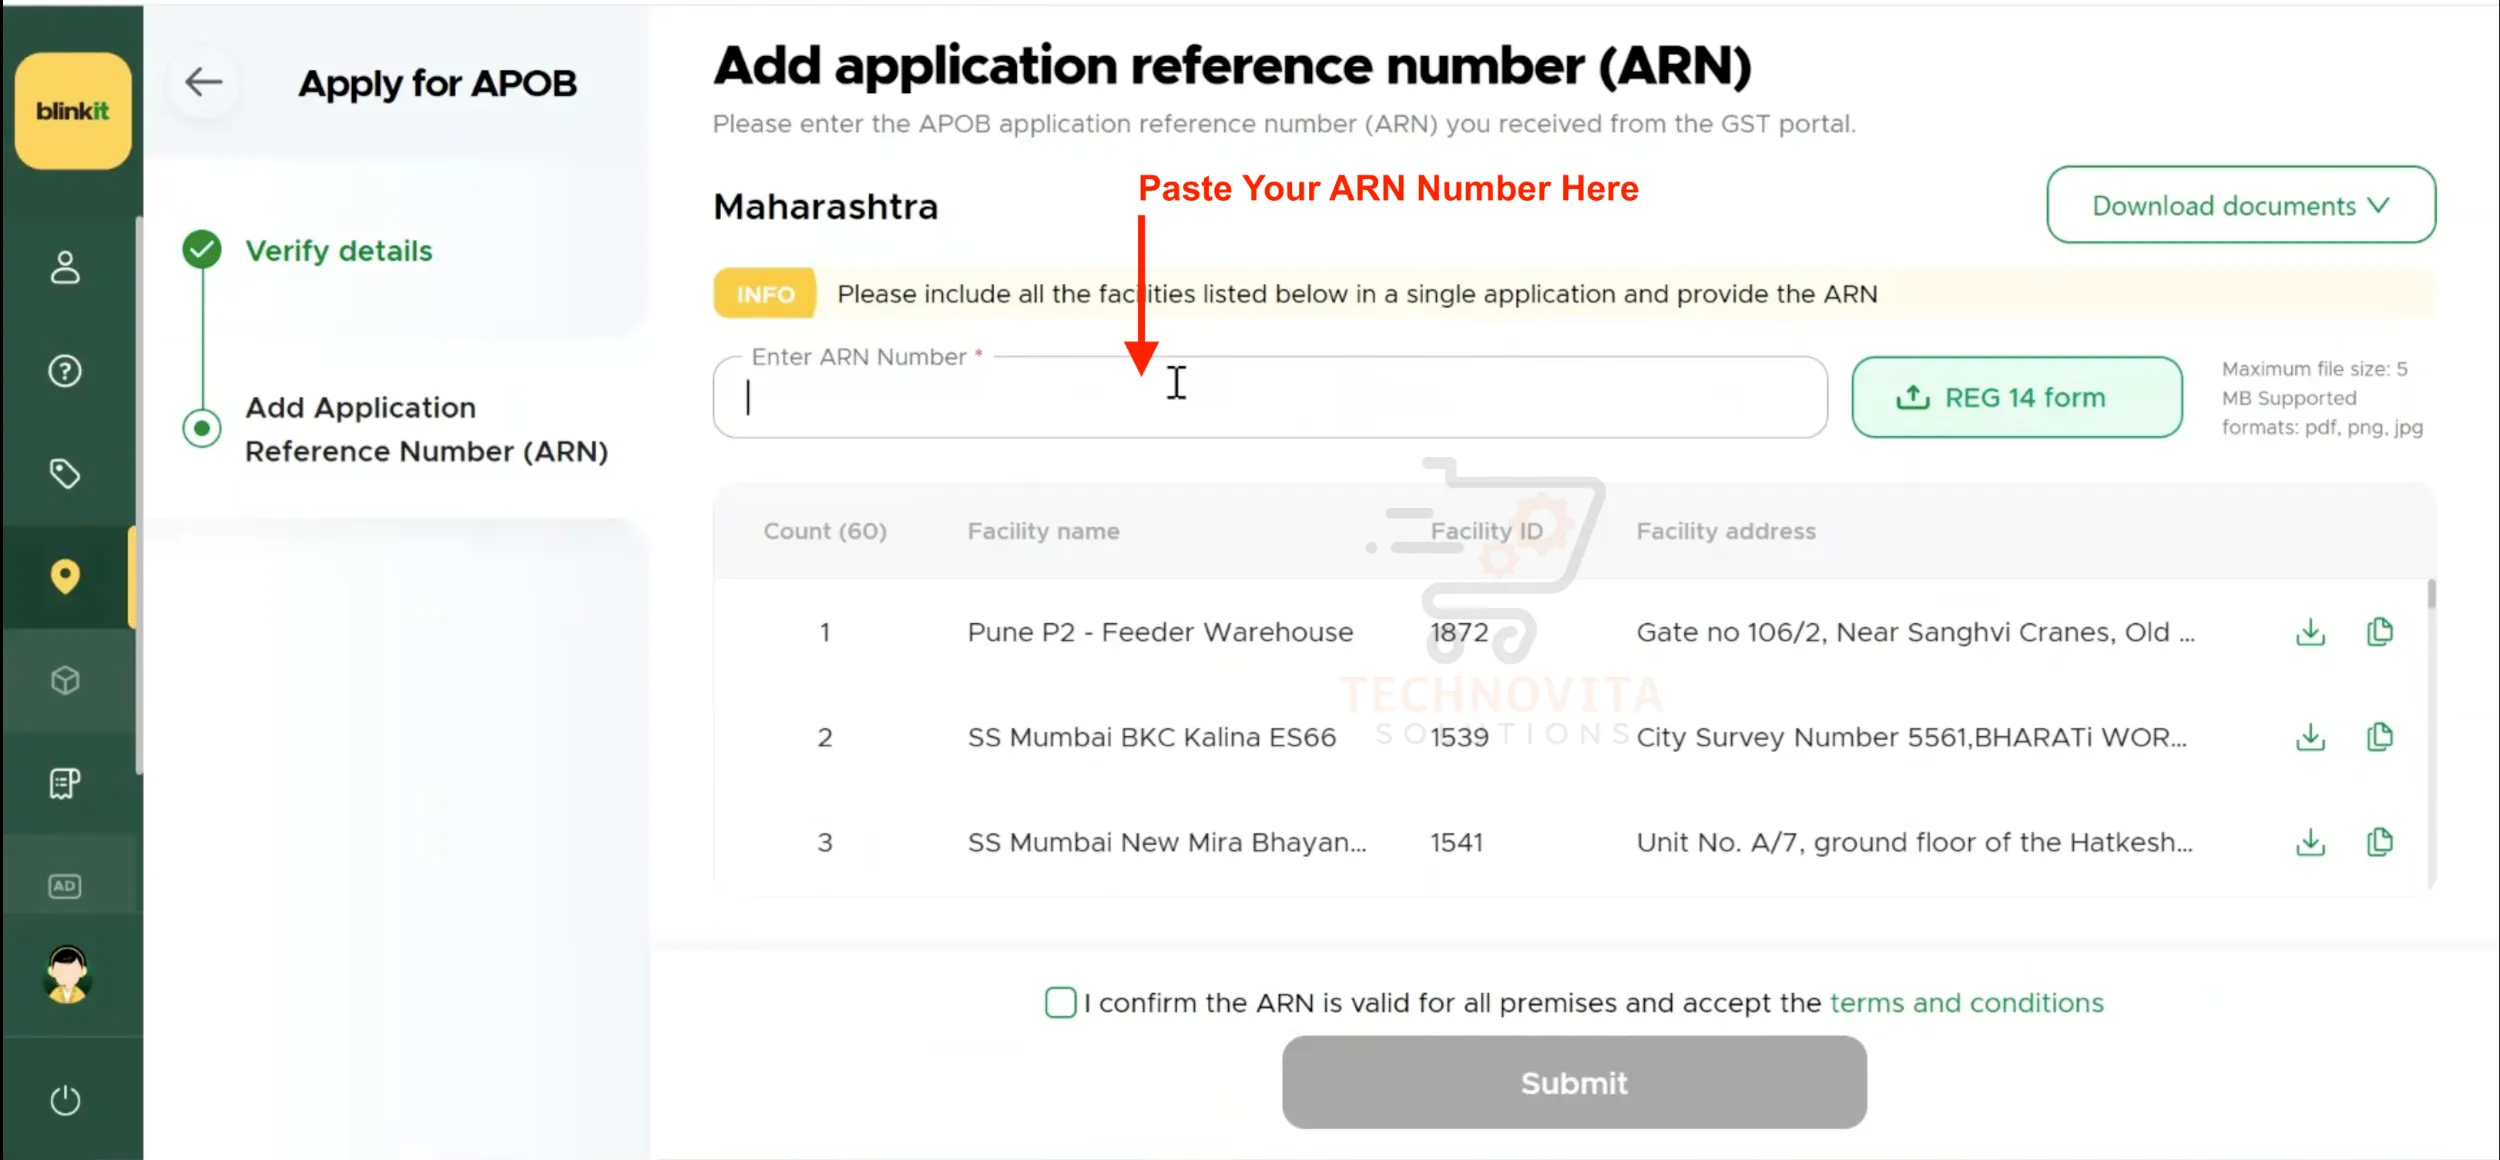
Go to the 'Apply for APOB' section in your dashboard. You'll be asked to enter the ARN Number you received from GST in the previous step.
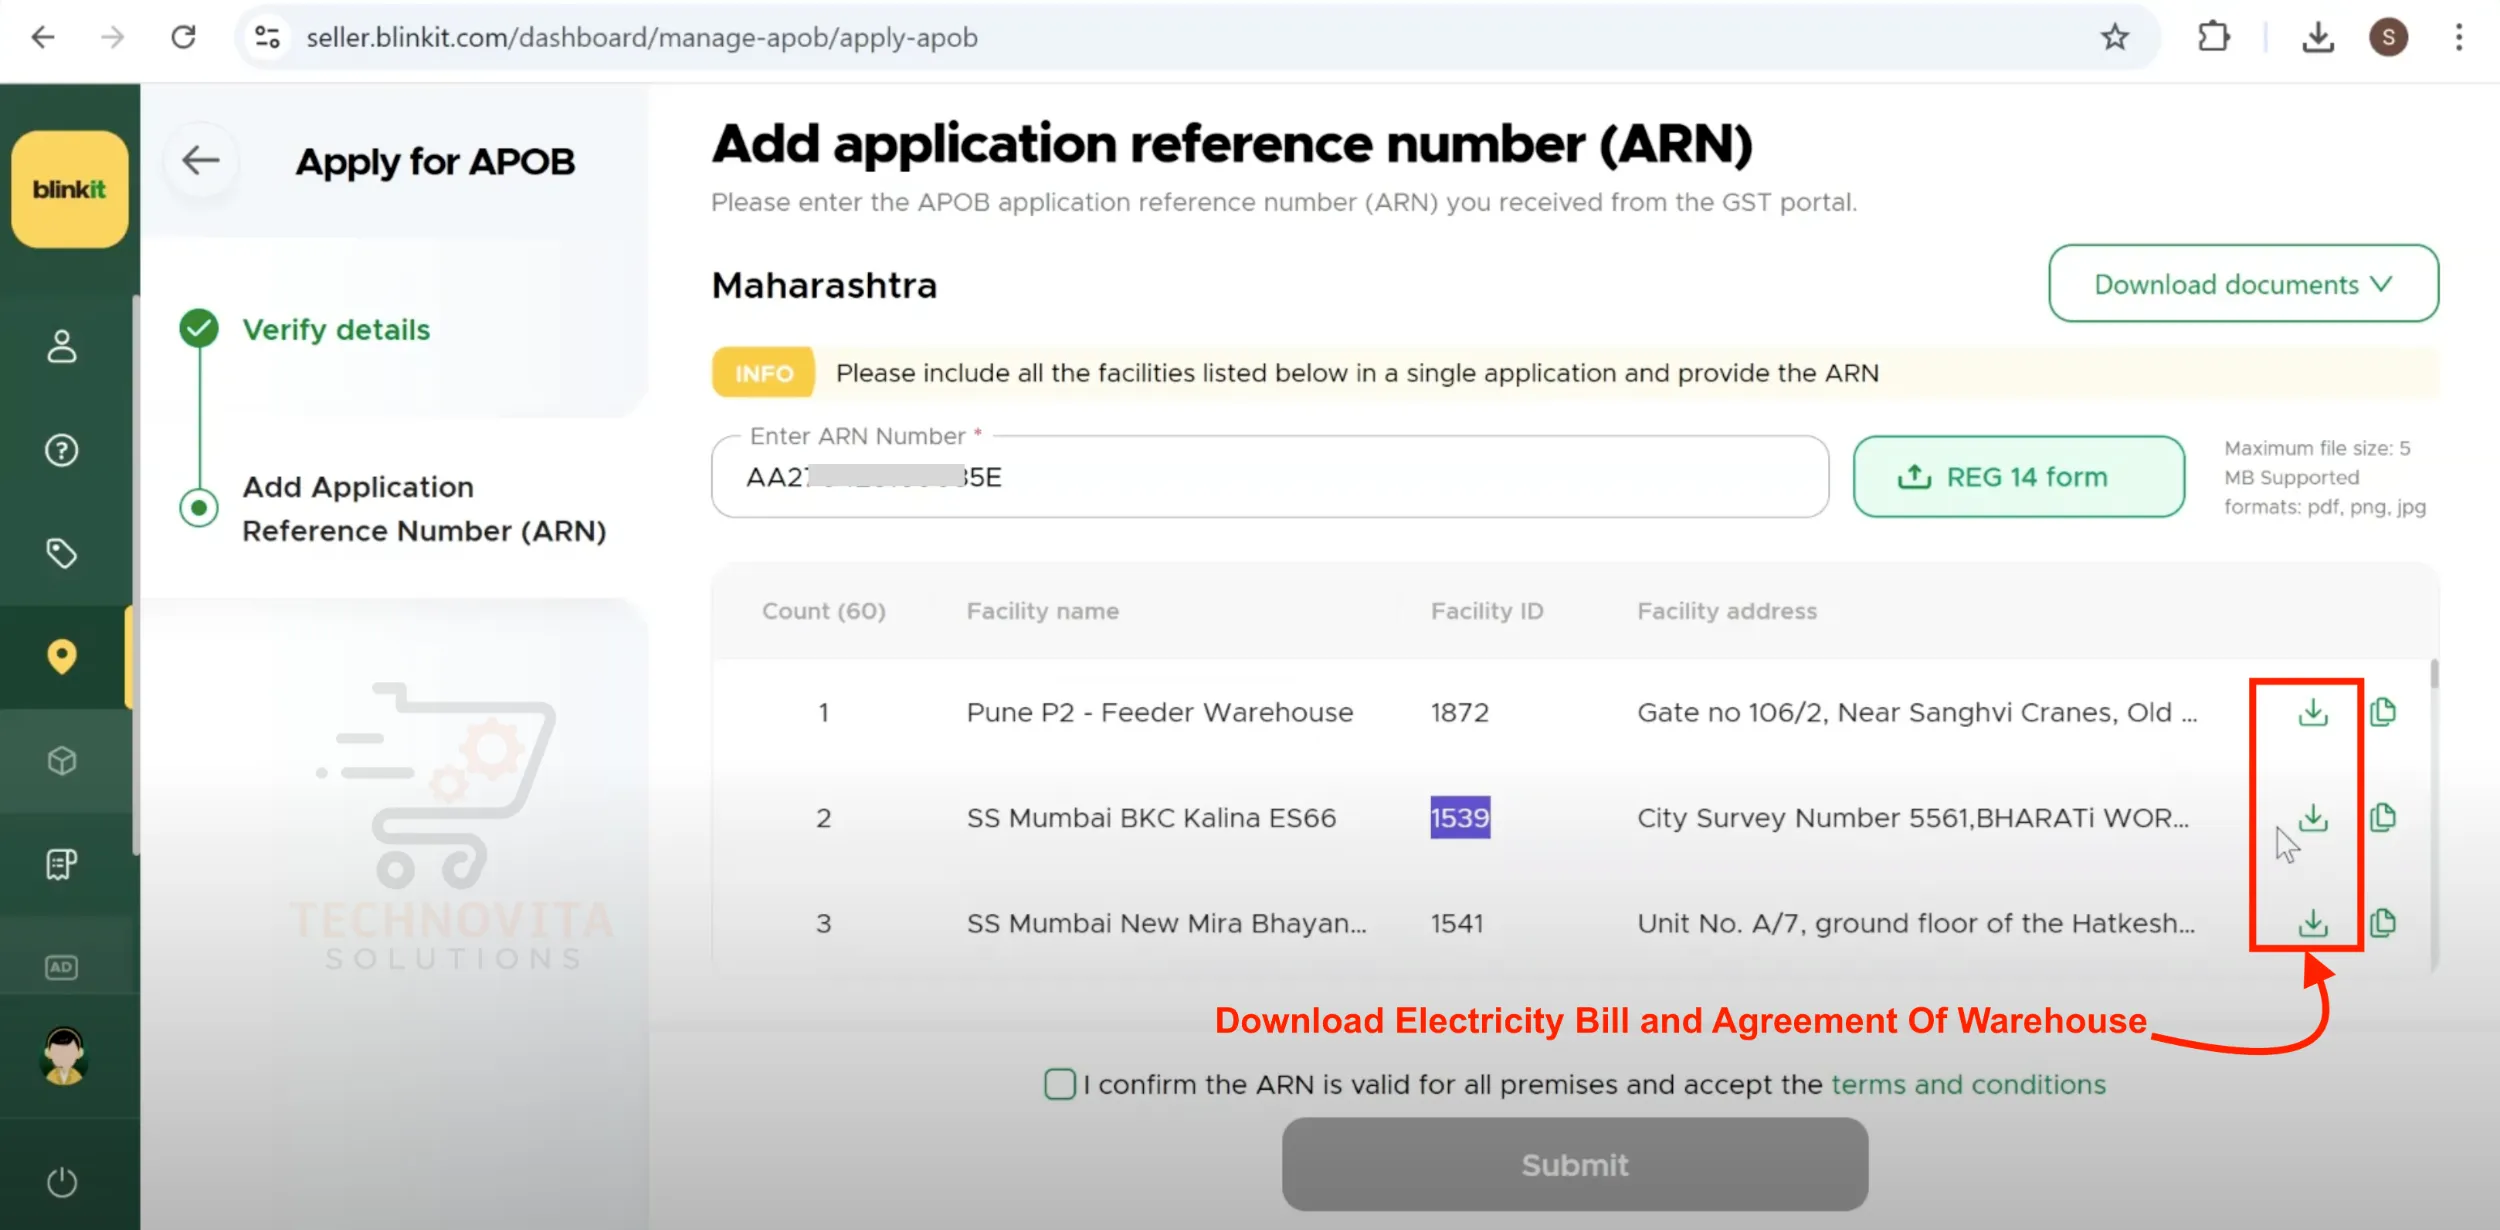
11. Download Required Documents
Select the warehouse location you are applying for and download the relevant documents: Electricity Bill and Warehouse Agreement. These are the same documents you used during the GST APOB application process.
12. Upload Merged PDF in Blinkit Portal
Merge the Electricity Bill and Agreement into a single PDF file if you haven't already. Upload this document in the APOB application section of the Blinkit portal.
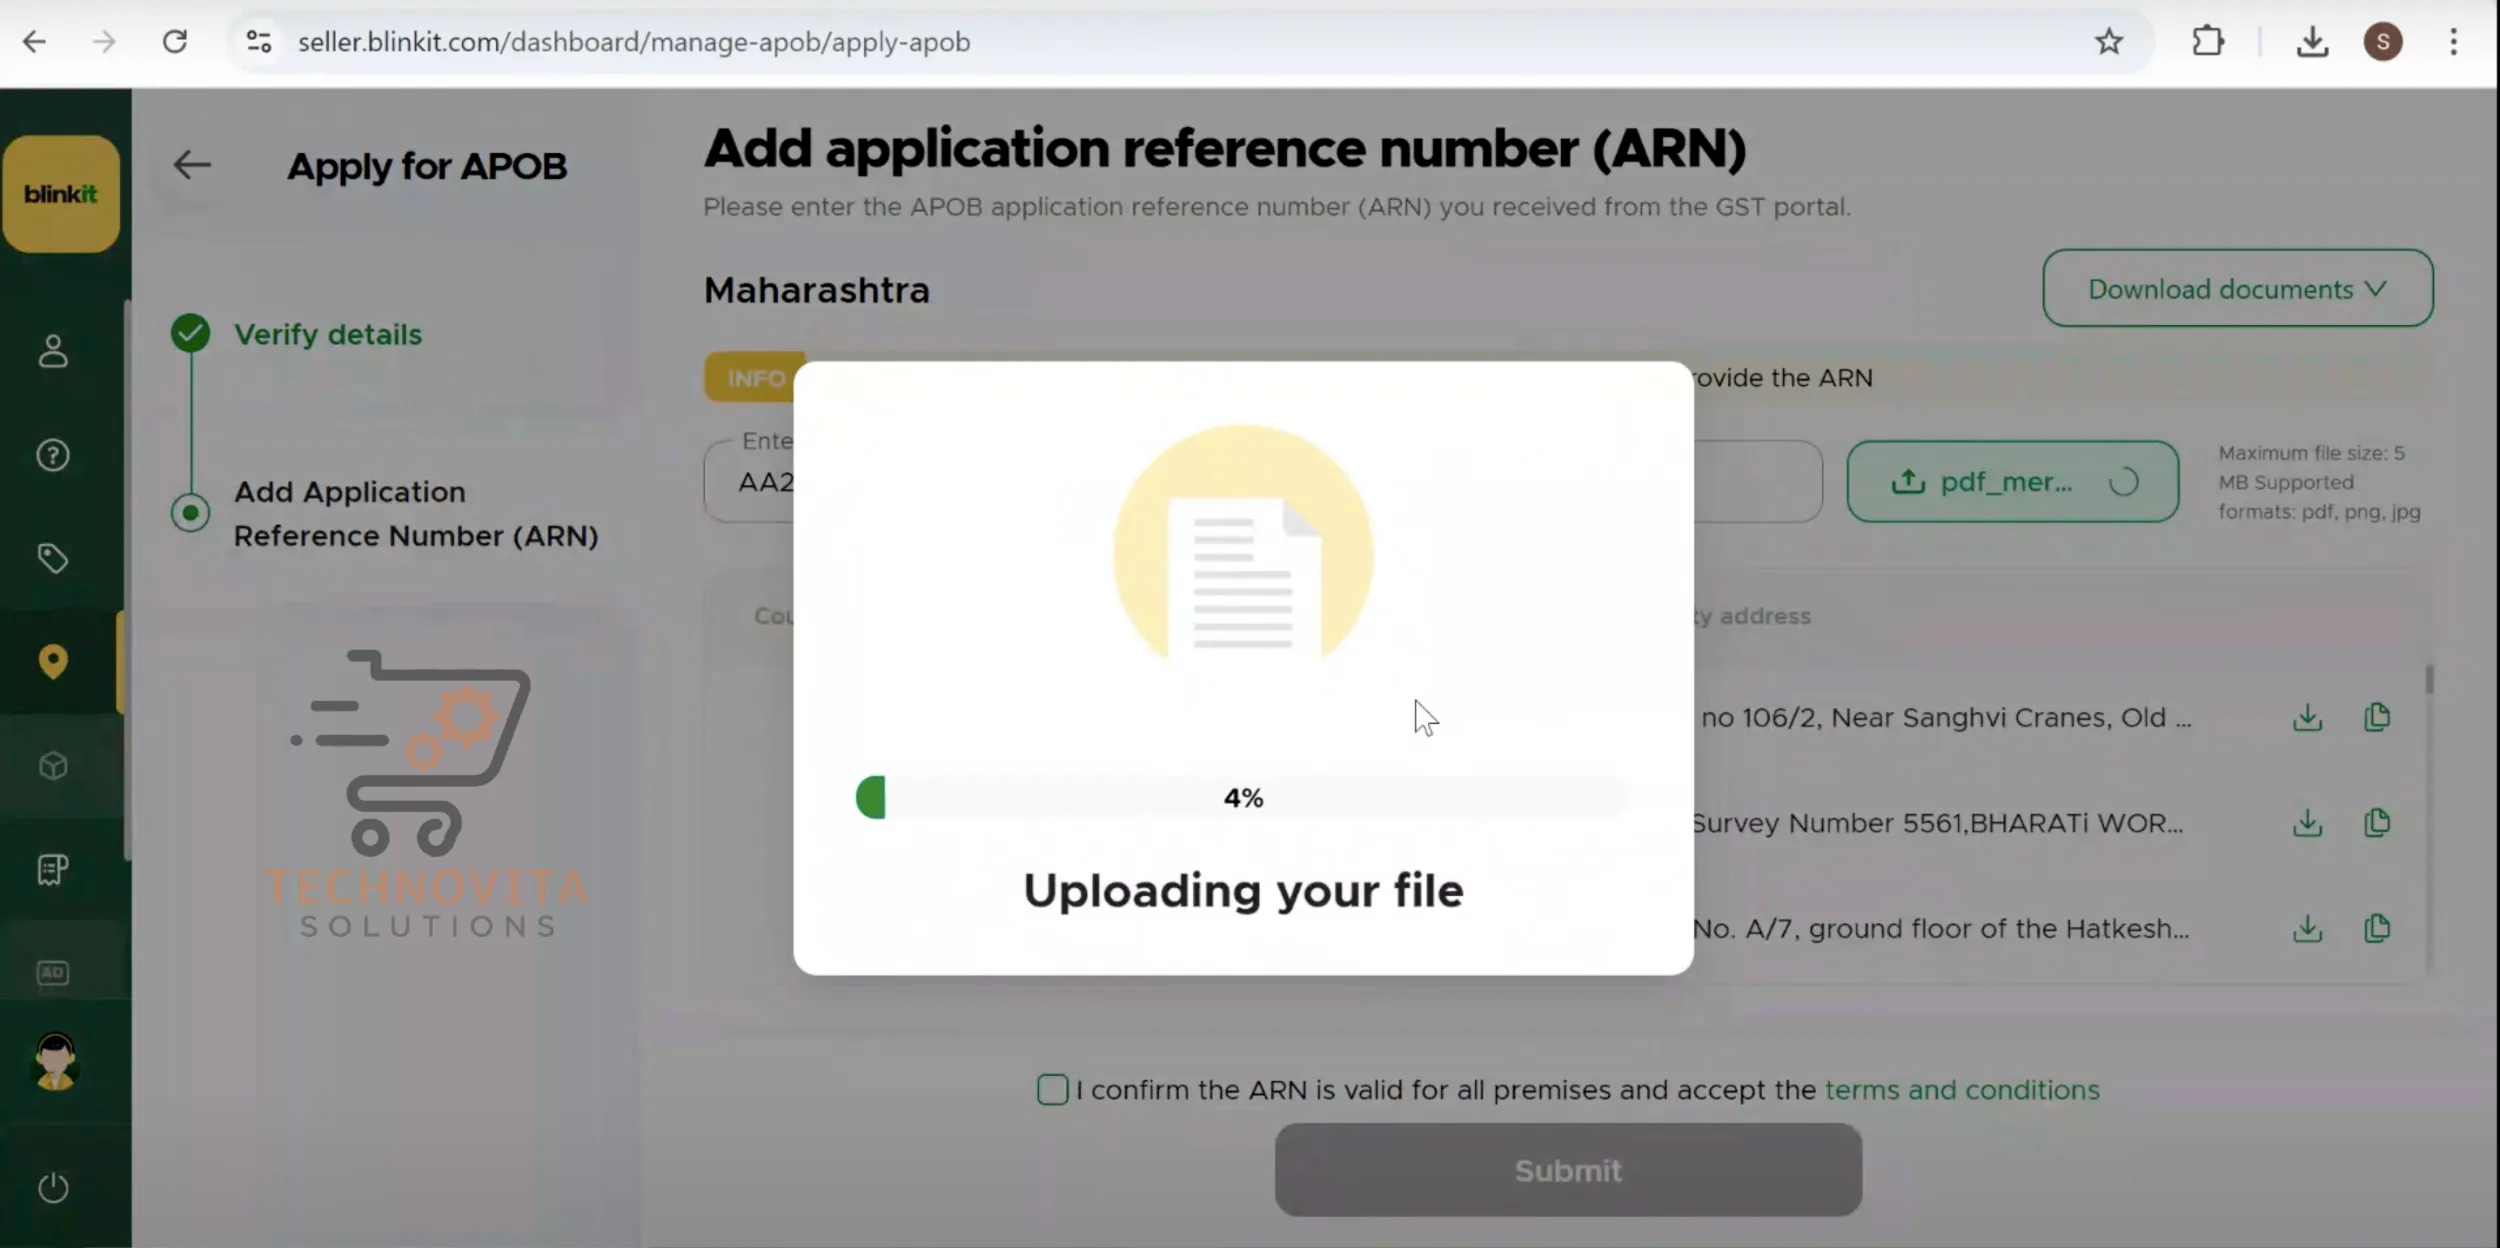
13. Submit and Wait for Approval
Tick the box: "I confirm the ARN is valid for all premises." Accept the terms and click 'Submit'. Your APOB request will show as 'In Progress', and Blinkit will verify and approve the details within 24–48 hours. Once approved, your listing on Blinkit will go live, and you can start sending products to the Blinkit dark store (warehouse) for fulfillment.
Congratulations!
You've successfully completed the APOB setup process. Once approved, you'll be ready to list your products on Blinkit and start selling!
Step-by-Step Guide to Listing Your Products on Blinkit
Dear sellers, congratulations on successfully completing your Blinkit seller registration and APOB verification! 🚀 Now, it’s time to learn how to list your products professionally on Blinkit to maximize your visibility and sales. Follow this detailed step-by-step guide along with real screenshots to ensure your listings are optimized, compliant, and conversion-friendly.
1. Log in to Your Blinkit Seller Dashboard
Visit seller.blinkit.com and log in using your registered email ID and password. Make sure your KYC and seller profile are completed for full dashboard access.
Pro Tip: Bookmark the dashboard page for faster access daily.
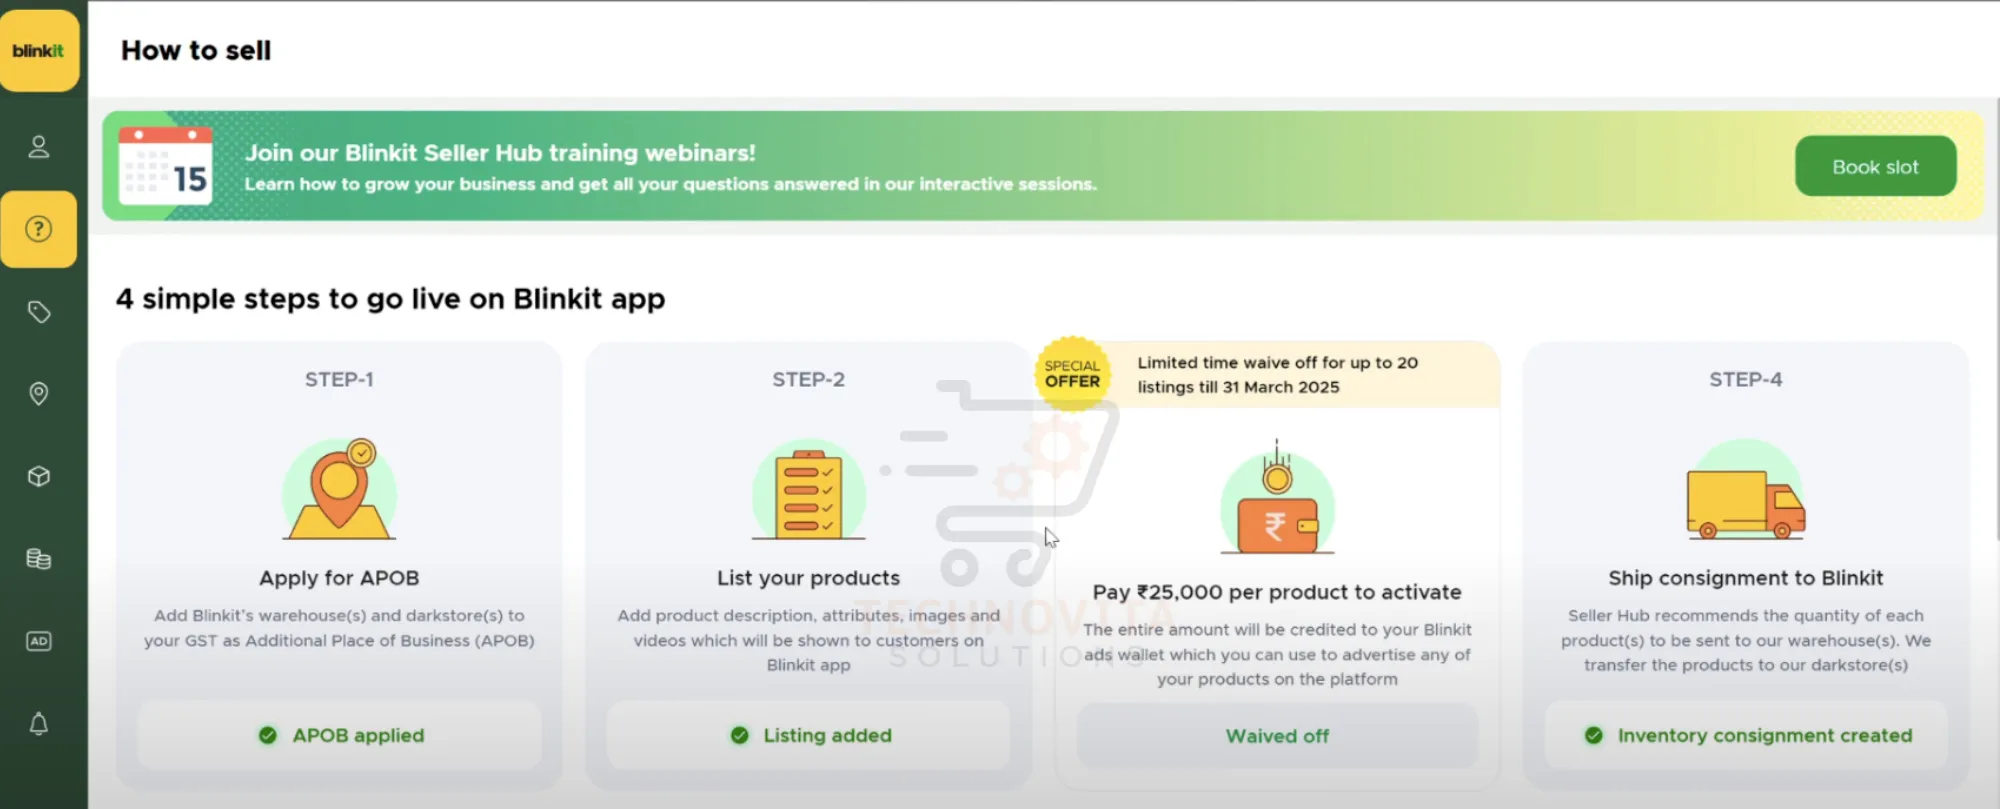
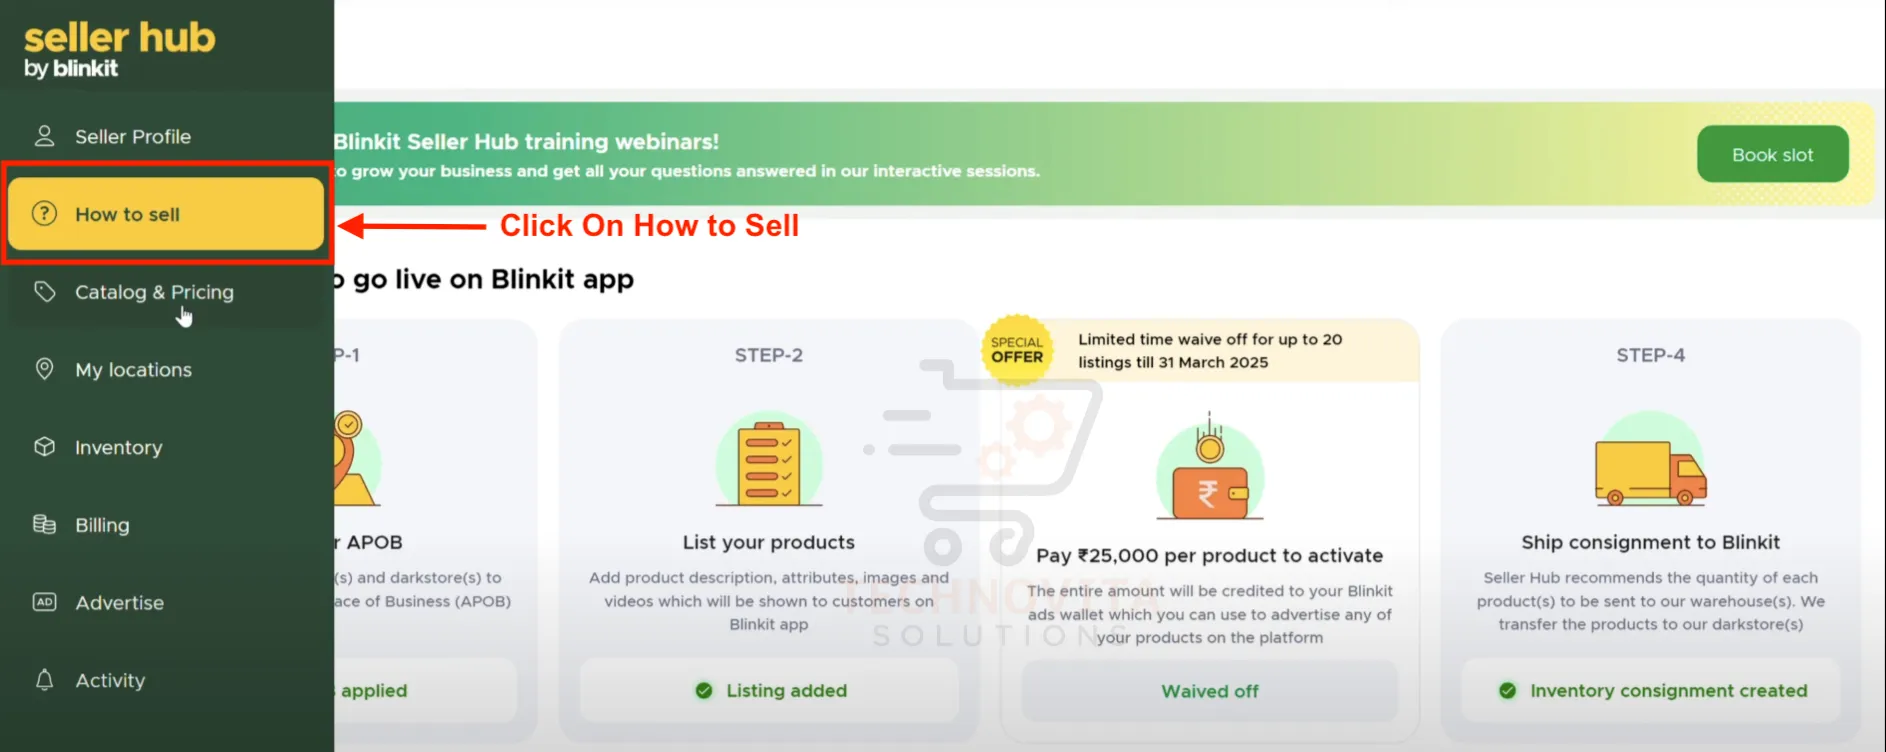
2. Navigate to "How to Sell" Section
After logging in, locate the “How to Sell” tab on the left-hand side menu bar. Here you will find useful guides and any listed products under your account.
SEO Tip: Familiarize yourself with Blinkit’s policies early to avoid listing rejections.
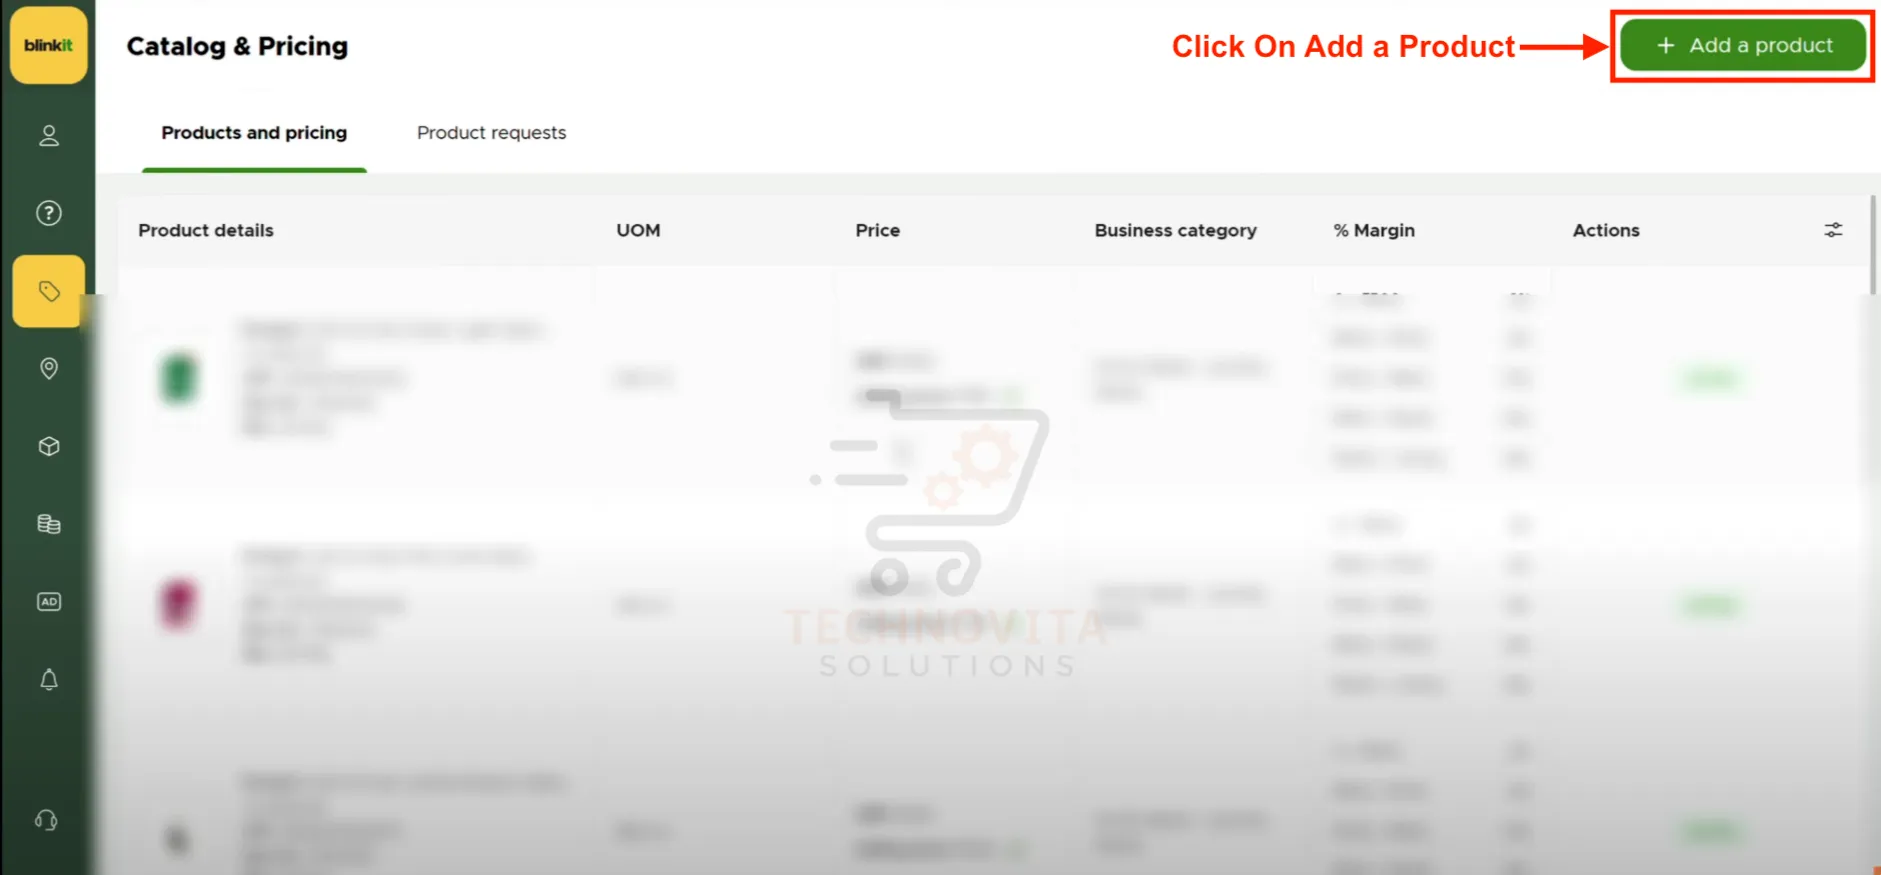
3. Click "Add a Product" Button
On the product listing page, click the green “Add a Product” button on the top-right corner.
Pro Tip: Review your existing products before adding new ones for consistency.
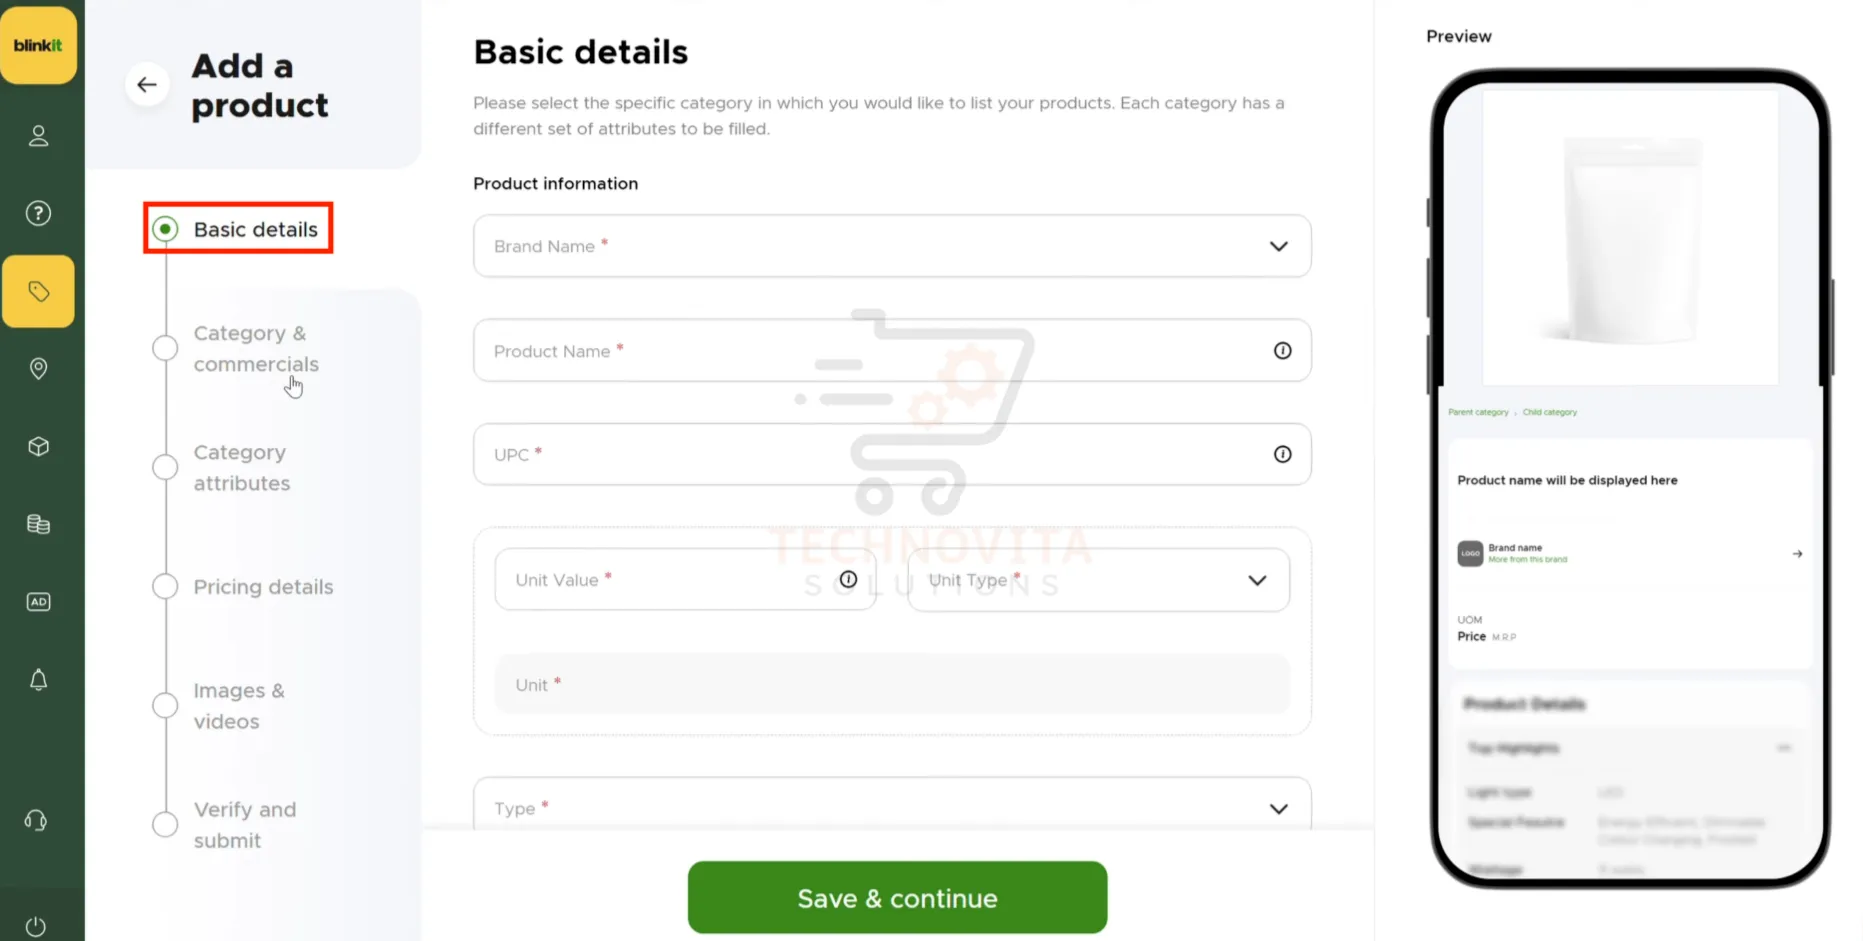
4. Fill Basic Product Details
Enter essential product information such as:
- Brand Name
- Product Name
- UPC / GIN (Unique barcode-based product code)
- Unit Value and Unit Type (e.g., 500g, 1L)
- Type (Food/Non-food)
- Measurements (with and without packaging)
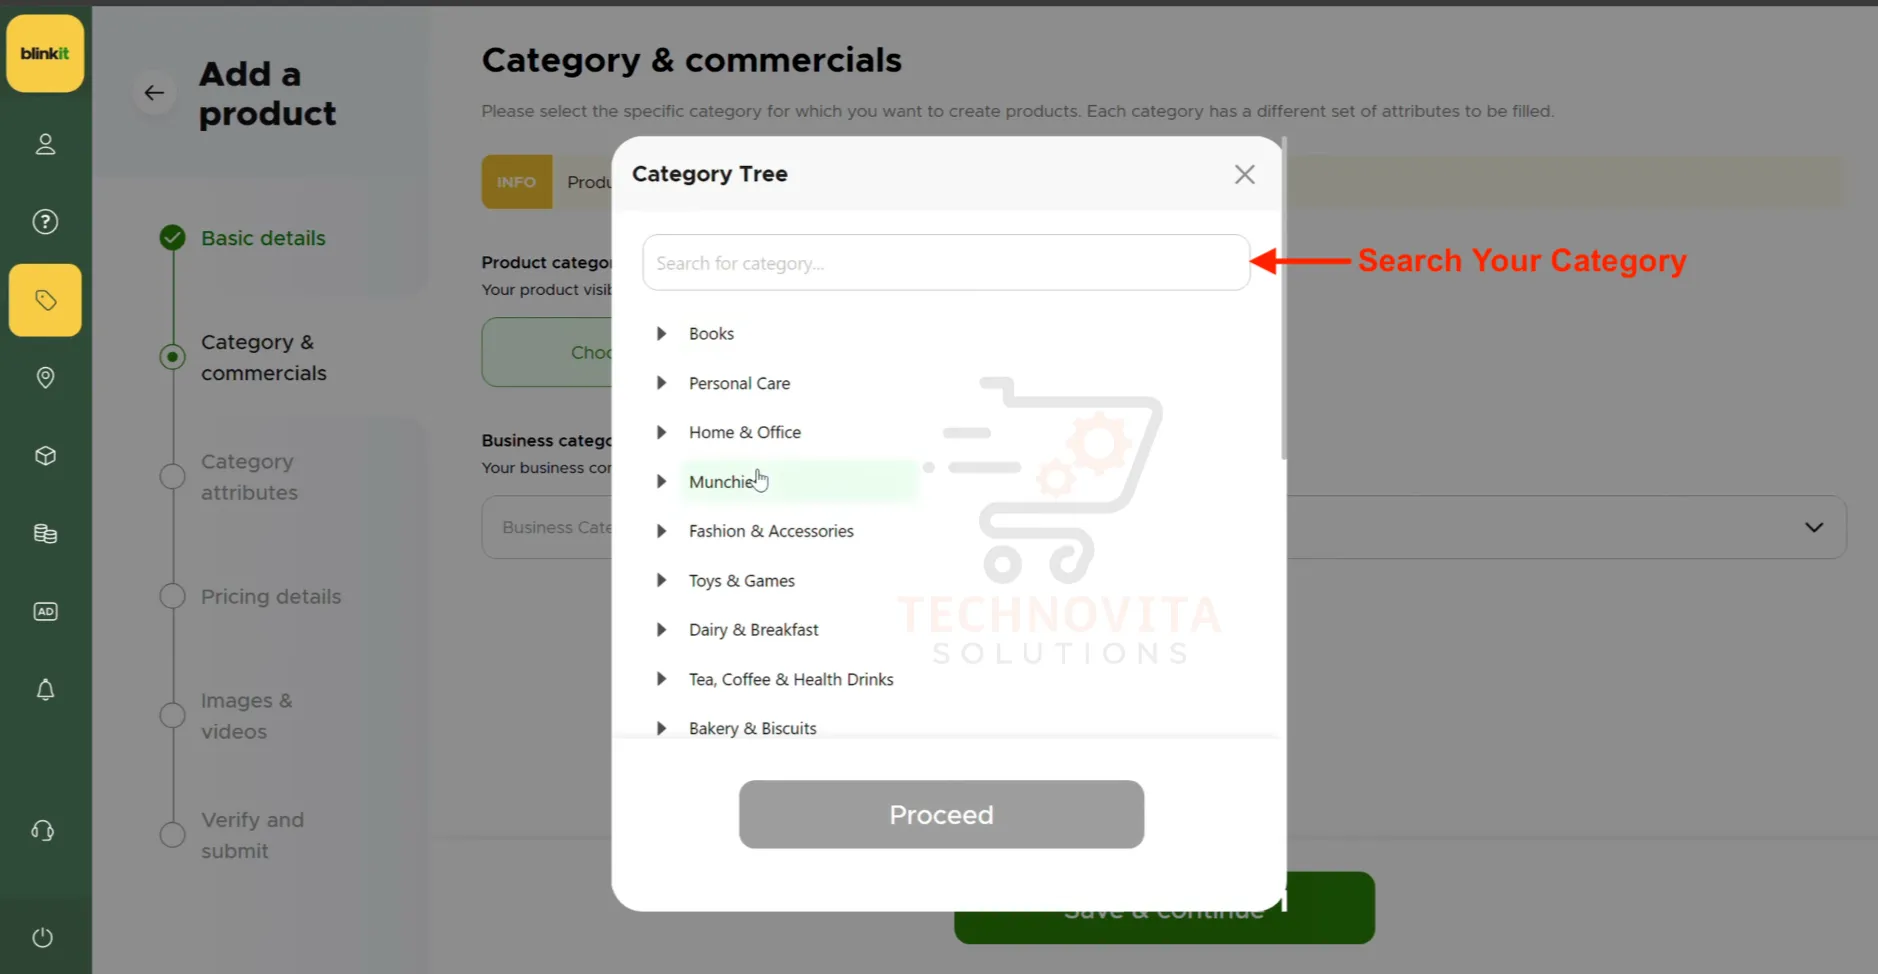
5. Choose the Product Category
Search and select the correct primary category that matches your product type. Accurate categorization ensures better discoverability on Blinkit’s platform.
SEO Tip: Always categorize as narrowly as possible for stronger keyword matching.
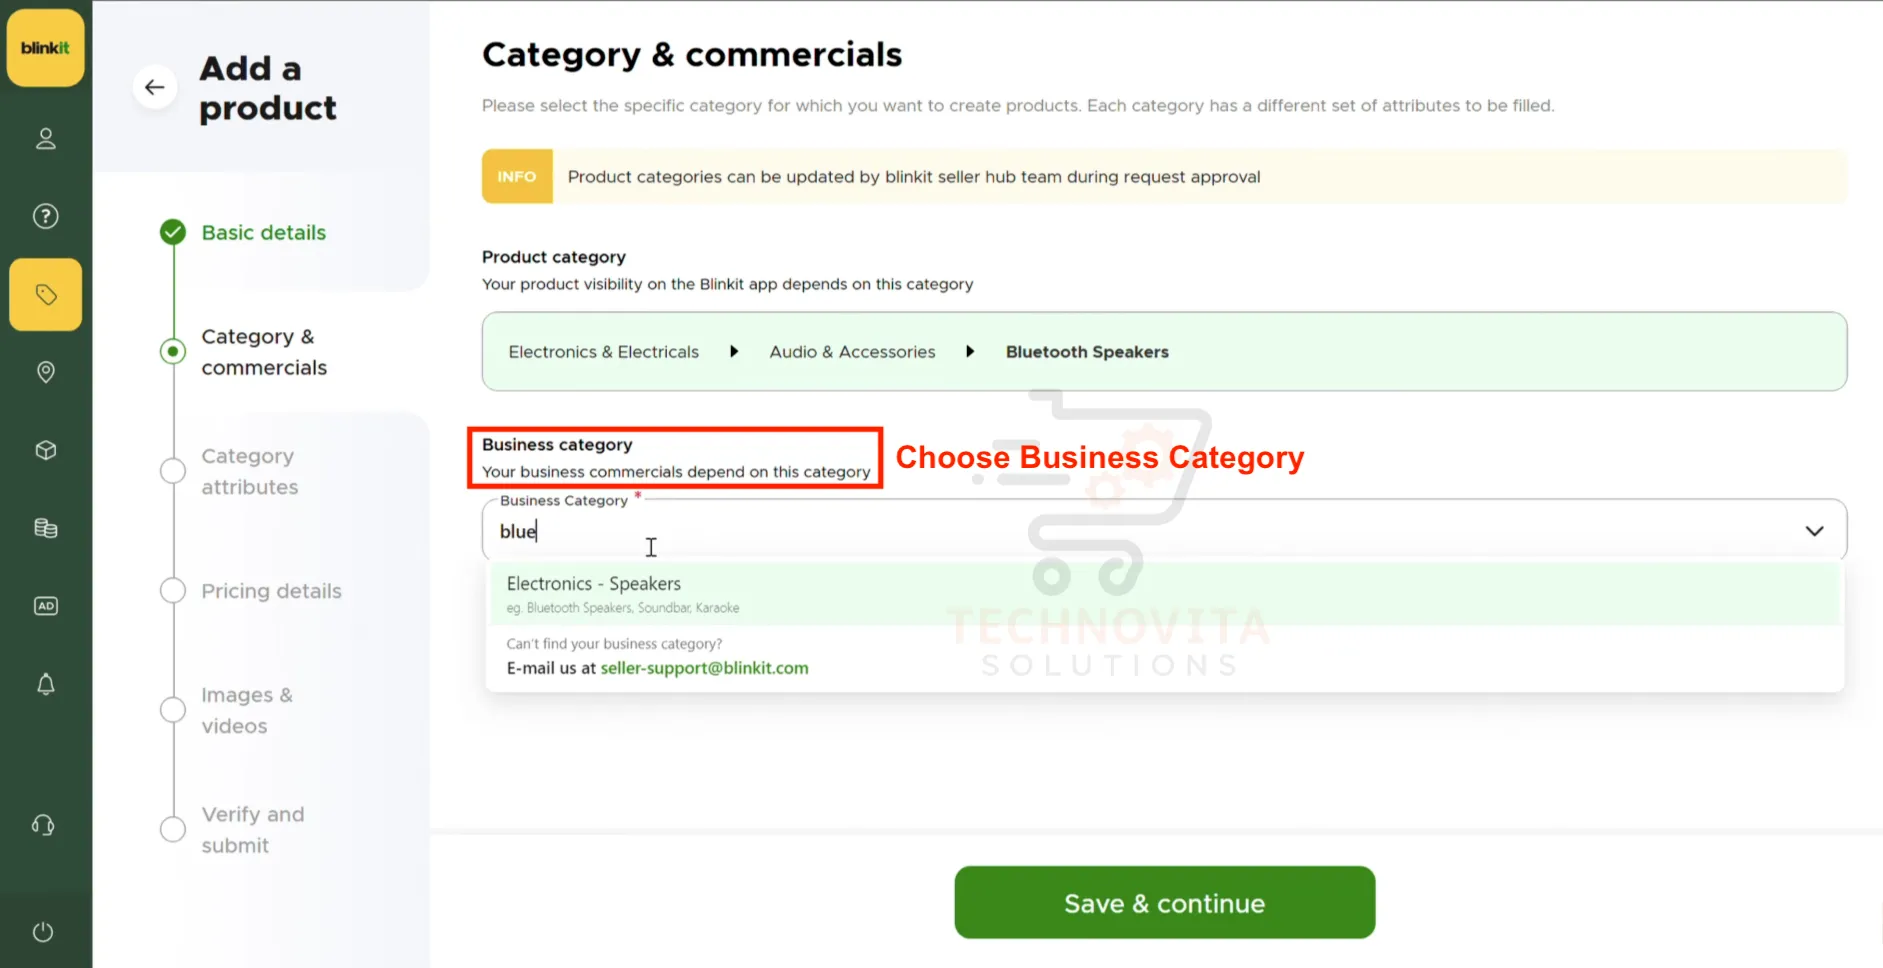
6. Select the Business Category
Select your business type from available options, such as FMCG, electronics, apparel, etc. It helps in proper tax mapping and backend classification.
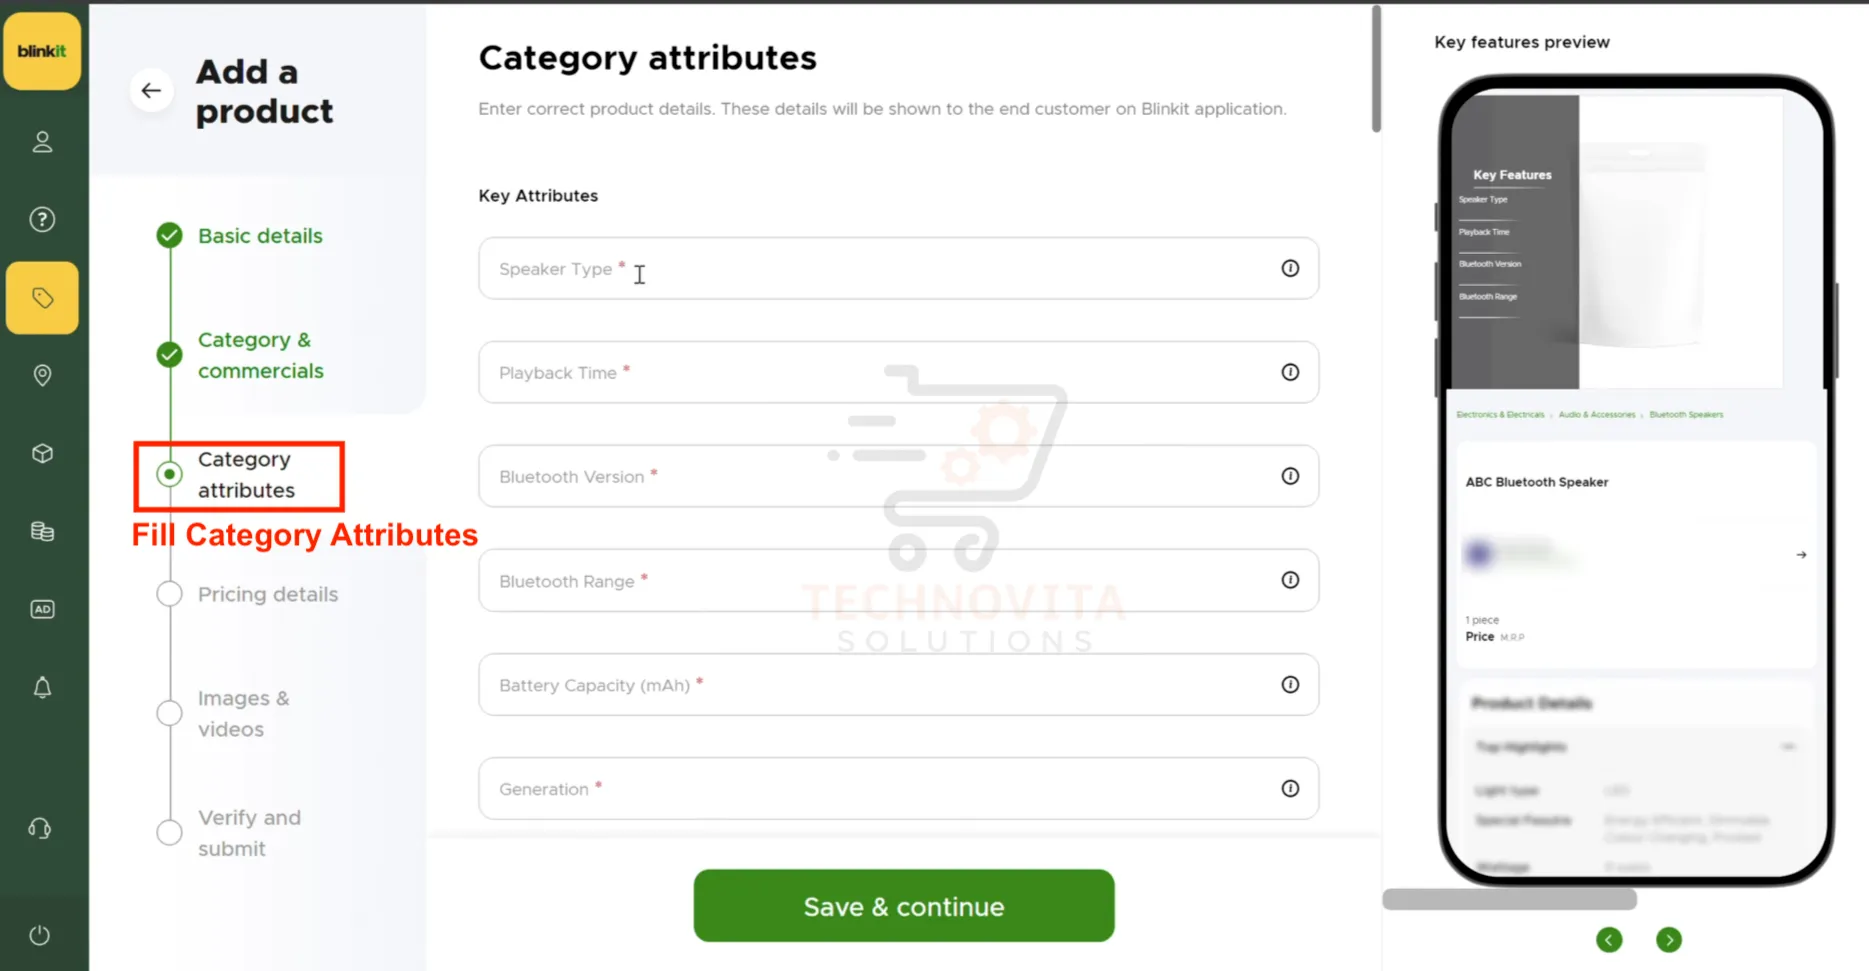
7. Fill Category-Specific Attributes
Enter specifications based on product type — such as battery life for electronics, shelf life for groceries, etc. Filling attributes accurately improves product ranking on search pages.
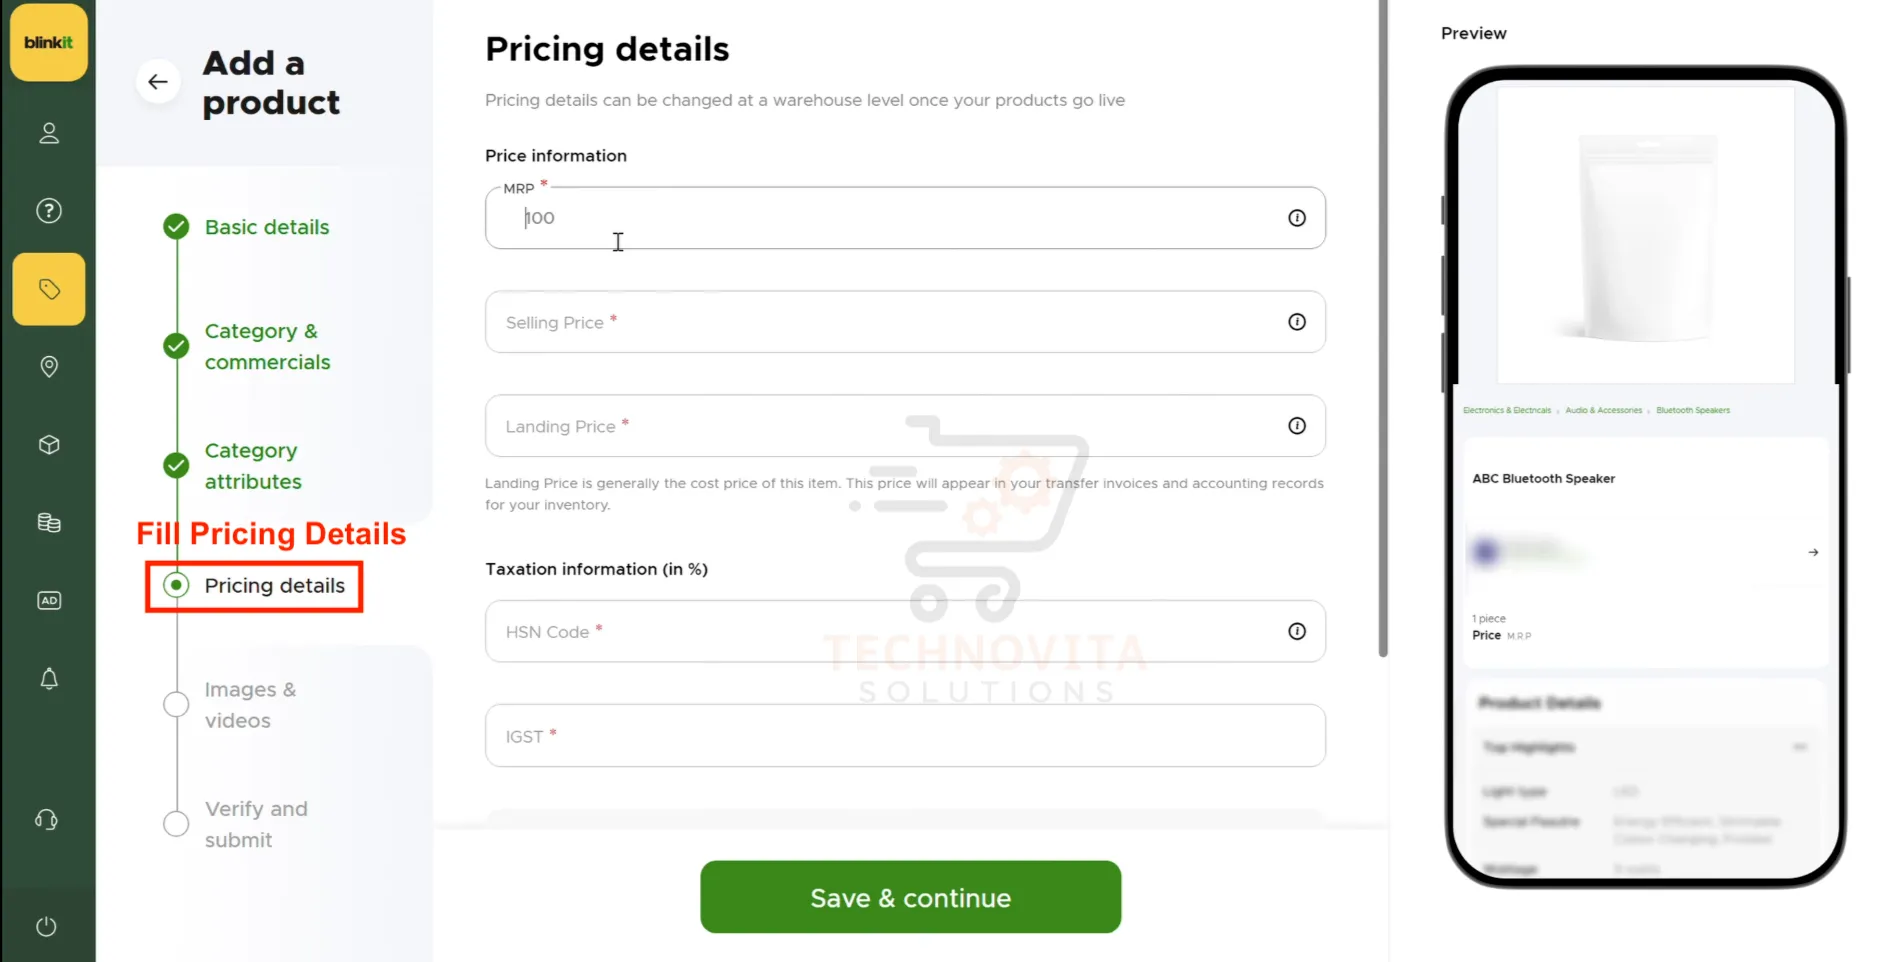
8. Add Pricing and Tax Details
Fill in MRP, selling price, landing price, and taxation details such as HSN code and IGST. Blinkit auto-calculates SGST and CGST based on IGST values you enter.
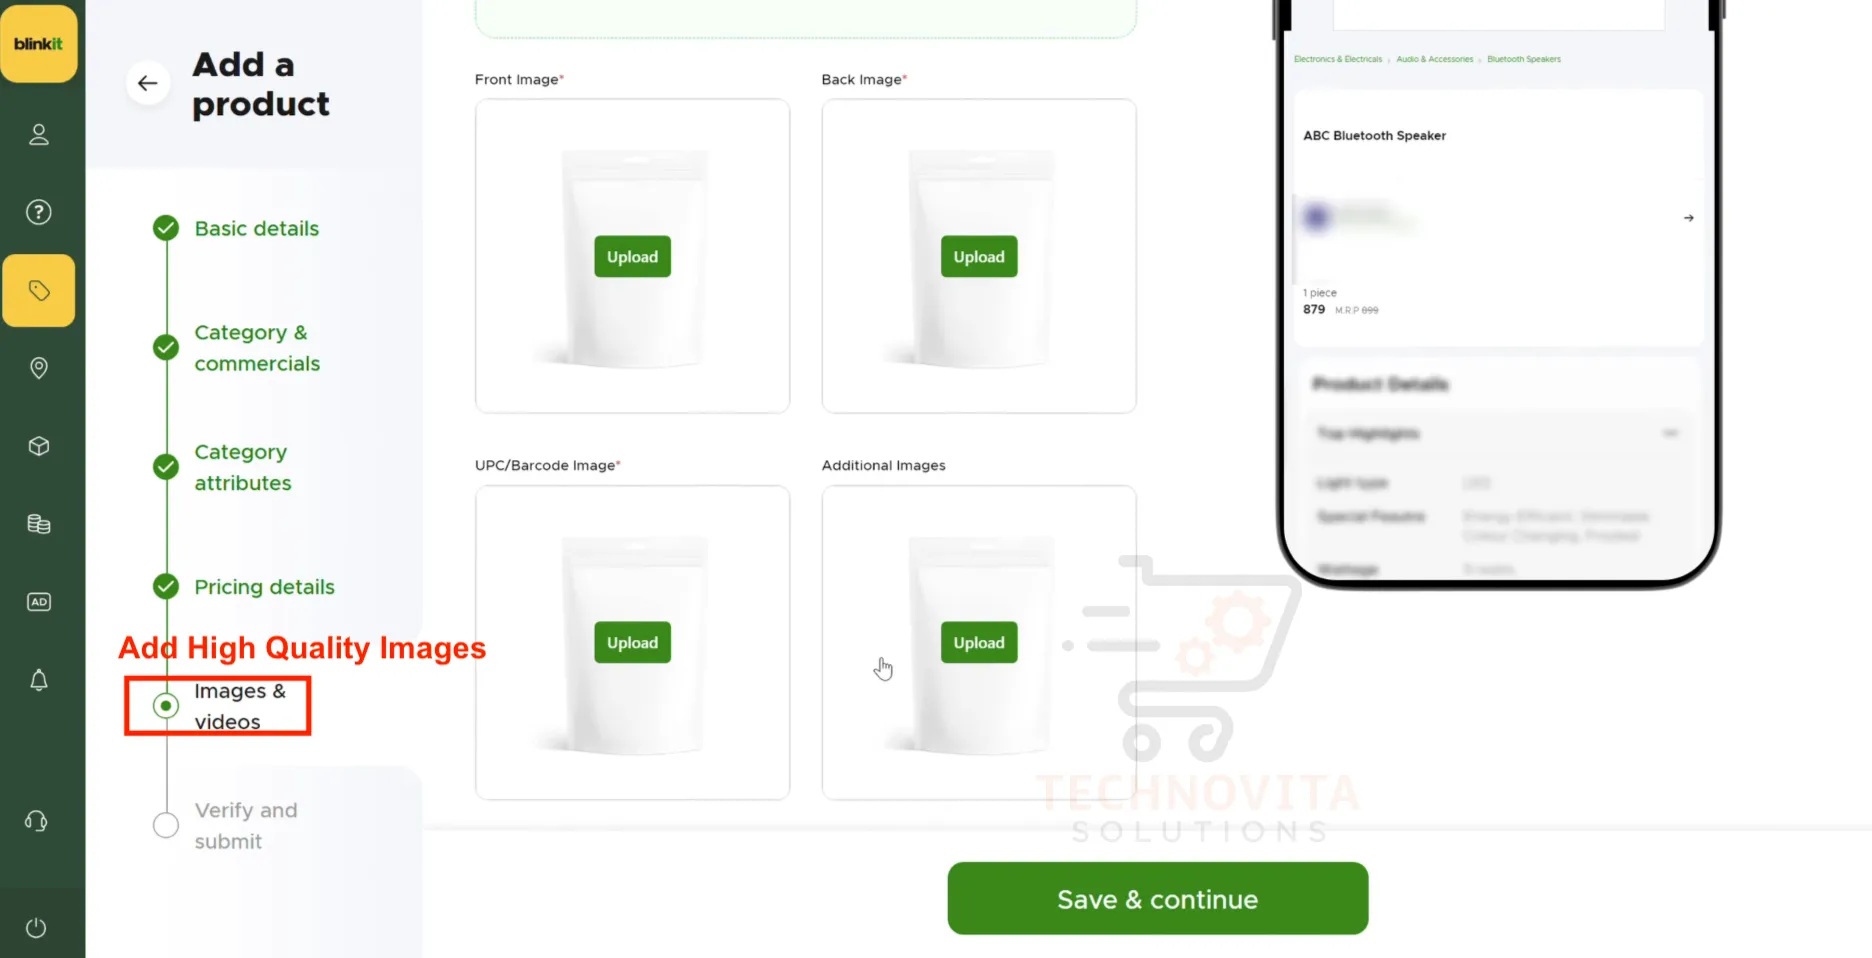
9. Upload Product Images and Videos
Upload high-resolution product images (minimum 1000x1000px) and promotional videos if available. Visual content greatly impacts conversion rates on Blinkit!
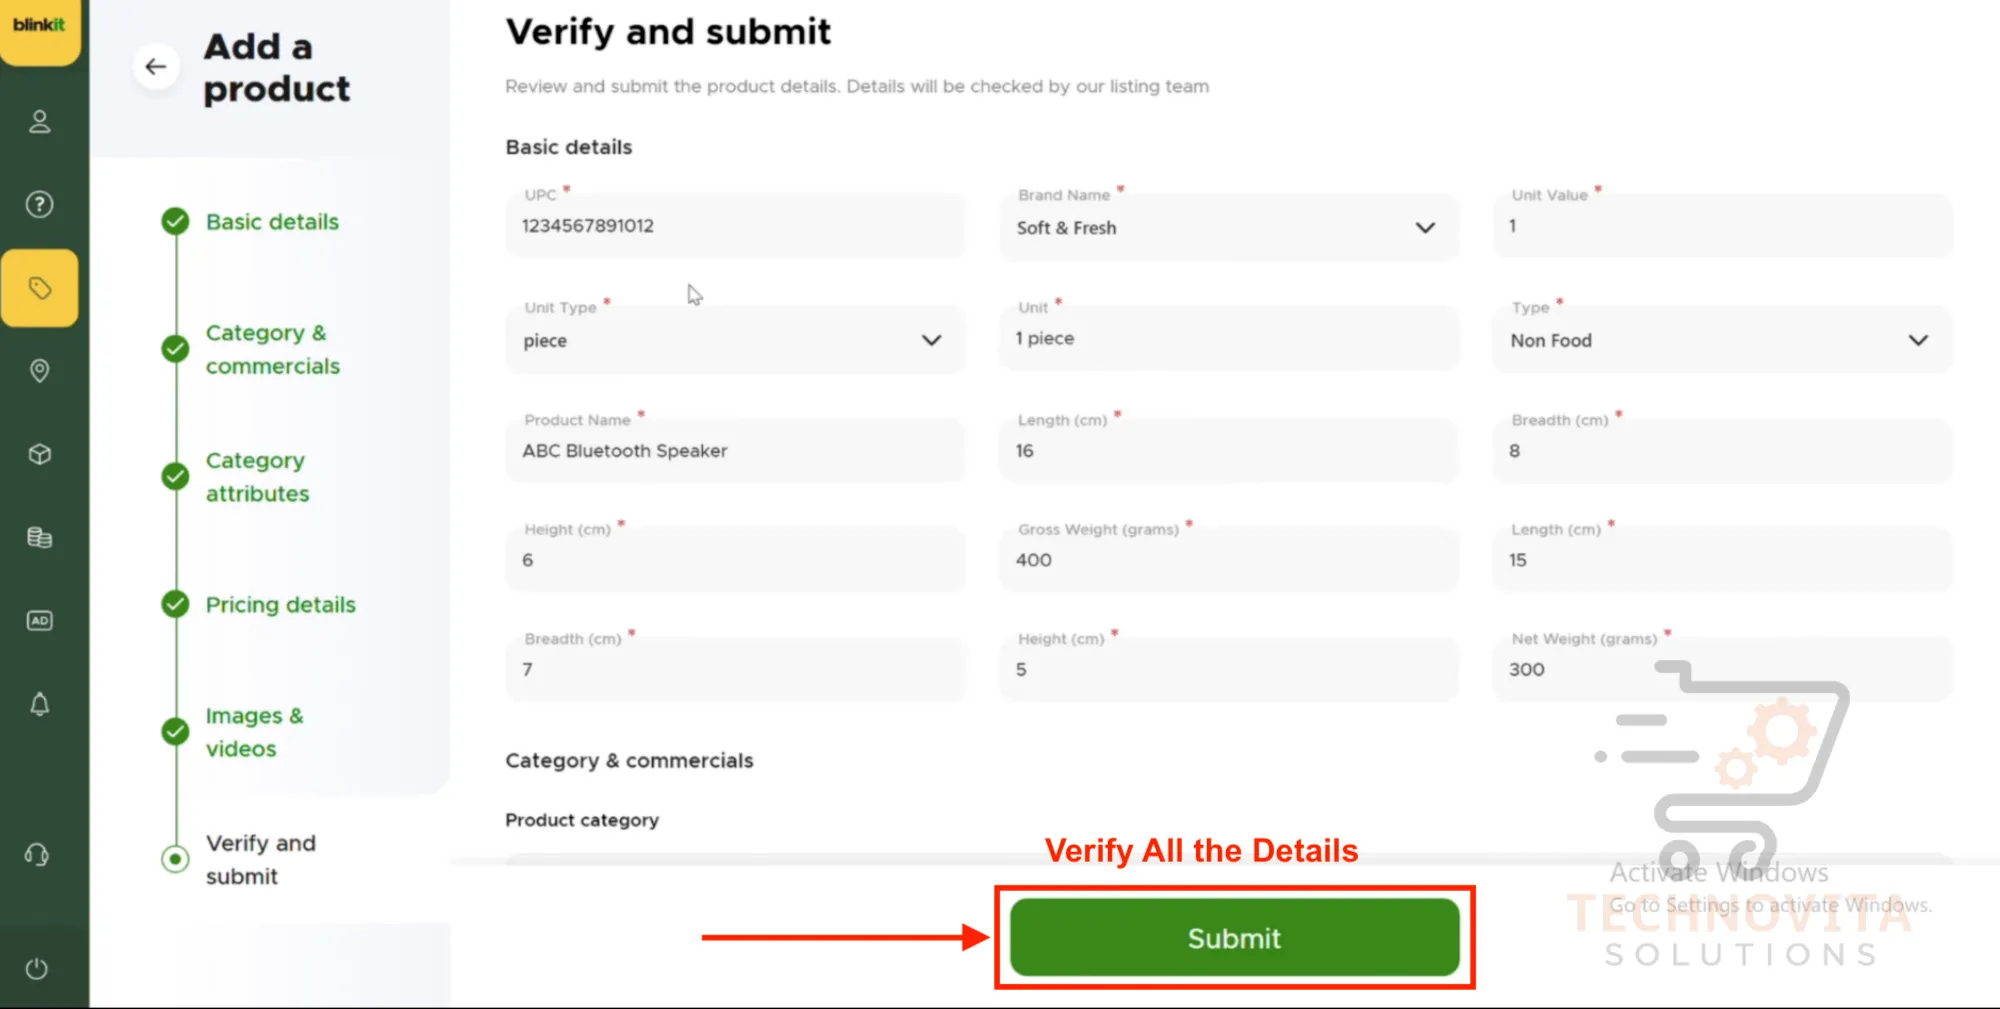
10. Review and Submit
Double-check all your product details, images, pricing, and compliance information. Once verified, hit the Submit button to send your product live for Blinkit's quality checks.
Blinkit Ads Setup
Now that your products are listed, it's time to boost their visibility and sales! 🚀 Dive into Blinkit's powerful advertising system to increase product rankings, reach more customers, and drive conversions. Let's explore the different ad formats available and how to set them up for maximum impact.
1. Product Booster Ads
Product Booster Ads help you promote individual products to highly relevant customers. Similar to Google Shopping ads, these appear within product categories and are designed to be non-intrusive yet highly targeted.
How they work: You can run these campaigns using either keyword-based or category-based targeting. For example, if you're promoting "Masoor Dal," you can bid on related keywords like "Dal," "Masoor Dal," or target the entire "Pulses" category.
Smart Feature: Blinkit's algorithm allows you to group products together. If your main product goes out of stock, the system automatically showcases your backup product—ensuring continuous ad performance!
2. Listing Spotlight Ads
Listing Spotlight Ads are perfect for showcasing multiple products in a visually engaging carousel format. These ads increase brand visibility and encourage product discovery throughout the customer's shopping journey.
Key Features:
- Display multiple products in a single creative carousel
- Custom creatives with up to 30 characters of promotional text
- Add your logo and even GIFs to grab attention
- Option to promote across multiple product categories
- Users can click "See All" to explore your full product range
Design Guidelines:
- Creative Dimensions: 208 px (width) x 530 px (height)
- Safe Content Area: 160 px x 362 px
- Use plain backgrounds or subtle textures
- Minimum font size: 12 px for readability
- Avoid dynamic elements like pricing or "T&C apply" disclaimers
3. Sponsored Display Ads
Sponsored Display Ads allow you to advertise products alongside related or affinity keywords. For instance, if you're selling mustard oil, your product can appear when users search for terms like "mustard," "oil," or your brand name.
Execution: These ads are managed directly by Blinkit. Simply coordinate with Blinkit's point of contact, or let them handle it completely on your behalf. This format works exceptionally well for brands looking to cross-merchandise or expand reach within specific keyword groups.
How to Set Up a Blinkit Promotional Ad in 3 Simple Steps
1Choose the Right Ad Format
Identify the ad format that aligns with your business objectives—whether it's boosting awareness, increasing sales, or driving traffic to a product range.
2Set Your Budget and Bid Value
Decide your campaign budget and bid amount. Blinkit will translate your budget into impressions and potential reach, ensuring you get the best value for your advertising spend.
3Track and Optimize Performance
Monitor your campaign in real time through the Blinkit seller dashboard. Analyze key metrics to understand what's working, what's not, and optimize future campaigns for better results.
Pro Tip: By understanding and leveraging Blinkit's ad ecosystem, you can create impactful campaigns that drive real business outcomes—from visibility to conversions. Whether you're a new seller or an established brand, choosing the right combination of ad formats can significantly elevate your presence on Blinkit and connect you with the right audience.
Commission Structure
Understanding Blinkit's seller commission structure is crucial if you want to price your products profitably. To make it easy, we've built a freeBlinkit Commission Calculator— instantly estimate all fees and plan your margins smarter!
Here’s a detailed breakdown of Blinkit's Seller Fees in 2025:
🔹 Inwarding Fee: ₹7.50 per unit
Every product you send to Blinkit's warehouse is charged an inwarding fee when it is received and processed. If you are a high-volume seller, optimizing shipment sizes can help reduce this cost.
🔹 Storage Fee: Tiered based on time
- First 30 days: ₹1/unit/day OR ₹6/cubic ft/day (whichever is higher)
- 31-60 days: ₹1.25/unit/day OR ₹6.25/cubic ft/day
- Beyond 60 days: ₹1.5/unit/day OR ₹6.55/cubic ft/day
Calculate volume: Length × Width × Height (cm) ÷ 28,316. Reducing product dimensions can save storage costs.
🔹 Platform Commission: Category-based percentage
The commission Blinkit charges depends on the selling price of your product:
| Selling Price Range | Commission Rate |
|---|---|
| Up to ₹500 | 2% |
| ₹500 – ₹700 | 6% |
| ₹700 – ₹900 | 13% |
| ₹900 – ₹1200 | 16% |
| Above ₹1200 | 18% |
Pro Tip: Slightly adjusting your product price can sometimes put you in a lower commission tier, maximizing your profits.
🔹 Fulfillment Fee: ₹25 per unit
Every time Blinkit picks, packs, and delivers your product, a fixed fulfillment fee is charged — making fast, reliable delivery part of your service offering.
🔹 Additional Seller Fees:
- Inventory Removal Fee: ₹5 per unit (when recalling stock)
- Customer Return Fee: ₹50 per unit (only if return is due to seller issue)
Note: All Blinkit fees attract an additional 18% GST.
Why Understanding Blinkit Fees Matters
Quick commerce platforms like Blinkit are booming, but managing your margins smartly is key to long-term success. By carefully calculating all costs upfront — using our Blinkit Seller Calculator — you can:
- Set profitable product pricing
- Optimize your inventory and reduce storage costs
- Minimize returns with better quality control
- Maximize exposure with fast-moving products
Start calculating your profits today with our free Blinkit Commission Calculator and take control of your quick commerce success!
How to Ship Stock to Blinkit Warehouse? Step-by-Step Process Explained
Learn how to dispatch inventory from your registered location to Blinkit’s verified warehouses using their online dashboard. Follow this guided workflow with screenshots to stay compliant and avoid dispatch issues.
1. Open Blinkit Seller Dashboard & Go to Inventory
Log in at seller.blinkit.com and click the “Inventory” tab on the left-side menu. This is where you initiate the shipping process.
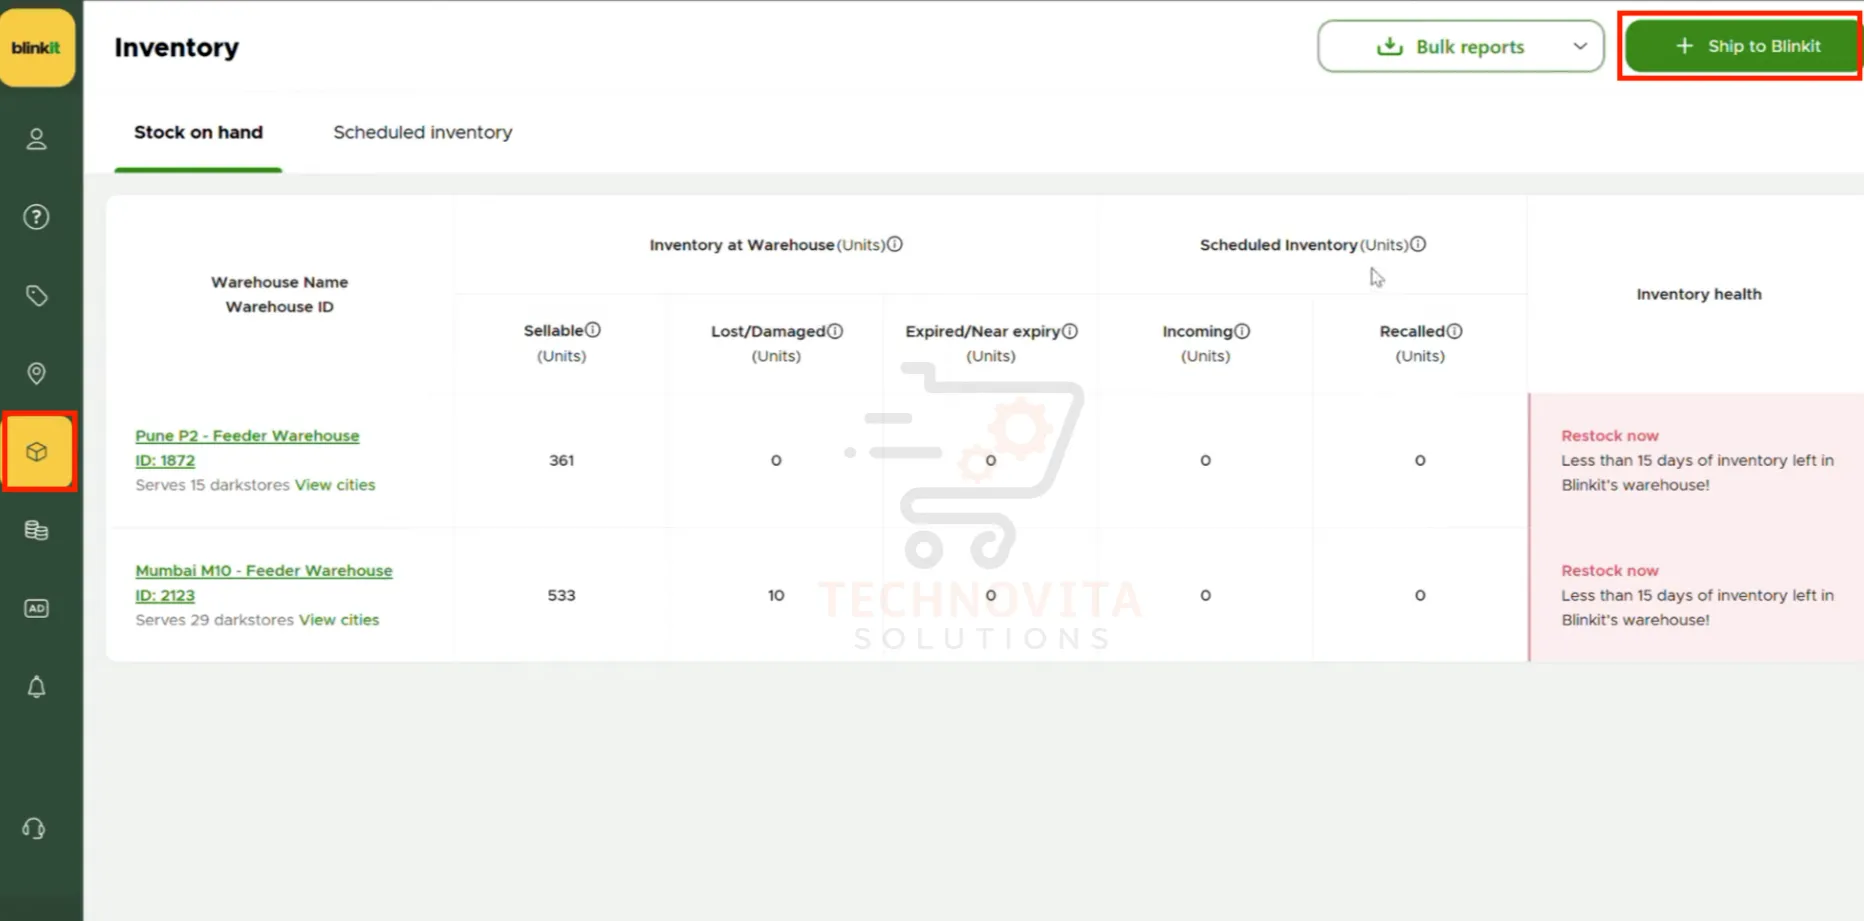
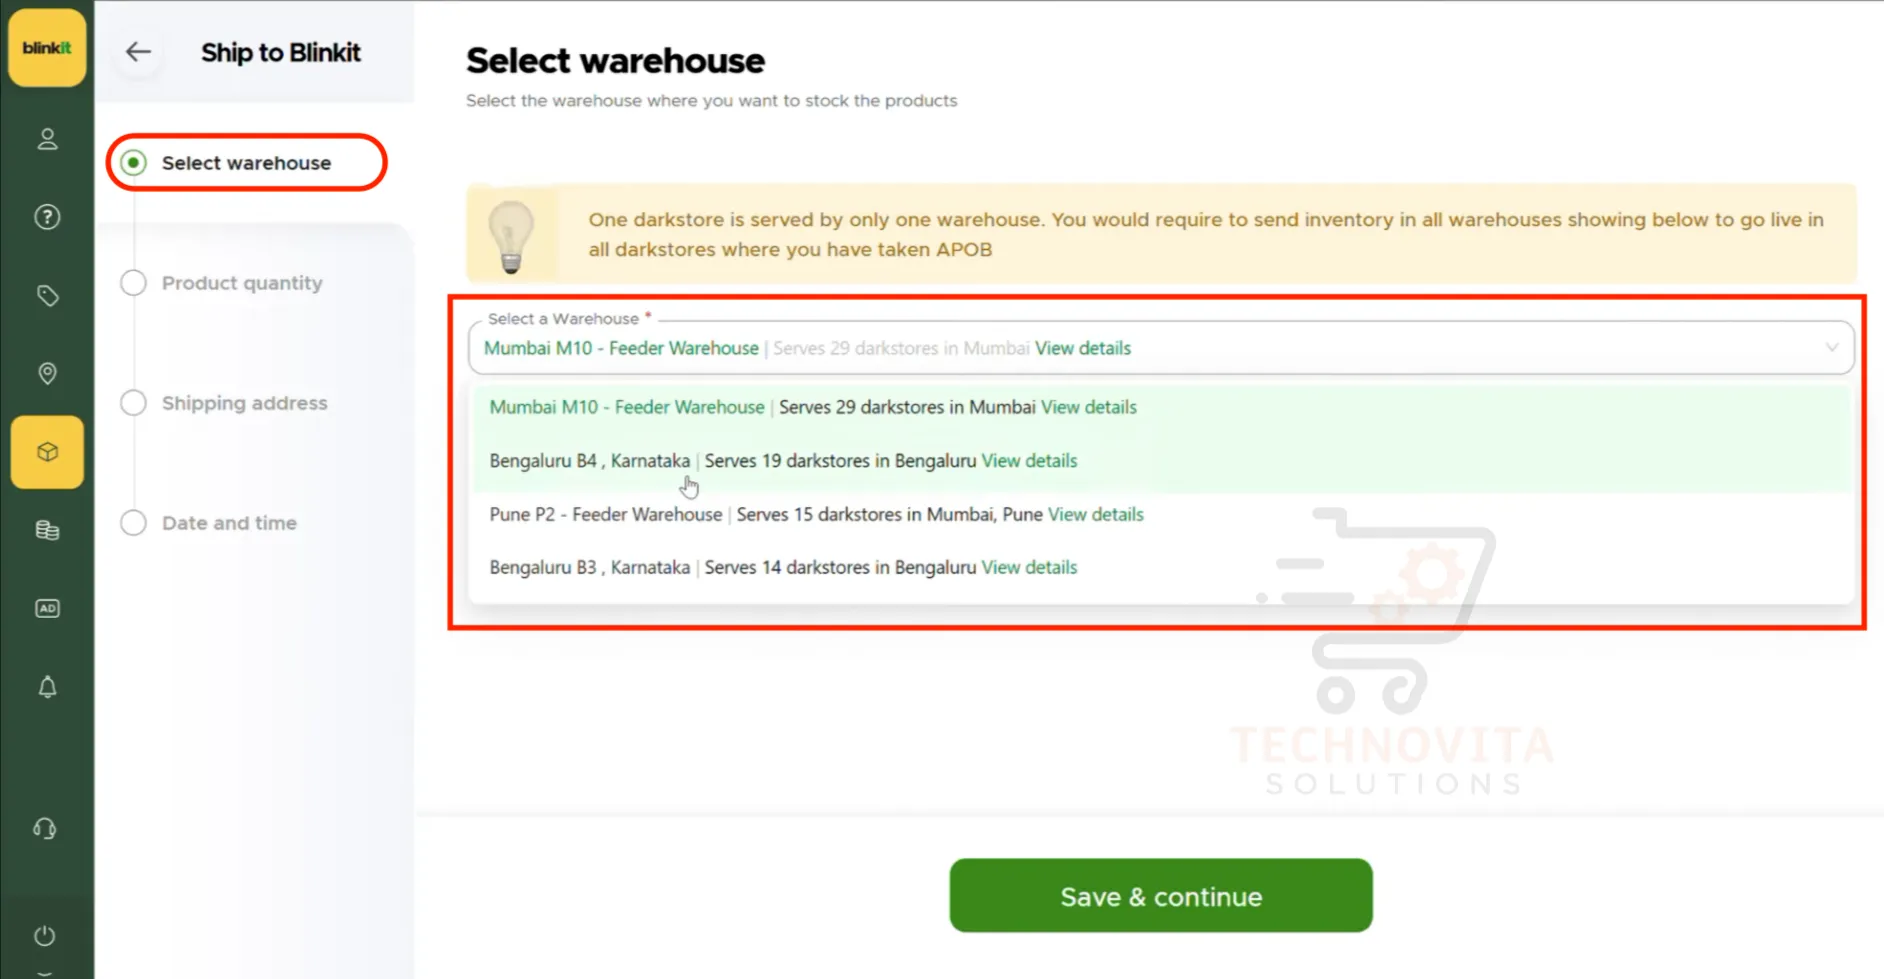
2. Click on “Ship to Blinkit”
On the inventory page, click the green “Ship to Blinkit” button on the top-right corner. You'll see a list of Blinkit warehouses verified on your account. Select the warehouse where you want to send the stock.
Need Help? Contact our support team via the number listed on our website if you don’t see a verified warehouse.
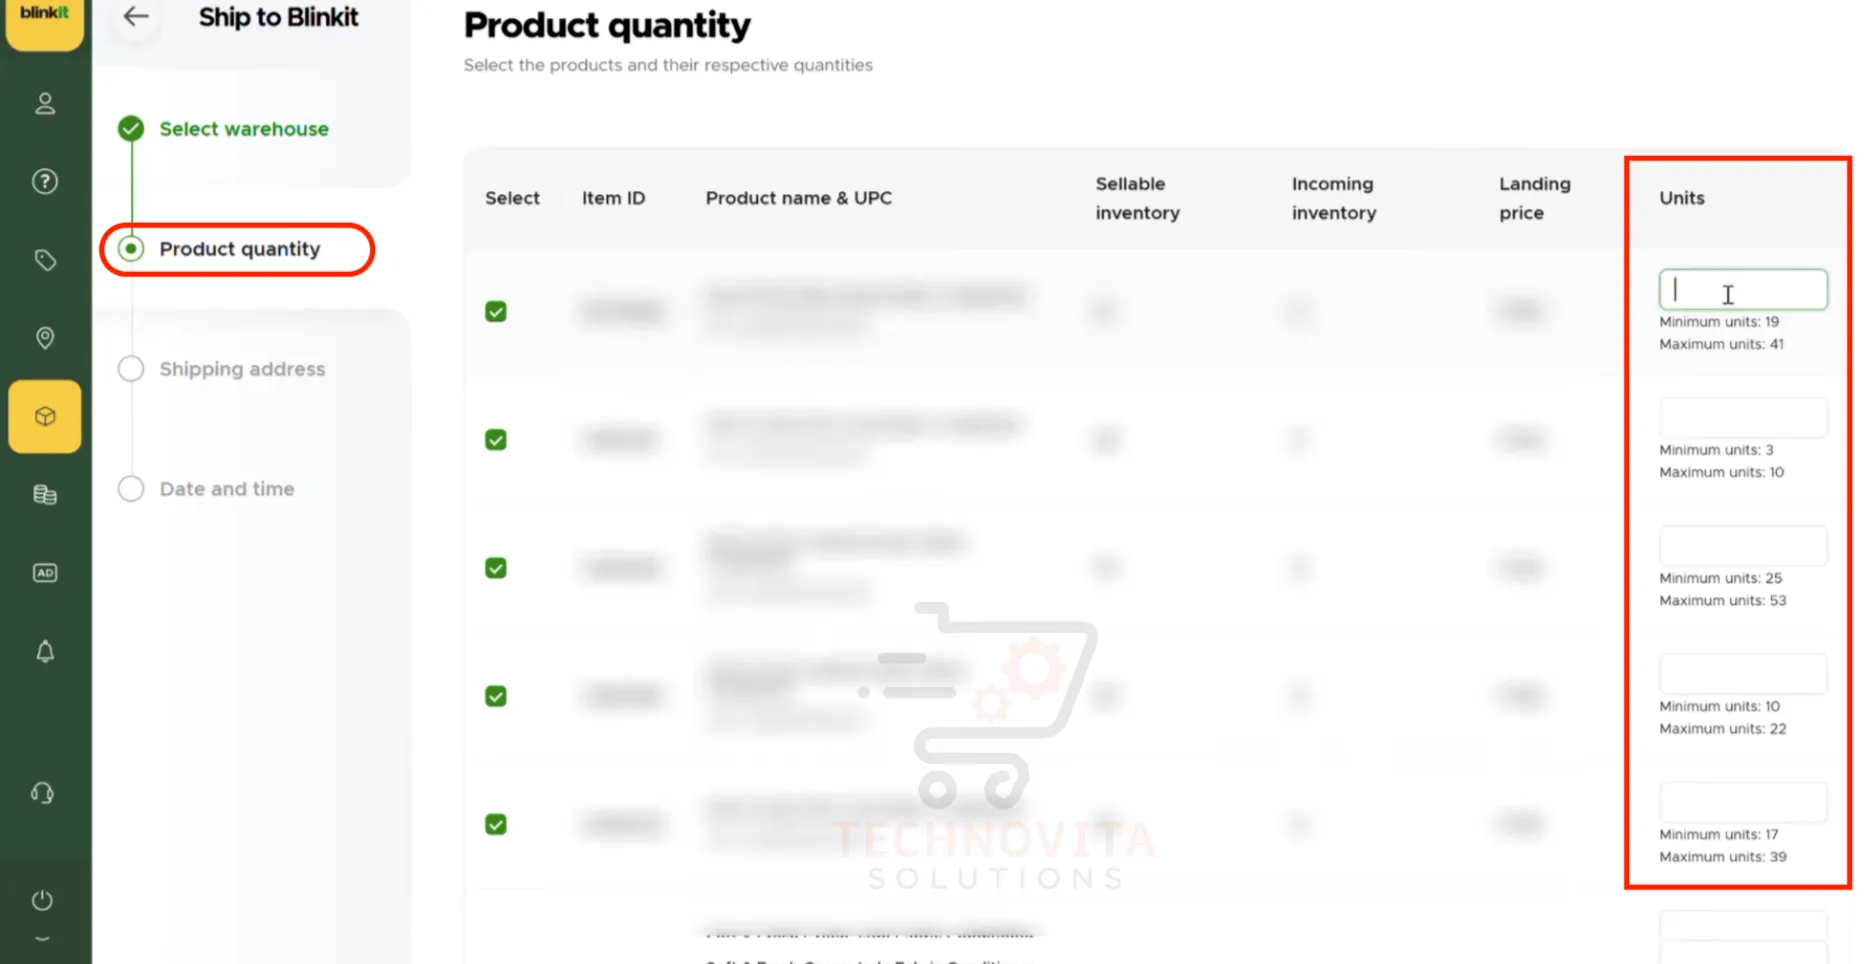
3. Select Products for Dispatch
Choose products listed in your store. Blinkit will auto-suggest minimum and maximum unit quantities allowed per product for the selected warehouse.
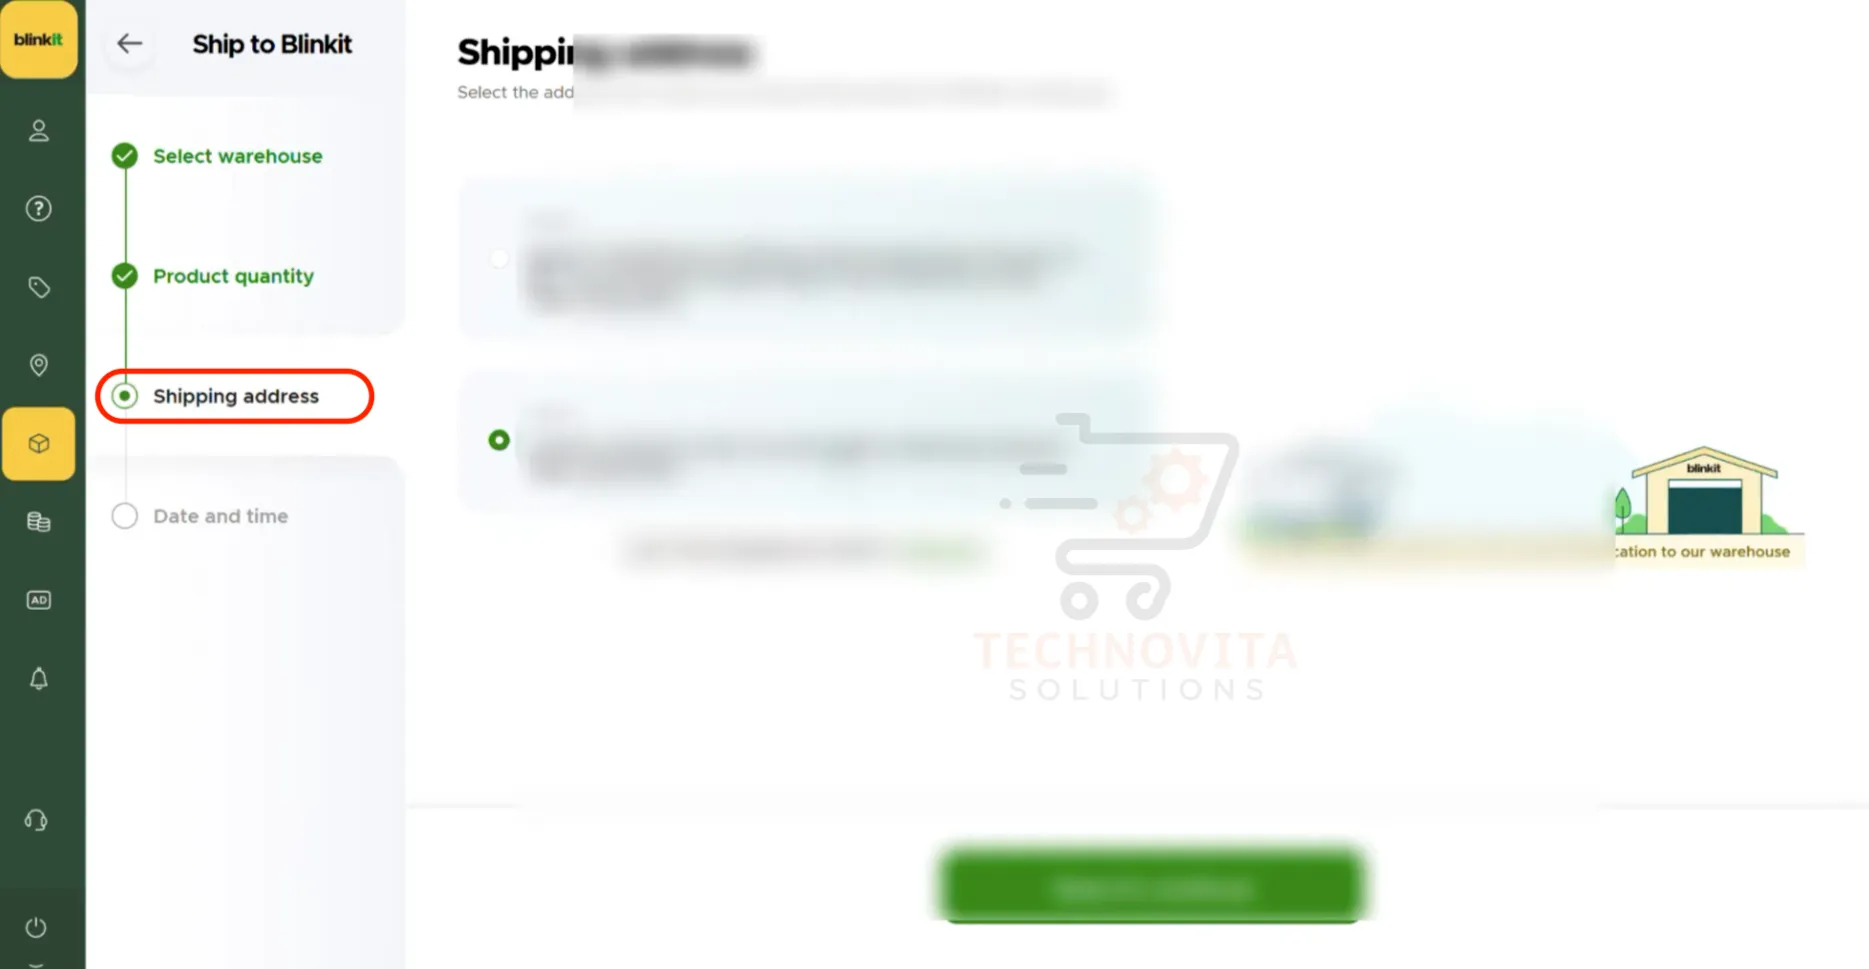
4. Choose Dispatch Address
Select your registered dispatch location — this is the source address from which you’ll send inventory to Blinkit’s warehouse. Then click “Save & Continue”.
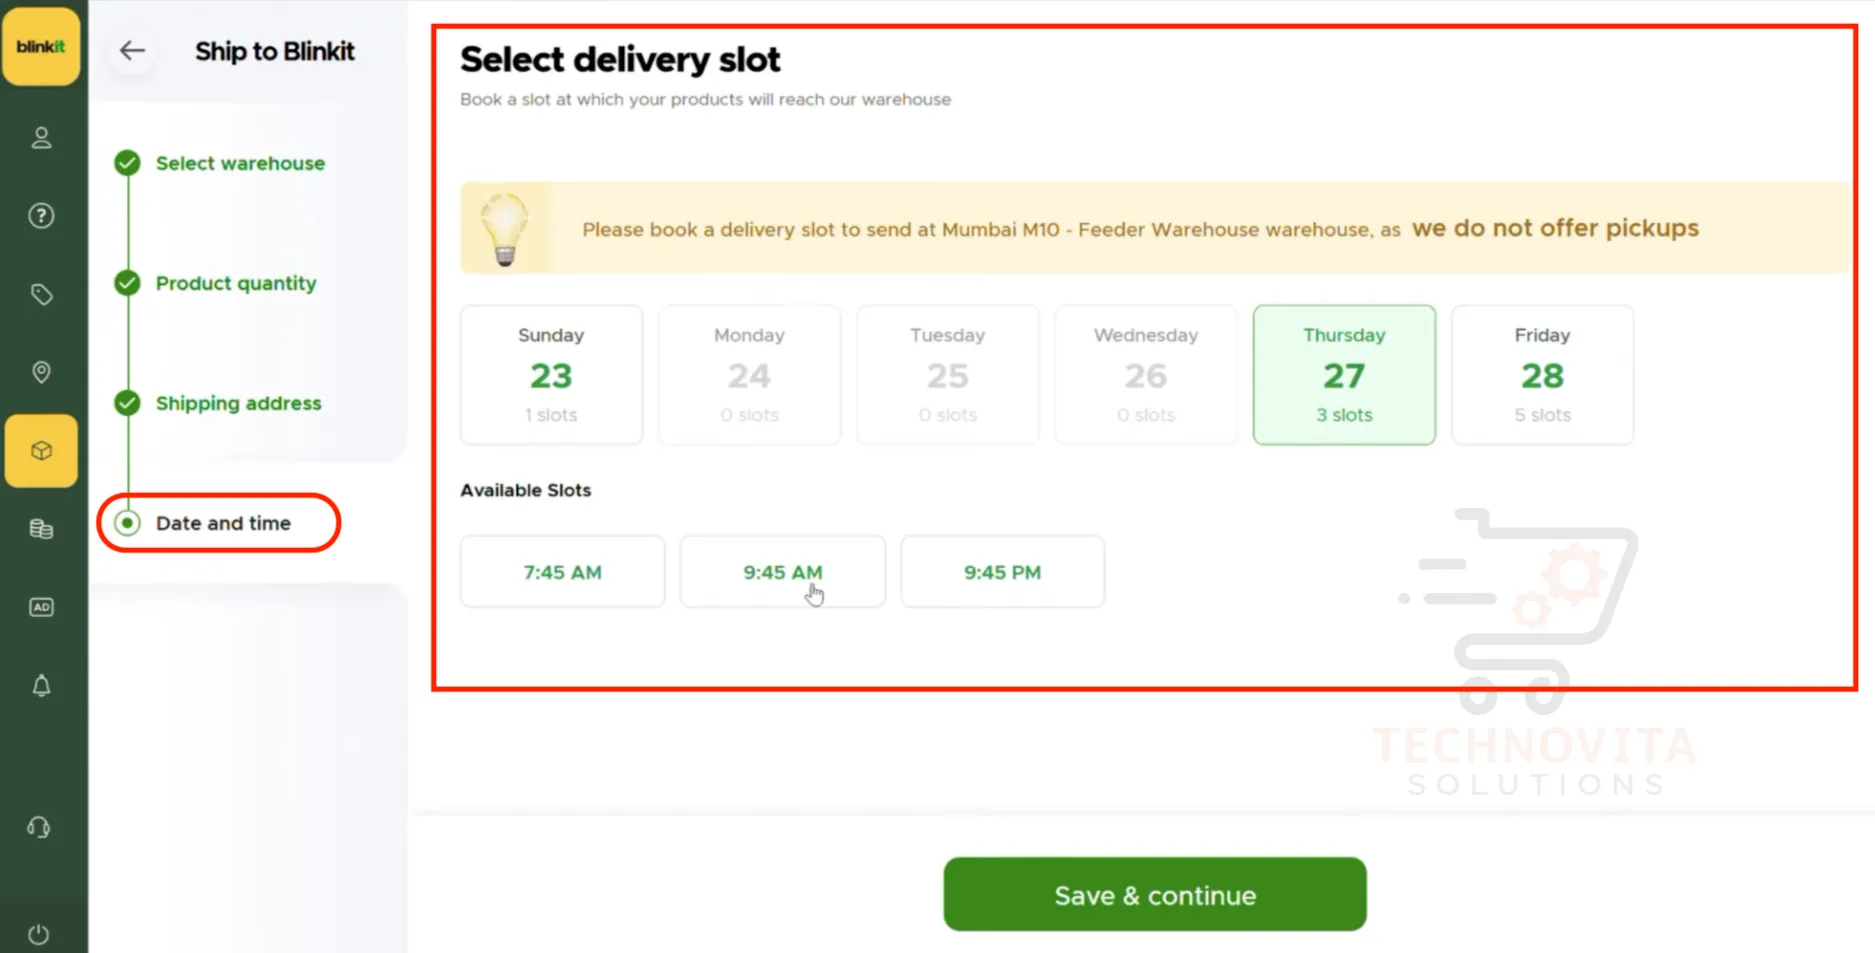
5. Select Delivery Slot
Choose the available delivery date and time slot to dispatch the shipment. After selecting the slot, click “Save & Continue”.
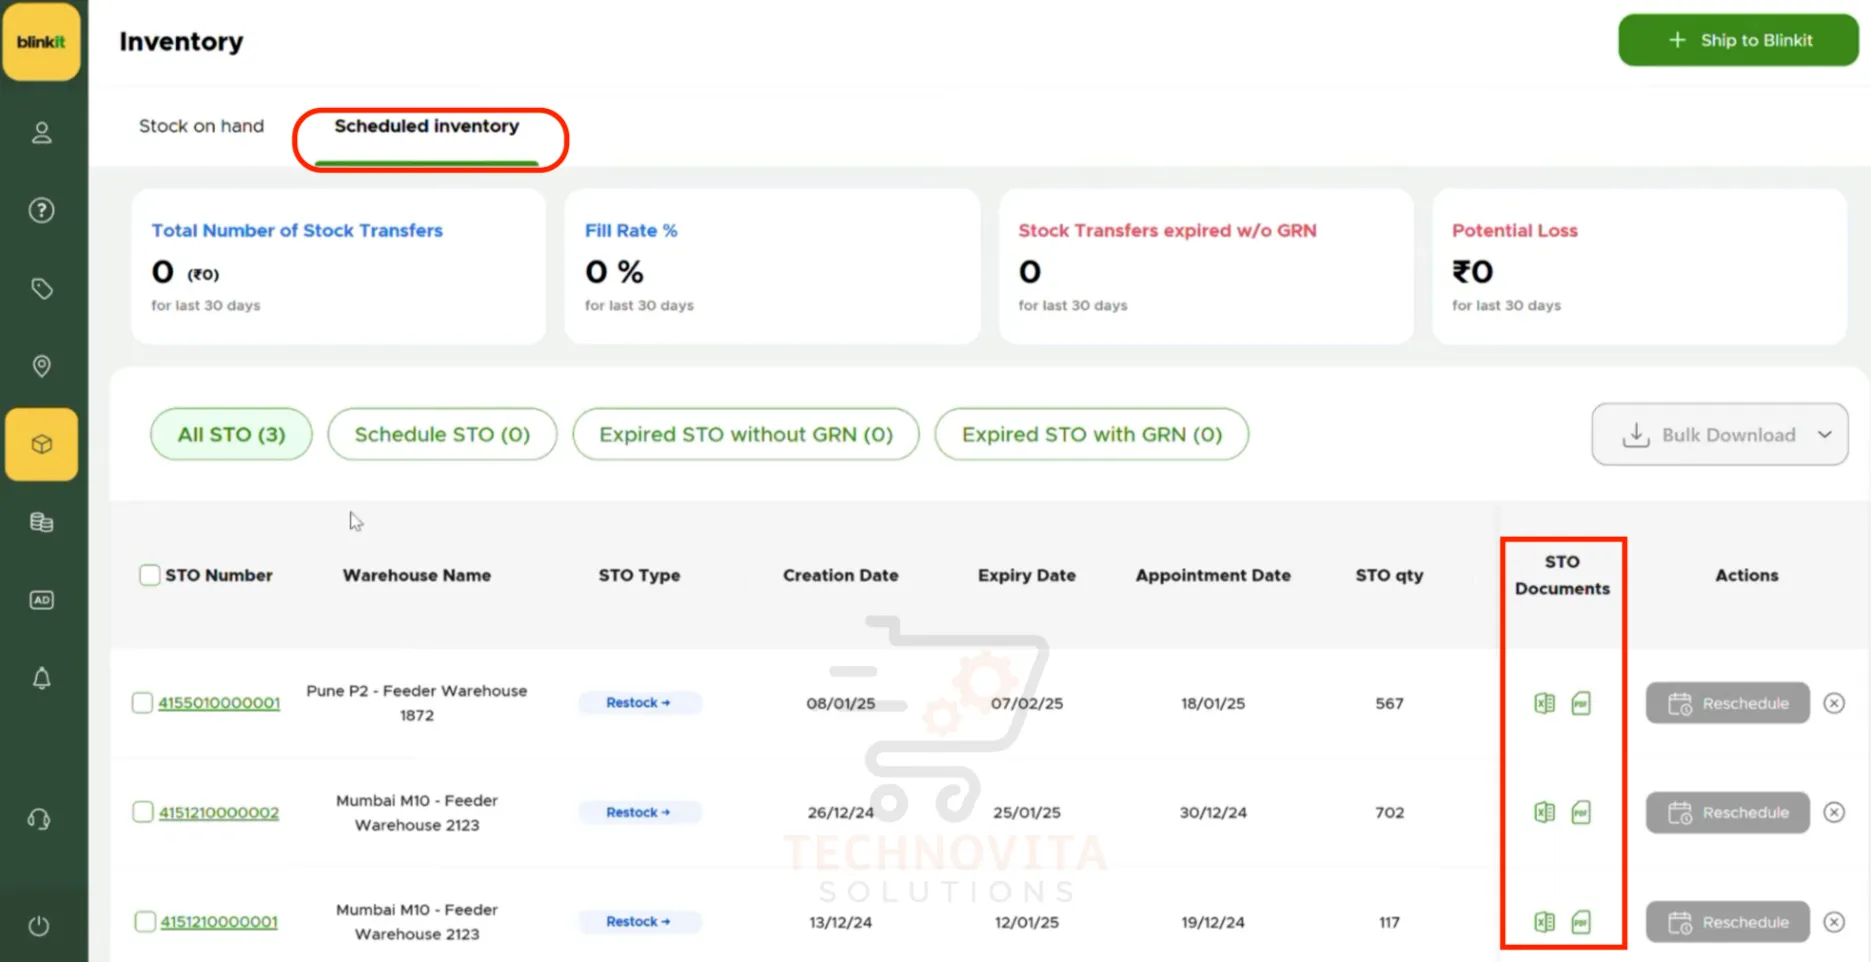
6. Generate & Download STO (Stock Transfer Order)
Once the delivery slot is saved, your STO (Stock Transfer Order) will be generated under the “Scheduled Inventory” tab. You can download the STO in PDF or Excel format — this will be required for packing and dispatch.
Blinkit Payment Cycle
Stay informed about how and when you receive your payouts as a Blinkit seller. Understanding the payment cycle is crucial for effective cash flow management and strategic planning.
- Bi-Monthly Payouts: Blinkit processes seller payments twice a month — on the 15th and 30th. This consistent payment schedule helps you plan your inventory restocking and business operations better.
- Automatic Fee Deductions: All Blinkit seller fees, commissions, fulfillment charges, and return handling fees are automatically deducted from your sales revenue before your payouts are processed.
- Transparent Payout Reports: You can view detailed breakdowns of your earnings, deductions, and net payouts directly in your seller dashboard.
- Quick Access to Funds: Funds are credited directly to your registered bank account, ensuring seamless and hassle-free transactions.
Growth Strategy
Get proven tips and tactics to grow faster on Blinkit and stand out among your competitors easily. Follow these expert-recommended strategies to scale your business and achieve sustainable growth on the platform.
1. Optimize Product Listings for Visibility and Conversion
Ensure your product listings are clear, concise, and informative to increase visibility and conversion rates:
- Titles: Use the format "Brand + Product + Size + Key Feature" to enhance searchability (Example: "Fresh Harvest Organic Almonds 500g Premium California")
- Descriptions: Highlight benefits, usage instructions, and unique selling points. Include important details like ingredients, nutrition facts, and shelf life for food products.
- Images: Upload high-quality images showing the product from multiple angles, including packaging details. Use white backgrounds for main product images and lifestyle images for secondary shots.
- Attributes: Fill all category-specific attributes accurately as they affect search rankings and help customers filter products according to their preferences.
Accurate and detailed listings improve customer trust and increase the likelihood of purchase. Top-performing Blinkit sellers update their listings regularly based on customer feedback and search trends.
2. Maintain Optimal Inventory Levels
Regularly monitor your stock to prevent cancellations due to out-of-stock items:
- Inventory Management: Use Blinkit's dashboard to track stock levels and set alerts for low inventory. Implement a 48-hour replenishment cycle for fast-moving products.
- Demand Forecasting: Analyze sales trends to anticipate demand, especially during festivals or seasonal peaks. Most successful sellers maintain at least 15-20% extra inventory during promotional periods.
- Stock Rotation: Follow FIFO (First In, First Out) principles, particularly for perishables, to maintain product freshness and minimize write-offs.
- Buffer Stock: Maintain a safety stock of minimum 10-15% above expected sales volume to handle unexpected surges in demand.
Consistent stock availability ensures customer satisfaction and repeat business. Unlike other platforms, Blinkit's rapid delivery promise means stockouts can severely impact your store metrics and visibility.
3. Implement Competitive Pricing and Promotions
Attract and retain customers through strategic pricing:
- Competitive Analysis: Regularly review competitor prices to position your products effectively. Blinkit's pricing algorithms favor sellers who maintain competitive yet profitable pricing.
- Promotions: Offer discounts, bundle deals, or free shipping on bulk orders to incentivize purchases. Consider "Buy One Get One" offers for new product launches to drive initial sales.
- Flash Sales: Participate in Blinkit's time-limited flash sales to increase visibility. Sellers report up to 300% increase in visibility during these promotional periods.
- Psychological Pricing: Use price points ending in 9 or 5 to create perception of better value (₹99 instead of ₹100).
Blinkit provides tools to manage promotional campaigns effectively. Top-performing sellers adjust pricing strategies weekly based on competitive analysis and seasonality.
4. Ensure Efficient Order Fulfillment and Packaging
Timely and secure delivery enhances customer experience:
- Order Processing: Promptly accept and prepare orders to meet Blinkit's delivery timelines. Aim for order acceptance within 30 minutes of notification.
- Packaging: Use appropriate, tamper-proof packaging, especially for perishables, to maintain product integrity. Invest in thermal packaging for temperature-sensitive items.
- Quality Check: Implement a pre-shipment quality control process to verify product condition, expiry dates, and packaging integrity.
- Batch Processing: Group similar orders to streamline packing and reduce fulfillment time by up to 40%.
Efficient fulfillment processes reduce returns and increase customer trust. Data shows that sellers with fulfillment rates above 95% receive significantly better placement in Blinkit's search results.
5. Leverage Blinkit's Promotional Tools and Analytics
Utilize Blinkit's platform features to boost visibility and sales:
- Targeted Promotions: Participate in Blinkit's promotional campaigns to reach specific customer segments. Featured products can see up to 5x more visibility than non-featured ones.
- Analytics: Monitor sales performance, customer behavior, and inventory turnover to make informed decisions. Pay special attention to peak ordering times and modify inventory accordingly.
- A/B Testing: Test different product images, descriptions, and pricing strategies to identify what resonates best with your target audience.
- Performance Tracking: Use Blinkit's seller dashboard to monitor key metrics like conversion rate, average order value, and customer return rate.
Data-driven strategies help in optimizing product offerings and marketing efforts. Top sellers on Blinkit review their analytics dashboard at least 3 times per week to identify growth opportunities.
6. Provide Excellent Customer Service
Positive customer interactions lead to repeat business:
- Responsive Communication: Address customer inquiries and complaints promptly through Blinkit's communication channels. Aim to respond within 2 hours during business hours.
- Feedback Management: Encourage reviews and respond to feedback to demonstrate commitment to customer satisfaction. Acknowledge negative reviews professionally and offer solutions.
- Return Handling: Process returns quickly and without hassle to build trust. Analyze return reasons to identify and address product or listing issues.
- Personalization: Include personalized thank-you notes or small samples with orders to create a positive impression and encourage repeat purchases.
High ratings improve your store's visibility and credibility on the platform. Stores with ratings above 4.5 stars typically see 70% more sales than those with lower ratings.
7. Expand Product Range Based on Market Demand
Diversify your offerings to cater to a broader customer base:
- Product Selection: Include high-demand categories like fresh produce, household essentials, and personal care items. Analyze Blinkit's trending categories to identify growth opportunities.
- Local Sourcing: Partner with local suppliers to ensure freshness and support community businesses. Highlight locally-sourced products in your listings as they often command premium prices.
- Complementary Products: Add items that complement your existing bestsellers. For example, if you sell coffee, consider adding coffee filters, sugar, and creamers.
- Seasonal Offerings: Introduce seasonal products and festival-specific items to capture seasonal demand spikes. Plan inventory 45-60 days ahead of major festivals.
Regularly updating your product catalog based on customer feedback and market trends can boost sales. Most successful Blinkit sellers introduce at least 5-10 new products monthly to keep their inventory fresh and relevant.
8. Build a Strong Brand Identity
Establish a recognizable brand presence to stand out on Blinkit:
- Consistent Branding: Use consistent packaging, color schemes, and logo placement across all products to build brand recognition.
- Quality Assurance: Maintain strict quality standards to build a reputation for reliability. Many top sellers implement quality check protocols that exceed Blinkit's minimum requirements.
- Unique Selling Proposition: Clearly communicate what makes your products different – whether it's organic ingredients, sustainable packaging, or exclusive formulations.
- Customer Loyalty: Consider including small branded inserts with orders that offer exclusive discounts on future purchases to encourage repeat business.
Brands with strong identity typically achieve 30-40% higher customer retention rates on Blinkit compared to generic sellers. Investing in brand development pays dividends in the long run through increased customer loyalty and higher average order values.
Pro Tips for Accelerated Growth
- First 30 Days Focus: During your first month, concentrate on perfect fulfillment rather than volume. Blinkit's algorithm rewards new sellers with consistent performance.
- Micro-Niches: Consider specializing in under-served categories where competition is low but demand is growing.
- Cross-Selling: Analyze order patterns to identify complementary products that customers frequently buy together, then optimize your listings to suggest these combinations.
- Weekend Strategy: Blinkit sees 30-40% higher traffic on weekends. Plan inventory replenishment and special promotions around Friday through Sunday for maximum impact.
Remember: Consistency is key on Blinkit. The most successful sellers maintain high performance metrics across all aspects of their business rather than excelling in just one area.
FAQs
Get answers to the most common questions about selling on Blinkit, including "Can I sell without a GST number?" and more.


